background image

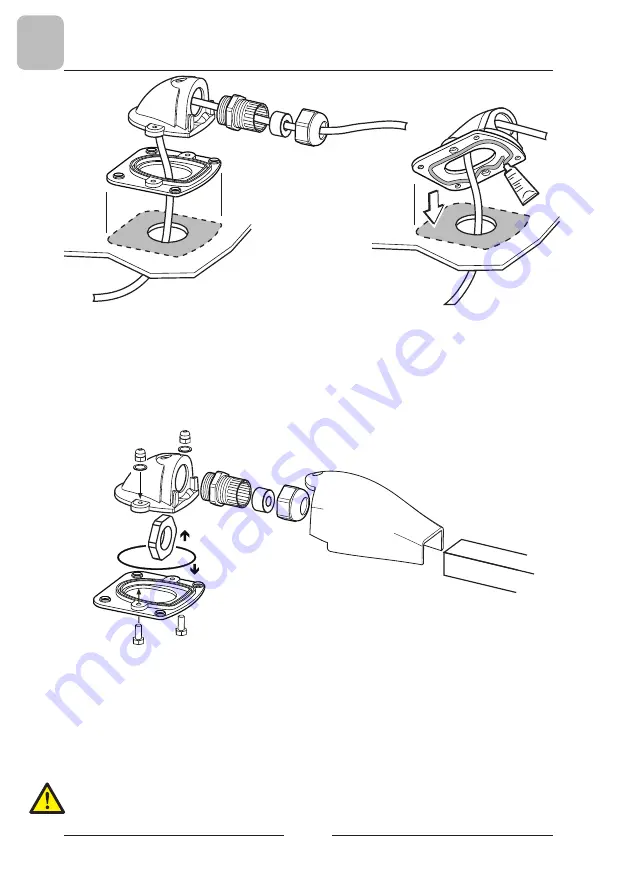
Positionnez le serre-câble sur le toit en marquant son profil, percez un trou approprié
au passage du câble

 (voir Fig. 6a)

, préparez les surfaces à coller comme nous l’avons

décrit plus haut pour l’installation du panneau solaire. Introduisez les deux vis M4x14
inox à la base du serre-câble, appliquez une ligne de colle TEROSON MS930 tout autour
de la base par l’applicateur prévu à cet effet 

(voir Fig. 6b)

, positionnez la base à la

position choisie et pressez avec force.
Complétez l’installation en suivant les instructions de la 

Figure 6c.

F

5

FIG. 6a

FIG. 6b

Attendez que la colle ait durci (24 h env.), avant de serrer l’écrou borgne
du serre-câble.

Utilisez des goulottes en plastique pour le passage des câbles pour qu’ils ne battent
pas contre le toit pendant la marche.
Choisissez un endroit approprié aussi au positionnement du module régulateur et des
batteries, vu que le passage des câbles dépend de ces composants.

 Ne déplacez le véhicule qu’après le durcissement de la colle

FIG. 6c

Содержание TSP 130W

Страница 1: ...Pannello Solare TELECOTSP 130W Istruzioni di Montaggio...

Страница 2: ...1 A richiesta viene fornito il regolatore di carica SPC10 2 per due Batterie N 1 2 3 4 5 6 7 Quantit 1 1 1 8 4 1 1 Componenti Kit Solar Panel Fig 1 Descrizione Colla siliconica Teroson MS930 Pulitore...

Страница 3: ...utilizzo es EN1648 Il pannello solare e relativa componentistica non devono essere installati nella vicinanza di prodotti infiammabili es vicino alla bombola del gas Il pannello solare genera corrente...

Страница 4: ...l pannello solare ed il cavo FV va prevista sotto il telaio del pannello solare in modo che il connettore sia protetto dall acqua Contrassegnare sul tetto le aree di incollaggio dei piedi e prima di i...

Страница 5: ...della corrente posizionare il pannello solare dove le sovrastrutture non vi gettino ombra Quando si monta il pannello solare in linea con la direzione di marcia va montato lo spoiler questo per ridur...

Страница 6: ...posizionare la base nella posizione prescelta e pressare energicamente Completare il montaggio seguendo le indicazioni di Figg 6c IT 5 FIG 6a FIG 6b Attendere l indurimento della colla 24h circa prima...

Страница 7: ...6 IT...

Страница 8: ...Panneau Solaire TELECOTSP 130W Instructions pour l installation...

Страница 9: ...ns du Panneau Solaire TELECO TSP 130W F 1 Sur demande nous pouvons fournir le r gulateur de charge SPC10 2 pour deux Batteries Rep 1 2 3 4 5 6 7 Quantit 1 1 1 8 4 1 1 D signation Colle base de silicon...

Страница 10: ...ion ex EN1648 Le panneau solaire et les composants y relatifs ne doivent pas tre install s proximit de produits inflammables ex pr s de la bouteille de gaz Le panneau solaire g n re du courant m me s...

Страница 11: ...e le panneau solaire et le c ble FV doit tre r alis e sous le ch ssis du panneau solaire afin que le connecteur soit prot g de l eau Marquez sur le toit les zones de collage des pieds et avant de coll...

Страница 12: ...maximum de courant positionnez le panneau solaire un endroit o aucune structure ne lui fasse de l ombre Quand le panneau solaire est mont parall le au sens de marche il faut aussi installer le spoiler...

Страница 13: ...ir Fig 6b positionnez la base la position choisie et pressez avec force Compl tez l installation en suivant les instructions de la Figure 6c F 5 FIG 6a FIG 6b Attendez que la colle ait durci 24 h env...

Страница 14: ...6 F...

Страница 15: ...TELECOTSP 130W Solar Panel Assembly instructions...

Страница 16: ...130W Solar Panel GB 1 SPC10 2 dual battery charge controller supplied on request No 1 2 3 4 5 6 7 Quantity 1 1 1 8 4 1 1 Solar Panel Kit Components Fig 1 Description Teroson MS930 silicone based glue...

Страница 17: ...in the country of use e g EN1648 The solar panel and its components should not be installed near flammable products or items e g gas bottles A solar panel will generate electricity do not touch the p...

Страница 18: ...ns MC3 The connection point between the solar panel and the PV cable should be under the solar panel frame to ensure that the connector is protected from water Mark the glueing areas for the feet on t...

Страница 19: ...ngest power generation ensure that the solar panel position is not shadowed by existing structures When the solar panel is installed in line with the travelling direction the spoiler should be install...

Страница 20: ...the base see Fig 6b then position the base in the required position and press firmly Complete the installation according to the indications in Figs 6c GB 5 FIG 6a FIG 6b Wait for the glue to set appro...

Страница 21: ...6 GB...

Страница 22: ...Solarpanel TELECO TSP 130W Montageanleitung...

Страница 23: ...unsch kann der Laderegler SPC10 2 f r zwei Batterien geliefert werden N 1 2 3 4 5 6 7 Menge 1 1 1 8 4 1 1 Componenti Kit Solar Panel Fig 1 Beschreibung Silikon Dichtstoff Teroson MS930 Schnellreiniger...

Страница 24: ...B EN1648 Das Solarpanel und die entsprechenden Bauteile d rfen nicht in der N he von entz ndlichen Produkten z B neben einer Gasflasche installiert werden Das Solarpanel erzeugt auch bei schwachen Li...

Страница 25: ...d dem PV Kabel ist unter dem Rahmen des Solarmoduls vorzusehen damit der Steckverbinder vor Wasser gesch tzt ist Die Klebefl chen der F e am Dach markieren und diese Bereiche sowie die Unterseite alle...

Страница 26: ...ng zu erreichen das Solarpanel so positionieren an die berbauten keinen Schatten darauf werfen Wenn das Solarpanel bereinstimmend zur Fahrtrichtung montiert wird muss der Spoiler so installiert werden...

Страница 27: ...tragen siehe Abb 6b Die Basis an der gew nschten Stelle positionieren und fest andr cken Die Montage wie in Abb 6c ersichtlich abschlie en D 5 ABB 6a ABB 6b Das Aush rten des Dichtstoffs abwarten ca 2...

Страница 28: ...6 D...

Страница 29: ...Zonnepaneel TELECO TSP 130W Montageaanwijzingen...

Страница 30: ...fig 1 Montageaanwijzingen van het TELECO zonnepaneel TSP 130W NL 1 Op aanvraag kan de laadregelaar SPC10 2 voor twee accu s geleverd worden Rep 1 2 3 4 5 6 7 Aantal 1 1 1 8 4 1 1 Beschrijving Silicon...

Страница 31: ...bijv EN1648 Hetzonnepaneelendebetreffendeonderdelenmogennietindebuurtvanontvlambareproducten geplaatstworden bijv indebuurtvandegasfles Hetzonnepaneelgenereertstroom ookbijweiniglicht raakdegeleidend...

Страница 32: ...en het zonnepaneel en de FV kabel moet onder het frame van het zonnepaneel komen zodat de stekkerverbinding beschermd wordt tegen water Teken de lijmpunten van de poten op het dak af en voordat het pa...

Страница 33: ...aangebracht worden op een plaats waar er geen schaduw op valt door hoge constructies stellages bebouwing e d Wanner het zonnepaneel op n lijn met de rijrichting aangebracht wordt moet de spoiler gemo...

Страница 34: ...zie fig 6b breng de onderkant op de gekozen plaats aan en druk deze stevig aan Voltooi de montage door de aanwijzingen in fig 6c op te volgen NL 5 FIG 6a FIG 6b Attendez que la colle ait durci 24 h e...

Страница 35: ...6 NL...

Страница 36: ...031 98939 Fax 0049 8031 98949 telecogmbh telecogroup com www telecogroup com SERVICE 0900 94 94 70 DEUTSCHLAND TELECO GmbH 82041 Deisenhofen Tel 08031 98939 Fax 08031 98949 telecogmbh telecogroup com...

Отзывы: