background image

Operator's guide:

1. Unpacking instructions
2. The handle
3. Grid shelves
4. The drip trays
5. Internal cleaning
6. External cleaning
7. Connection to the mains
8. Controls
9. Checking correct operation
10. Internal cleaning

11. Manual defrosting
12. Replacing the door's magnetic gasket

1. Cleaning the condenser
2. Replacing the internal lights
3. Replacing a glass panel

Maintenance manual (Page 48):

4. Wiring diagram diagram of refrigeration unit

!

I

UK

D

E

F

NL

P
S

DK

FIN

B

GR

CZ
EE

LV

LT

H

M

PL

SK

SLO

6

Operator's guide

WARNINGS
It is most important that this instruction booklet is kept together with the appliance both for future
reference and for reasons of safety. 1

. Adults should operate this appliance only. Do not allow children

to use the controls or play with it.

2

3

4

5

6

7

. It is forbidden to modify in any way the main functions and

characteristics of this appliance. . The electrical installation of the appliance should be carried out by a
qualified electrician or other competent person. . Never attempt to carry out repairs unassisted. Inexpert
repairs can cause serious damage and malfunction. . Assistance has to be provided by an authorized
engineer only. Always use original spare parts. . This appliance is not suitable for the storage of basic
commodities not including food-stuffs. . The manufacturers of this appliance accept no responsibility for
the consequences of misuse in contravention of these safety instructions. It further reserves the right to
carry out improvements without prior notice.

8

9

10

11

12

13

. Avoid installing the cabinet directly in line with sunlight.

.

. Keep the ventilation grills free from

obstruction for at least 30 cm.

. Ensure that the products displayed on the shelves and grills do not

hang over the edges.

. If damp air or products to be refrigerated should cause ice to form on the

evaporator, we recommend stopping the compressor and placing the goods in special refrigerated
containers,kept at the same temperature,until defrosting is completed;if this is not carried out the
compressor will continue to operate leading to a wasteful consumption of electricity and poor
performance.

. If the appliance is not working and unused, it is indispensable to keep the door open at

least 10 cm.

Nevere install the appliance near sources of heat (such as radiators, stoves, etc) and drafts (such as

windows, doors, ventilation systems, air conditioning, etc ...).

Cut the strap and lift up the cardboard package.

Remove the nails from the wooden crate with care. . Take out the box containing the shelves. . Insert
the forks of a forklift truck between appliance and pallet or crate.

Lift the appliance. . Remove the

pallet or crate.

Place the appliance on a flat and level surface and make any level adjustments by

means of the adjustable foot (only model 1150).

Make sure there is nothing left in the package before

disposal.

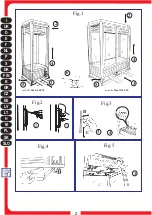
Separate the packaging materials to facilitate disposal (see figure 1).

The handle can be found inside the appliance in a bag. . Fix the metal part of the handle to the door

frame using the two screws already inserted in the holes. Tighten with care. . Place the plastic insert
over the metal handle and press down until it clicks into place (see figure 2).

The brackets, you will find in a cardboard box, should be inserted into the supports on the special

posts. Fit the mirror shelf at the bottom first. . The shelves should be fastened in place with the screws
you will find in the bag inside the appliance, with the plastic parts facing the glass. Tighten with care (see
figure 3).

Take the plastic tray from inside the appliance and slide it in the guides underneath the appliance itself:

(see figure 4).

. Clean the inside and glass panels with a soft cloth and neutral detergents. . Dry with a soft cloth (see

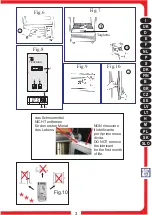
figure 5).

Use the same products as used for the internal cleaning. . Remove the protective film from the steel

panels and grilles (see figure 6).

1. UNPACKING INSTRUCTIONS
CARDBOARD PACKAGE 1a

WOODEN CRATE 1b

2

3

4.

5

6.

7.

8.

2. THE HANDLE
1.

2

3

3. GRID SHELVES
1.

2

4. THE DRIP TRAYS

5. INTERNAL CLEANING
1

2

6. EXTERNAL CLEANING
1.

2

- One for Meat 550 M. - Two for Meat 1150 M

!

Our products are for internal use only do not install outside restaurants, shops.

Содержание MEAT 1150

Страница 1: ...INGS ASENNUS JA K YTT INSTALLATIE EN GEBRUIK INSTALACE A POU IT UN INSTALACIJA IN UPORABA PAIGALDAMINE JA KASUTAMINE BE P T S S HASZN LAT IN TAL CIA A POU ITIE INSTALACJA I UZYTKOWANIE ISTALLAZJONI U...

Страница 2: ...I UK D E F NL P S DK FIN B GR CZ EE LV LT H M PL SK SLO 2 Fig 1 Fig 2 Fig 4 Fig 5 Fig 3 2 3 4 5 5 6 3 4 2 modello Meat 550 M modello Meat 1150 M 3 C B 4 1 2 3...

Страница 3: ...Fig 6 4 5 12 5 P 6 T 12 5 P TECFRIGO 2 1 3 2 Fig 7 Targhetta 1 5 Fig 9 2 Fig 10 NON rimuovere il lubrificante per il primo mese di vita DO NOT remove the lubricant for the first month of life das Schm...

Страница 4: ...no 10 cm l apparecchiatura l apparecchiatura l apparecchiatura Vedi Fig 1 vedi Fig 3 vedi Fig 4 IMBALLAGGIO IN SCATOLA DI CARTONE 1a IMBALLAGGIO IN CASSA DI LEGNO 1b 2 3 4 5 6 7 8 2 LA MANIGLIA 1 2 3...

Страница 5: ...nza un peso eccessivo sui ripiani Max Kg 10 per ogni piano e Kg 40 per ogni ganciera Sia in funzionamento il compressore con il led COMP acceso se la temperatura interna pi alta di quella impostata da...

Страница 6: ...if this is not carried out the compressor will continue to operate leading to a wasteful consumption of electricity and poor performance If the appliance is not working and unused it is indispensable...

Страница 7: ...esired temperature for the goods to be stored The internal lights are on and the door is properly closed The appliance is not exposed to direct sunlight or to high powered lamps The room temperature d...

Страница 8: ...2 4 DIE WASSERSAMMELSCHALEN 5 INNENREINIGUNG 1 2 Denken Sie daran dass die ausgestellten Produkte nicht ber die Ablagen oder Gitter hinnausstrecken d rfen Sollte es durch die Luftfeuchtigkeit oder di...

Страница 9: ...tung eingeschaltet und die T r gut geschlossen ist Das Ger t nicht der direkten Sonneneinstrahlung oder dem Licht von Hochleistungsstrahlern ausgesetzt ist Die Raumtemperatur nicht ber 30 CC RF U R 55...

Страница 10: ...cionado etc Si se verificase una producci n an mala de hielo en el evaporador causado bien por la humedad del aire o de los productos que se quieren refrigerar les aconsejamos que paren el compresor y...

Страница 11: ...est n encendidas y la puerta est bien cerrada No haya irradiaciones solares o de faros de potencia elevada directamente sobre el equipo La temperatura ambiente no supere los 30 C y la humedad relativa...

Страница 12: ...effet uniquement mod 1150 S assurer de n avoir rien laiss dans l emballage avant de le jeter S parer les mati res de l emballage selon leur composition afin d en faciliter l limination voir illustr 1...

Страница 13: ...porte est bien ferm e L appareil n est pas directement expos aux rayons du soleil ou la lumi re de projecteurs puissance lev e La temp rature ambiante ne d passe pas les 30 C H R 55 pr vus pour l app...

Страница 14: ...3 DE ROOSTERPLATEN 1 2 4 DE BAKKEN OM HET WATER OP TE VANGEN 5 HET REINIGEN VAN DE BINNENKANT 1 2 6 HET REINIGEN VAN DE BUITENKANT 1 2 Bij abnormale ijsvorming op de verdamper die wordt veroorzaakt d...

Страница 15: ...ingsmiddelen De binnenverlichting ingeschakeld is en de deur goed dicht is Er geen zonnestralen of felle lampen rechtstreeks op het apparaat gericht zijn De omgevingstemperatuur niet hoger is dan 30 C...

Страница 16: ...se verificar forma o anor mal de gelo no evaporador causado pela humidade do ar ou pelos produtos a serem refrigerados aconselhamos parar o compressor e p r a mercadoria num apropriado contentor refri...

Страница 17: ...s e a porta est bem fechada N o h raios solares ou de far is com elevada pot ncia a reflectir directamente na aparelhagem A temperatura ambiente n o superior a 30 C Hum Rel 55 pela qual a aparelhagem...

Страница 18: ...rns ventilationsgaller placeras p ett avst nd p 30 cm fr n v ggar Placera inte produkter i montern som r st rre n hyllornas och gallrens omkrets Om det bildas f r mycket is p evaporatorn p g a luftfuk...

Страница 19: ...inte uts tts f r direkt solljus eller kraftig belysning Lokalens temperatur f r inte verskrida 30 C med relativ fuktighet p 55 som anordningen r avsedd f r klimatklass 4 Luftfl det till motorrummet r...

Страница 20: ...lge af fugtighed i luften eller i f devarerne som skal afk les anbefales det at standse kompressoren og anbringe varerne i k leskab k ledisk indtil afrimningen har fundet sted I modsat fald oprethold...

Страница 21: ...r Den indvendige belysning er t ndt og d ren er ordentligt lukket Apparatet ikke uds ttes for direkte sollys eller en st rk varmelampe Rumtemperaturen ikke er h jere end den temperatur som apparatet e...

Страница 22: ...a tai s ilytett vist tuotteista Suorita sulatus aseta tuotteet sulatuksen ajaksi astiaan joka on j hdytetty samaan l mp tilaan kuin laite ja pys yt kompressori Muuten kompressori toimii jatkuvasti kul...

Страница 23: ...t on sytytetty ja ovi on kunnolla kiinni Laite ei ole alttiina auringonvalolle eik voimakkaille valoille Ymp rist n l mp tila ei ole yli 30 C Suht kost 55 jolle laite on s detty ilmastoluokka 4 Mootto...

Страница 24: ...r uit te zetten en de waren gedurende de tijd die nodig is voor het ontdooien in een adequate op dezelfde temperatuur gekoelde plaats te zetten Indien dit niet gebeurt zal de compressor voortdurend we...

Страница 25: ...esloten is Er geen zonnestralen of felle lampen direct op het apparaat gericht staan De omgevingstemperatuur niet hoger is dan 30 C R V 55 waarvoor het apparaat geschikt is Klimaatklasse 4 Een luchtst...

Страница 26: ...10 11 12 1 2 3 51 4 1 2 3 4 5 6 7 8 9 10 11 12 13 30 10 cm evaporator cm 1 1 1 2 3 4 5 6 7 8 2 1 2 3 3 1 2 4 5 1 2 6 1 2 1150 1 2 3 4 5 6 Meat 550 M Meat 1150 M I UK D E F NL P S DK FIN B GR CZ EE LV...

Страница 27: ...T 5 UP 6 DOWN 9 1 2 3 4 5 6 7 8 9 10 1 2 3 4 5 6 7 8 11 1 2 3 4 5 12 1 2 3 IEC In Id 30 mA AD T H05 VVF H0 7 VV F 3 7 8 30 C U R 55 4 30 cm ax 10 Kg 40 Kg COMP 9 10 I UK D E F NL P S DK FIN B GR CZ EE...

Страница 28: ...raj polic nebo ro t Pokud by z d vodu vlhkosti vzduchu nebo z ulo en ch potravin doch zelo k p li n mu vytv en ledu na v parn ku doporu ujeme zastavit kompresor po dobu pot ebnou k odmrazen a mezit m...

Страница 29: ...r en klimatick t da 4 P ed ro tem mus b t voln prostor min 30 cm aby byl zaru en dostate n p vod vzduchu k prostoru motoru Vnit n prostor za zen je spr vn napln n a je respektov na nosnost polic max 1...

Страница 30: ...ite v i restide rte Kui t heldatakse ebatavalist j teket aurustil huniiskuse v i k lmutatavate toodete t ttu soovitame kompressori peatada asetades kauba seadme lahti sulatamise ajaks spetsiaalsesse s...

Страница 31: ...ekiirguses ega suure v imsusega lampide valguses Toatemperatuur ei leta 30 C suhteline niiskus 55 mis on seadme etten htud t tingimused Kliimaklass 4 Tagatud on vajalik hujuurdevool mootoriruumi ja re...

Страница 32: ...das ne maz k k 30 cm no sienas Produktus nedr kst novietot t lai tie atrastos rpus rest u perimetram Uz iztvaic t ja sakr joties p r k lielam daudzumam ledus augstas gaisa vai produktu mitruma pak pes...

Страница 33: ...staros Apk rt j s vides temperat ra nep rsniedz 30 C un mitrums 55 parametri kas piem roti apr kojumam Klimatisk klase 4 J nodro ina adekv ta gaisa pl smas padevi motoram nenovietojot r us gaisa pl s...

Страница 34: ...nuo sienos turi b ti nutolusios bent 30 I d lioti gaminiai neturi i siki ti u lentyn ar groteli ribos Jei ant garintuvo atsirast nenormali ledo sankaupa susidaranti d l oro ar aldom produkt dr gm s pa...

Страница 35: ...i 30 C ir 55 4 klimato klas Variklio skyriui u tikrintas reikiamas v dinimasis bent 30 cm atstumu nuo groteli n ra joki kliuvini Vidaus skyrius tinkamai pakrautas ant lentyn n ra vir svorio ne daugia...

Страница 36: ...d s k vetkezne be akkor a kompresszor le ll t s t s az runak megfelel ugyanolyan h m rs kletre h t tt tart lyokba t rt n thelyez s t javasoljuk a j gleolvaszt shoz sz ks ges id re ellenkez esetben a...

Страница 37: ...that l sd 8 bra Bek t tt csatlakoz dug Bekapcsolt h t berendez s megszak t vil g t z ld f nnyel A h m r az ru sz A bels f nycs vek be legyenek k tve s az ajt j l be legyen csukva Ne rje a berendez st...

Страница 38: ...sti kwalifikati jew minn persuni kompetenti Wie ed m g andu qatt jipprova jsewwi l appliance wa du Tiswija mag mula minn persuni mhux tal mestjier jistg u jikkaw aw danni serji Tibdil jew tiswija fl a...

Страница 39: ...nti w anke tar rata plate li jil aq ir regoli tal IEC Kif huwa iddikjarat fuq t tabella ta l istrument u ID sensitivity of 30MA c Kun cert li m hemm l ebda riskju ta esplosjoni ewwa l kamra AD ambjent...

Страница 40: ...od cianek przynajmniej o 30 cm Nie ustawia produkt w poza obr b p ek i kratek Je li powstanie l d na parowniku wywo any przez wilgotno powietrza lub przez produkty przeznaczone do ch odzenia radzimy...

Страница 41: ...cza 30 C U R 55 do kt rej to temperatury urz dzenie jest przystosowane Klasa klimatyczna 4 Ma by zapewniony dost p powietrza do silnika przed kratk pozostawione wolne miejsce na przynajmniej 30 cm Kom...

Страница 42: ...steny aspo 30 cm Potraviny ukladajte tak aby nepresahovali cez okraje pol c alebo ro tov Pokia by z d vodu vlhkosti vzduchu alebo z uskladnen ch potrav n doch dzalo k nadmern mu vytv raniu sa adu vo...

Страница 43: ...o aruj vysokov konn osvetlova e Teplota prostredia neprevy uje 30 C a relat vna vlhkos 55 pre ktor hodnoty je pr strojov zariadenie ur en Klimatick trieda 4 Pred ro tom mus by vo n priestor min 30 cm...

Страница 44: ...i abnormalni sloj ledu na evaporatorju povzro en od previsoke vlage v zraku ali od shranjenih izdelkov v tem primeru priporo amo da se ustavi kompresor in da se blago shrani v primernem prostoru z ist...

Страница 45: ...se enkrat pritisne na gumb je mogo e vizualizirati postavljeno temperaturo katero je mogo e spremeniti e se pritisne na gumb GOR ali na gumb DOL glej skico 8 Vtika vklju en Stikalo naprave za hlajenje...

Страница 46: ...derhoud Pokyny pro dr bu Hooldusjuhend Instrukcija tehnisk s apkopes darbiniekam Techninio aptarnavimo darbuotojo vadovas Karbantart si k zik nyv Manwal g all manutenzjoni Podrecznik obslugi konserwac...

Страница 47: ...I UK D E F NL P S DK FIN B GR CZ EE LV LT H M PL SK SLO 47 Fig 3 Fig 2 3 3 2 3 4 Fig 1 9 17 7 2 Led TLZ 20 3 1 2 4 5 6 7 s s M M 12 7 15 2 13 9 10 14 6 6 16 M 230 V 18 MEAT VINO...

Страница 48: ...top lamp socket in place Detach the fluorescent tube with its protective cover from the top lamp socket Take the tube out of the bottom lamp socket Remove the protective cover Replace the fluorescent...

Страница 49: ...ire le tube de la douille inf rieure Enlever le tube transparent de protection Remplacer le tube fluorescent Remonter le tout en proc dant en sens inverse voir illustration 2 Couper le courant lectriq...

Страница 50: ...ch anslut utrustningen till eln tet se fig 1 Koppla ifr n str mmen Lossa f stskruvarna p den vre lamph llaren Dra loss den vre lamph llaren fr n lysr ret med genomskinligt skyddsr r Dra ur r ret fr n...

Страница 51: ...1 2 3 4 5 6 7 3 VERVANGING VAN EEN GLASWAND 1 2 3 4 5 6 7 8 9 Schakel de elektrische voeding uit middels de hoofdschakelaar en haal de stekker uit het stopcontact De beschermingsrooster aan de linker...

Страница 52: ...ipesast v lja V tta lamp alumisest lambipesast v lja Eemaldada l bipaistev kaitsetoru Vahetada fluorestsentslamp v lja Paigaldada k ik osad tagasi toimides vastupidises j rjekorras vt Joon 2 L litada...

Страница 53: ...m porr teget A porsz v val t vol tsa el a marad k port Szerelje vissza a r csot s k sse be a h l zati cs A le a h l zati csatlakoz st Csavarozz k le a fels l mpafoglalat r gz t csavarjait H zz k le a...

Страница 54: ...trubky Vytiahnite iarivku z dolnej obj mky iarovky Sn mte priesvitn ochrann kryt trubky Vyme te iarivku fluorescen n trubku Zopakujte cel postup v opa nom porad Pozri obr Vypnite pr vod elektrickej e...

Страница 55: ...I UK D E F NL P S DK FIN B GR CZ EE LV LT H M PL SK SLO 55 15 2 13 7 14 10 9 12 6 6 modello Meat 1150 M 5 3 4 15 1 8 modello Meat 9 1 7 7 2 L e d...

Страница 56: ...llo Meat 550 M 3 1 2 4 5 6 7 s s TLY 28 2 1 4 3 5 6 7 8 9 10 11 12 M M 12 7 15 2 13 9 10 14 11 6 6 16 9 17 7 2 Led modello Meat 250 S 3 1 2 4 5 6 7 s s TLY 28 2 1 4 3 5 6 7 8 9 10 11 12 M M 12 7 15 2...

Страница 57: ...bacinella di evaporazione automatica Anche l acqua di sbrinamento pu causare guasti considerevoli poich pu bucare il tubo che fornisce il calore necessario per l evaporazione dell acqua o deteriorare...

Страница 58: ...erstand Stekker Starter Thermostaat Ventilator koelinstallatie 16 Sonde 17 18 Toevoerleiding Ventilator 1 2 3 4 5 6 7 8 9 10 11 12 13 14 15 16 17 18 1 2 3 4 5 6 7 8 9 10 11 12 13 14 15 Vani ka Kompres...

Страница 59: ...T pegys g Ventil tor 1 2 3 4 5 6 7 8 9 10 11 12 13 14 15 Trej Kompressur Kondensatur Evaporatur Filtru Interruttur Terminal Kompressur bil mutur Dwal Rijattur Rezistenza Plakka tal Kurrent Starter Te...

Страница 60: ...FRIGO s p a 42024 Castelnovo di Sotto Reggio Emilia Italy Via Galileo Galilei 22 Tel 0522 683246 0522 688443 Fax 0522 682196 Fax Uff acquisti 0522 682311 Fax Uff amm 0522 688444 e mail info tecfrigo c...

Отзывы: