background image

Page 11

Rebuilding/Refilling the Shocks

Rebuilding/Refilling the Shocks

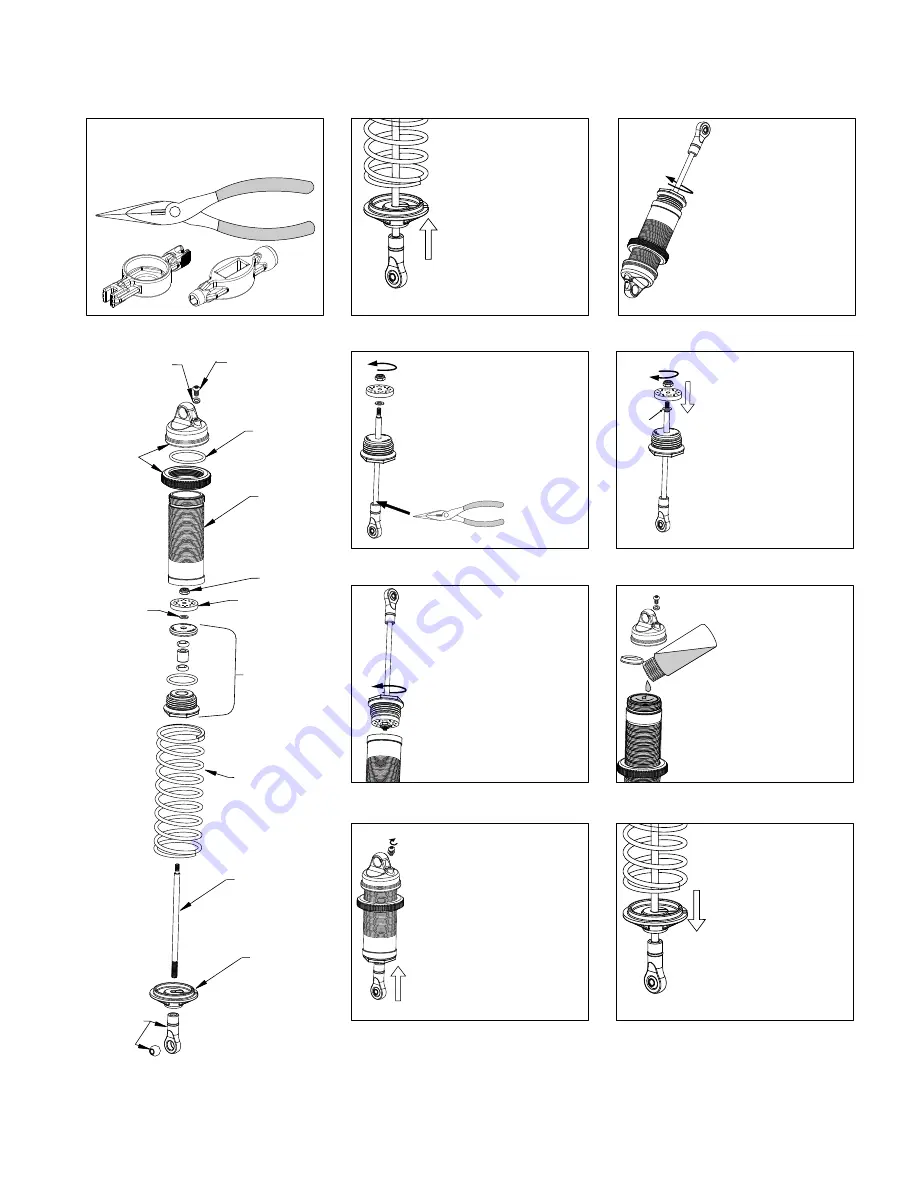
Step 1.  
After removing the shock, 
push up on the lower spring 
cup and snap it off of the 
shaft. Remove the spring.

NOTE: If you only wish to change
or fill the shock fluid, skip to step 6.

Turn the shock upside down
and, using the included shock
tool, remove the black shock
cartridge/shaft assembly from 
the shock body by turning it 
counterclockwise.

Step 2.

Step3.
Remove the 1/4" nut by turning it 
counterclockwise. Remove the
piston and washer. Remove the
old cartridge. Put a drop of shock
oil on the shock shaft before 
installing new shock cartridge. 

Hold here with needle-nose pliers

Tools Needed

Step 4.
Install washer onto the shock
shaft until it stops. Slide the 
shock piston onto the shaft 
against the washer.  Reinstall
1/4" nut and tighten by 
turning it clockwise.

Be sure to 
reinstall 
washer

Step 5.
If you plan on completely changing
the shock fluid (suggested), dump
out the old fluid from the shock 
body before reinstalling the car-
tridge/shaft assembly. Pull the shaft
  out so that the piston is next to the
  cartridge and reinstall the
assembly into the shock body;
tighten in a clockwise direction.

Step 6.
Note: If you are just refilling your 
                    shocks, be sure to use 
                     Losi 30wt silicone 
       shock fluid (LOSA5224). 
Remove the shock cap and the 
small button head screw and 
washer in the top of it.
Carefully fill the shock body with 
fluid to the top.  Move the shaft 
up and down slowly to remove 
bubbles. Top off with oil if needed.

Step 7.
Holding the shock upright,  push 
the shock shaft in slowly until it 
bottoms out. While holding the 
shock shaft in this position, replace 
the small screw and washer in the 
shock top. If fluid leaks around the 
threads of the cartridge, it is 
probably not tight enough.

Step 8. 
Slide the spring over the 
shock body against the 
shock adjuster nut. Slide 
the lower shock cup onto 
the shock shaft and snap it 
onto the shock end being 
sure that it seats on the 
mount. Reinstall the shock.

"snap!"

"snap!"

"snap!"

A6234

B2900

B2815

B2876

B2820

B2840

B2900

B2875

B2948

B2840

B2900

B2900

B2840

LOSA5224

30wt

Содержание Losi Mega Baja

Страница 1: ...Operations Guide Not responsible for errors All prices subject to change without notice Losi a Division of Horizon Hobby Inc MEGA BAJA Nitro Monster Vehicle...

Страница 2: ...osi JR and Horizon Hobby shall not be liable for any loss or damages whether direct indirect special incidental or consequential arising from the use misuse or abuse of this product or any product req...

Страница 3: ...an desired and does not provide enough lubrication for the internal engine components causing premature wear and damage It is always advisable to run the engine slightly rich and never lean to avoid o...

Страница 4: ...and hold the fuel line near the carburetor cutting off the flow of fuel and listen closely to the engine rpm speed If the low speed needle is set correctly the engine speed will increase only slightl...

Страница 5: ...battery being weak or dead the glow plug being wet with fuel or the element burned out Use a spare glow plug to check the igniter If the igniter makes the element glow remove the plug from the engine...

Страница 6: ...vo savers so they are timed as close as possible like that seen in the photo Use the steering trim on the transmitter to fine tune the timing of the servo savers Make sure the front tires are pointing...

Страница 7: ...r adjusting the two speed is as follows Remove the gear cover Turn the spur gears until the adjustment hole is visible in the bell housing between the large and small spur gears Hold the small spur ge...

Страница 8: ...arings and brush any loose dirt away from the bearing faces Put only ONE drop of oil on the inside face the side facing away from the clutch shoes near the inner race of the bearing Install the bearin...

Страница 9: ...move the two screws in the bottom at the extreme end of the chassis fig1 Remove the four screws in the bulkhead allowing the bumper skidplates and pin mounts to be removed fig 2 Remove the diff retain...

Страница 10: ...the transmission case half Regrease the gears and shafts inspecting each for wear Replace any worn or failed gears Wipe out the inside of the gear case removing any debris old grease and foreign matte...

Страница 11: ...t the old fluid from the shock body before reinstalling the car tridge shaft assembly Pull the shaft out so that the piston is next to the cartridge and reinstall the assembly into the shock body tigh...

Страница 12: ...ry Settings 2 7 in 68mm Tie Rods Steering Transmission Slipper 1 turn out Two Speed 5 turns out x1 x5 Engine x 3 x21 2 Shocks Low Speed Needle 21 2 turns out High Speed Needle 31 2 turns out Using Nit...

Страница 13: ...build Engine overheats High speed fuel mixture is too lean Low speed fuel mixture too lean Spoiled or improper fuel Cooling air is being blocked Excessive load on the engine See Understanding Rich and...

Страница 14: ...e LST 2 5 00 LOSB3545 Center CV Driveshaft LST 2 10 99 LOSB3601 Brake Disks Steel 2 LST 2 4 00 LOSB3603 Brake Cam LST 2 3 00 LOSB3605 Brake Pads Bracket LST AFT 5 00 HARDWARE LOSA3045 Gear Cover Acces...

Страница 15: ...el Ti Nitride Gear Conversion LST 2 79 99 LOSB3429 70T Steel Spur w Ti Nitride 1st LST 2 33 66 LOSB3430 63T Steel Spur w Ti Nitride 2nd LST 2 25 99 LOSB3431 Drive Rings for 70T Steel Spur 2 2 00 DRIVE...

Страница 16: ...06 A6206 B3605 B4203 B3601 B3128 B3127 B3118 A6940 A6940 A6247 B3127 B3125 B3128 B3102 A6250 A6246 A6250 A6206 A6248 A6355 TRANSMISSION ASSEMBLY A6940 B3132 B3133 A6107 A6941 B3135 B3125 B3132 B3125 A...

Страница 17: ...056 A6206 B6350 B5049 B5062 B3545 A6250 B3505 B3301 B2257 B3541 B5020 B5020 B5021 Drivetrain Assembly A6240 A6350 B5051 B3301 B3125 A6250 B4202 B3532 B3538 B3451 A6942 B3505 B3537 A6942 B3534 A6942 B3...

Страница 18: ...Page 18 B2256 B2256...

Страница 19: ...Page 19...

Страница 20: ...Page 20 FRONT ASSEMBLY...

Страница 21: ...Page 21 B2451 REAR ASSEMBLY...

Страница 22: ...R1032 LOSR1031 LOSR1033 LOSB5111 LOSR1033 LOSR1040 CARBURETOR LOSR1038 LOSR1030 DYN0915 LOSB5051 DYN0923 DYN0924 LOSR1038 DYN0927 LOSB4204 DYN0926 DYN0926 LOSR1039 LOSR1020 LOSR1021 Optional LOSR1022...

Страница 23: ...ential to read and follow all the instructions and warnings in the manual prior to assembly setup or use in order to operate correctly and avoid damage or injury Questions Assistance and Repairs Your...

Страница 24: ...2 AFT 7 50 LOSB3193 Inside Gear Cover LST2 5 50 LOSB3323 Aluminum Clutch Shoe Spring Set LST2 19 99 LOSB3509 Wheel Hex Set Hard Anodized Alum LST AFT 19 99 LOSB5031 Finned Engine Mounts Hard Ano Alumi...

Отзывы: