77-20SR70I00020
Z
SR-L70i
Hi-Fi Table Radio
OWNER’S MANUAL
MODE D’EMPLOI
MANUAL DEL USUARIO
ENGLISH
FR
ANÇ
AIS
ESPAÑOL
Страница 1: ...77 20SR70I00020 Z SR L70i Hi FiTable Radio OWNER S MANUAL MODE D EMPLOI MANUAL DEL USUARIO ENGLISH FRAN AIS ESPA OL...
Страница 2: ...ssories specified by the manufacturer 12 Use only with the cart stand tripod bracket or table specified by the manufacturer or sold with the apparatus When a cart is used use caution when moving the c...
Страница 3: ...V technician for help CAUTION Changes or modifications to this equipments n o t e x p r e s s l y a p p r o v e d b y T E AC CORPORATION for compliance will void the user s warranty The apparatus draw...
Страница 4: ...e unit on an amplifier or receiver Do not open the cabinet because this might result in damage to the circuitry or electrical shock If a foreign object should get into the unit contact your dealer or...
Страница 5: ...se different types of batteries together Do not heat or disassemble batteries and never throw them in fire or water Do not carry or store batteries with other metallic objects Doing so could cause bat...
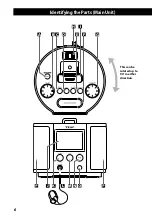
Страница 6: ...6 Identifying the Parts Main Unit A C D E M L K G F I H B J This can be rotated up to 90 in either direction...
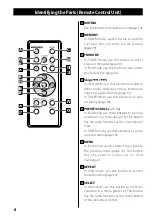
Страница 7: ...ton to start or pause playback of the iPod page 14 O Remote Sensor P Speakers Stereo A STANDBY ON Use this button to turn the unit on or put it into standby mode B VOLUME Turn this knob to adjust the...
Страница 8: ...art of a track page 15 In TUNER mode use these buttons to tune in stations page 18 U PRESET SCROLL In iPod mode use these buttons to scroll up and down in a menu page 16 This button has the same funct...
Страница 9: ...ared rays or if other remote control devices that use infrared rays are operated near the unit Likewise the other products might also operate incorrectly 1 Remove the battery compartment cover 2 Put i...
Страница 10: ...re making connections Read the instructions for each component that you intend to use with this unit Be sure to insert each plug securely To prevent hum and noise do not bundle the connection cords AC...
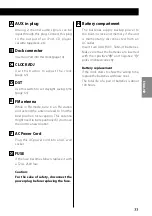
Страница 11: ...d if you move the unit to a new location F AC Power Cord Plug this AC power cord into an AC wall socket G FUSE If the fuse becomes blown replace it with a T2 AL 250V fuse Caution For the sake of safet...
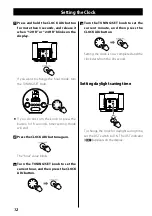
Страница 12: ...setting mode will end 2 Press the CLOCK ADJ button again The hour value blinks 3 Turn the TUNING SET knob to set the current hour and then press the CLOCK ADJ button Setting daylight saving time To ch...
Страница 13: ...the TUNER button the AUX button or the iPod button y J 2 Press the TUNER button the AUX button or the iPod button y J to select the sound source Select AUX to listen to an external source connected t...
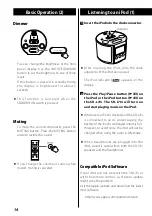
Страница 14: ...Pod being used The iPod indicator appears on the display 2 Press the Play Pause button y J on the iPod or the iPod button y J on the SR L70i The SR L70i will turn on and start playing music on the iPo...
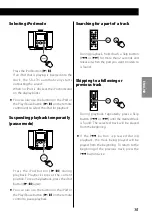
Страница 15: ...sition To resume playback press the iPod button G J again You can also use the button on the iPod or the Play Pause button y J on the remote control to pause playback Searching for a part of a track D...
Страница 16: ...k press the REPEAT button to change the repeat mode Each time the REPEAT button is pressed the iPod REPEAT setting is changed as follows All One off If the iPod is set to repeat one song the repeat on...
Страница 17: ...on the display 3 Play the source and adjust the volume on both the SR L70i and the audio player When using the PHONES jack of the audio player you must adjust its volume or you might not hear any soun...
Страница 18: ...nge When a station is tuned in the tuning process will stop automatically To stop automatic selection press a Skip button or Listening to the Radio Manual selection Use the TUNING SET knob to select s...
Страница 19: ...en an FM stereo broadcast is received the STEREO indicator lights on the display If the sound is distorted and the STEREO indicator flashes the signal is not strong enough for good stereo reception In...
Страница 20: ...after a specified amount of time Press the SLEEP button repeatedly until the desired time appears on the display The SLEEP indicator appears on the display SLEEP 120 90 60 30 or 15 Depending on the s...
Страница 21: ...SNOOZE DIMMER button to stop the buzzer for 10 minutes It will sounds again after 10 minutes To turn the Nap Alarm off completely press the NAP button again Wake Up Timer The unit can be programmed to...
Страница 22: ...et the buzzer will sound Timer 2 2 Turn the TUNING SET knob to set the hour and minute and then press the ALARM 1 button The Timer indicator and source indicator blink The Wake Up Timer can be set by...
Страница 23: ...e to power off on the iPod Touch The screen can be turned off without any problem If Video is displayed on an iPod Touch s screen you cannot use the alarm even if it is docked in this system To use th...
Страница 24: ...ve obstacles between the remote control unit and the main unit e If a bright light is near the unit turn it off Troubleshooting The sound is noisy e The unit is too close to a TV or similar device Rel...
Страница 25: ...nsumption 25 W Dimensions W x H x D 191 x 152 x 196 mm 7 1 2 x 6 x 7 3 4 Weight Net 2 2 kg 4 7 8 lb Standard Accessories Remote control unit RC 1198 x 1 Battery for remote control unit CR2032 x 1 Batt...
Страница 26: ...d un tel produit doit tre branch dans une prise secteur avec terre de s curit Si le produit utilise des piles batteries y compris un pack de batteries ou des piles install es elles ne doivent pas tre...
Страница 27: ...d vous d branchez l appareil tirez toujours par la prise jamais par le cordon d alimentation N essayez pas de nettoyer l appareil avec des d i s s o l v a nt s c h i m i q u e s ce l a p e u t endomma...
Страница 28: ...28 A C D E M L K G F I H B J Peut tourner 90 dans les deux directions Identification des parties Unit principale...
Страница 29: ...A STANDBY ON Utilisez cette touche pour allumer l appareil ou le mettre en veille standby B VOLUME Tournez cette molette pour r gler le volume C SLEEP Utilisez cette touche pour r gler la minuterie d...
Страница 30: ...une plage page 37 En mode TUNER utilisez ces touches pour changer les stations page 40 U PRESET SCROLL En mode iPod utilisez ces touches pour faire d filer le menu vers le haut ou vers le bas page 38...
Страница 31: ...la pile Si vous remarquez que la distance entre le bo tier de t l commande et le lecteur devient plus courte pour un fonctionnement correct cela indique que la pile est us e Dans ce cas remplacez la...
Страница 32: ...uctions qui accompagnent chaque appareil que vous avez l intention d utiliser en association avec cet appareil ci Veillez ce que chaque fiche soit soigneusement ins r e Pour viter les ronflements et l...
Страница 33: ...z votre appareil F Cordon d alimentation Branchez ce cordon d alimentation dans une prise secteur G FUSE Si le fusible saute remplacez le par un mod le T2 AL 250 V Attention Pour votre s curit d branc...
Страница 34: ...suivantes le mode de r glage d horloge est abandonn 2 Appuyez encore une fois sur la touche CLOCK ADJ La valeur de l heure clignote 3 Tournez la molette TUNING SET pour sp cifier l heure puis appuyez...
Страница 35: ...AUX ou la touche iPod y J pour allumer l appareil 2 Appuyez sur la touche TUNER la touche AUX ou la touche iPod y J pour s lectionner une source S lectionnez AUX pour couter une source externe branch...
Страница 36: ...glisser l adaptateur de dock correspondant la taille de l iPod utilis L indicateur iPod appara t l cran 2 Appuyez sur la touche Lecture Pause y J de l iPod ou sur la touche iPod y J du SR L70i Le SR L...
Страница 37: ...x fois sur la touche S lectionner le mode iPod Appuyez sur la touche iPod y J Si un iPod en lecture est ins r dans le dock le SR L70i commence automatiquement la reproduction du son S il n y a pas d i...
Страница 38: ...touche REPEAT A chaque pression sur la touche le r glage de lecture r p titive de l iPod change comme suit All One off Quand l iPod est configur pour r p ter un seul morceau l ic ne R p ter un seul ap...
Страница 39: ...che AUX L indicateur AUX appara t l cran 3 Mettez la source en lecture et r glez le volume sonore du SR L70i et du lecteur audio Si vous utilisez la prise pour couteurs PHONES de votre mini lecteur vo...
Страница 40: ...ouv e le processus de syntonisation s arr te automatiquement Pour stopper la recherche automatique appuyez sur la touche Saut ou coute de la radio Recherche manuelle Utilisez la molette TUNING SET pou...
Страница 41: ...STEREO et MONO St r o Les missions FM st r o sont re ues en st r o et le t moin STEREO s allume l cran Si le son souffre de distorsion et si le t moin STEREO clignote c est que le signal n est pas as...
Страница 42: ...vez r gler une minuterie d extinction pour que l appareil s teigne tout seul apr s un temps donn Appuyez r p titivement sur la touche SLEEP jusqu ce que la dur e voulue s affiche L indicateur SLEEP ap...
Страница 43: ...z la press e plus de 5 secondes Minuteur de r veil Vous pouvez programmer un minuteur de r veil pour qu il sonne apr s un temps donn La sonnerie retentira pendant 5 minutes Appuyez r p titivement sur...
Страница 44: ...tilisera la sonnerie Minuterie 2 2 Tournez la molette TUNING SET pour r gler les heures et les minutes puis appuyez sur la touche ALARM 1 ou ALARM 2 L indicateur de minuterie et l indicateur de source...
Страница 45: ...rs service sans aucun probl me Si une image vid o est affich e sur l cran de votre iPod touch vous ne pouvez pas utiliser l alarme m me si l iPod touch est sur le Dock de ce syst me Pour utiliser l al...
Страница 46: ...le panneau avant e E n l e v e z l e s o b s t a c l e s e n t r e l a t l commande et l unit principale e S il y a une lumi re puissante pr s de l appareil teignez la D pannage Le son est bruyant e...
Страница 47: ...que 25 W Dimensions L x H x P 191 x 152 x 196 mm Poids net 2 2 kg Accessoires fournis T l commande RC 1198 x 1 Pile pour t l commande CR2032 x 1 Piles pour sauvegarde taille AAA x 2 Mode d emploi ce d...
Страница 48: ...de tres bornes con toma de tierra Este tipo de cables deben ser conectados en salidas de corriente alterna que dispongan de una toma de tierra de protecci n Si este aparato utiliza pilas tanto un pack...
Страница 49: ...jeto extra o en el aparato p ngase en contacto con su distribuidor o con el servicio t cnico A la hora de extraer el enchufe de alimentaci n de la salida de corriente tire siempre directamente del enc...
Страница 50: ...50 A C D E M L K G F I H B J Puede girarlo hasta 90 en ambos sentidos Identificaci n de las partes unidad principal...
Страница 51: ...ANDBY ON Utilice este bot n para encender o apagar la unidad B VOLUME Use estos botones para ajustar el volumen C SLEEP Use este bot n para ajustar el temporizador de la funci n Sleep p g 64 D NAP Uti...
Страница 52: ...a pista p g 59 En el modo TUNER use estos botones para elegir las emisoras p g 62 U PRESET SCROLL En modo iPod utilice estos botones para desplazarse por el men p g 60 Este bot n tiene las mismas func...
Страница 53: ...reduce la distancia operativa del mando a distancia eso querr decir que las pilas est n gastadas En ese caso sustit yalas por unas nuevas Para m s informaci n acerca de c mo deshacerse de las pilas p...
Страница 54: ...las instrucciones de todos los componentes que vaya a utilizar con la unidad Asegure firmemente cada uno de los conectores Para evitar zumbidos y ruidos no permita que los cables audio queden junto c...
Страница 55: ...reorientar la antena F Cable de alimentaci n de CA Enchufe este cable de alimentaci n en una salida de corriente alterna G FUSIBLE Si este fusible se quema o salta sustit yalo por otro de tipo T2AL 2...
Страница 56: ...ADJ una vez m s Parpadear el valor de hora 3 Gire el mando TUNING SET para ajustar las horas y despu s pulse el bot n CLOCK ADJ Puesta en hora del reloj Para ajustar el horario de verano Para cambiar...
Страница 57: ...s botones TUNER AUX o iPod y J para encender la unidad 2 Pulse el bot n TUNER AUX o el bot n iPod y J para elegir la fuente de sonido Elija AUX si quiere escuchar una fuente exterior conectada a la en...
Страница 58: ...do En la pantalla aparecer entonces el indicador iPod 2 Pulse el bot n de reproducci n pausa y J en el iPod o el bot n iPod y J del SR L70i El SR L70i se encender y comenzar a reproducir la m sica del...
Страница 59: ...de la pista anterior pulse dos veces el bot n Selecci n del modo iPod Pulse el bot n iPod y J Si en el dock hay colocado un iPod que est reproduciendo datos el SR L70i empezar autom ticamente a dar sa...
Страница 60: ...ci n Cada vez que pulse el bot n el modo de repetici n cambiar de la siguiente forma All One off Si configura el iPod al modo de repetici n de una canci n el icono de repetici n de una sola canci n ap...
Страница 61: ...AUX El indicador AUX aparecer en la pantalla 3 Reproduzca la fuente y ajuste el volumen tanto en el SR L70i como en el reproductor audio Cuan d o us e la s ali da PH O N E S d e l reproductor deber aj...
Страница 62: ...to la unidad localiza una emisora la b squeda se detiene autom ticamente Para detener la selecci n autom tica pulse el bot n de salto o Escucha de la radio Sintonizaci n manual Use el mando TUNING SET...
Страница 63: ...nes de FM stereo se reciben en stereo y el indicador STEREO se ilumina en la pantalla Si el sonido se recibe distorsionado y el indicador STEREO parpadea eso indica que la se al no tiene suficiente in...
Страница 64: ...s de un periodo de tiempo especificado Pulse el bot n SLEEP repetidas veces hasta que aparezca el valor de tiempo que quiera El indicador SLEEP aparecer en la pantalla SLEEP 120 90 60 30 15 Dependien...
Страница 65: ...SNOOZE DIMMER durante m s de 5 segundos Alarma de siesta Puede configurar una alarma de siesta para que suene un zumbido tras un periodo de tiempo determinado El zumbador suena durante 5 minutos Pulse...
Страница 66: ...la unidad usar el sonido del zumbador Temporizador 2 2 Gire el mando TUNING SET para ajustar las horas y minutos y pulse despu s el bot n ALARM 1 o ALARM 2 El indicador de temporizador y el de fuente...
Страница 67: ...as Si est visualizando un video en la pantalla del iPod touch no podr utilizar la alarma incluso aunque el iPod touch est conectado al dock Para utilizar la alarma elija cualquier elemento distinto a...
Страница 68: ...principal e Si hay una luz muy brillante cerca de esta unidad ap guela Resoluci n de problemas Sonido con ruidos e La unidad est demasiado cerca de un televisor o aparato similar Aleje la unidad o ap...
Страница 69: ...rof 191 x 152 x 196 mm Peso neto 2 2 kg Elementos incluidos Mando a distancia RC 1198 x 1 Pila del mando a distancia CR2032 x 1 Pilas de mantenimiento de memoria tipo AAA x 2 Manual de instrucciones e...
Страница 70: ...70...
Страница 71: ...71...
Страница 72: ...733 Telegraph Road Montebello California 90640 U S A Phone 323 726 0303 TEAC CANADA LTD 5939 Wallace Street Mississauga Ontario L4Z 1Z8 Canada Phone 905 890 8008 TEAC MEXICO S A de C V R o Churubusco...