background image

10

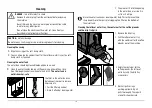
Initial operation – prior to first use 

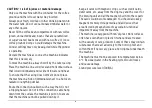
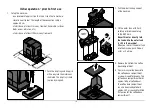
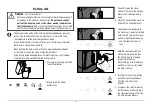
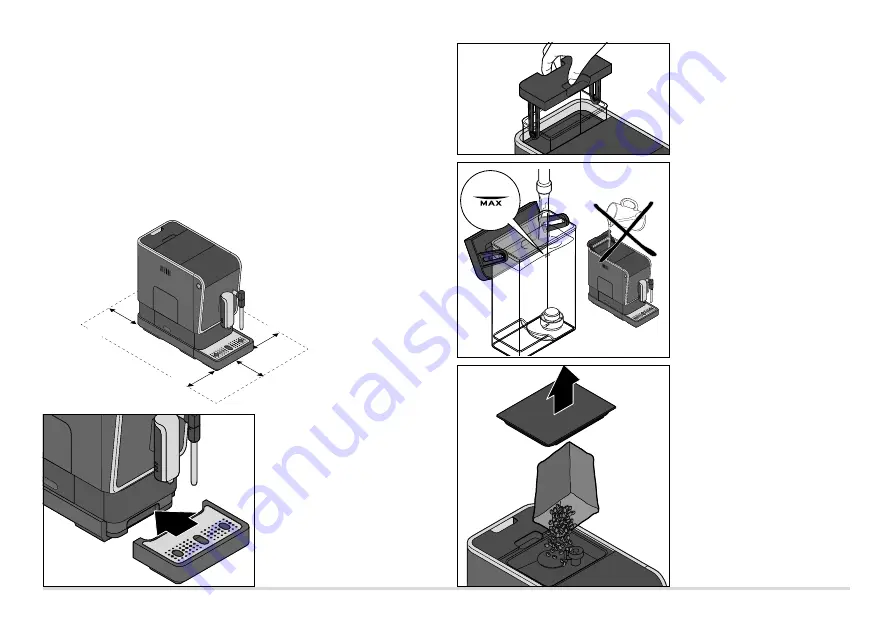
1.      Set up the machine...

       ... on a level worktop or surface that is not sensitive to moisture.

       ... close to a wall socket. The length of the connection cable is 

approx. 80 cm.

       ... at a distance of at least 1 m away from hot, flammable surfaces 

(hobs, ovens, radiators, etc.).

       ... at a distance of at least 150 mm away from walls. 

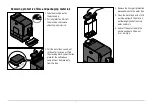
2.  Push the drip tray and drip grid

all the way into the machine as

illustrated. The drip tray is held

in place by magnets.

15

m

m

15

m

m

15

m

m

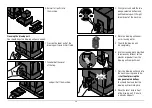
3.  Pull the water tank up and out 

of the machine.

4.  Fill the water tank with fresh,

cold tap or drinking water up 

to the MAX mark.

Never fill water directly into

the tank while the water tank

is still in the machine!

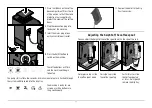
    When you reinsert the water tank

into the machine, push it down

as far as it will go.

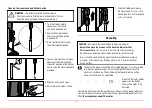
5.  Remove the lid from the coffee

bean compartment.

6.  Pour as many coffee beans into

the coffee bean compartment 

as you will need for one day. The

coffee bean compartment holds

approx. 160 g of coffee beans. 

The coffee bean compartment

can also be extended to hold

approx. 300 g (see chapter titled

“Extension for the coffee bean

compartment”).

Содержание 377042

Страница 1: ...Tchibo GmbH D 22290 Hamburg 17858HBNW 2019 05 Original instructions for use and warranty en Fully Automatic Coffee Machine Esperto Latte ...

Страница 2: ... Disposal 27 Warranty 27 Service and repair 27 Customer care service 28 Service Form Dear Customer The fully automatic coffee machine by Tchibo allows you to enjoy the perfect espresso caffè crema and delicious milk specialities such as cappuccino and latte macchiato You will have no problems with this fully automatic coffee machine created by coffee experts it is perfectly designed for use with o...

Страница 3: ...of the danger of injury caused by electricity This indicates additional information Intended use The coffee machine has been designed for the following purposes Preparing espresso and caffè crema from whole unground roasted coffee beans Preparing milk specialities It has been designed for use in households or for similar applications such as in shops offices or similar work spaces agricultural bui...

Страница 4: ...epairs carried out by a specialist workshop or contact our customer care service 4 Safety warnings DANGER to children and people with restricted capabilities of operating appliances Children are not permitted to use this machine Keep the machine and its connection cable away from children under the age of 8 and animals This machine can be used by children aged 8 years and up as well as by persons ...

Страница 5: ...er in the water tank daily to prevent germs from collecting Use only the cleaning and descaling agents listed in these instructions as well as the relevant cleaning utensils to clean the machine The use of other cleaning agents can lead to health hazards WARNING risk of scalds burns Hot steam and hot water can cause scalding Never expose any part of the body to the steam or hot water jet Do not to...

Страница 6: ...ine with the container for the coffee grounds and the leftover water tray inserted Always pour fresh cold tap or other drinking water into the water tank Do not use carbonated mineral water or any other liquids Never fill the coffee bean compartment with raw coffee green unroasted beans beans that are caramelised or sugar coated beans mixed with raw coffee or loose coffee grounds Doing so could da...

Страница 7: ... and out In the water tank you will find the cleaning brush and extension piece for the coffee bean compartment Remove both from the tank 4 Remove the transport protection piece underneath the water tank 5 Clean the water tank with a little washing up liquid Then rinse it out thoroughly under running water and dry it 6 Reinsert the water tank in the machine and push it down as far as it will go ...

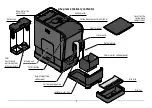
Страница 8: ...pening for the water tank Filter for filtering out limescale or other particles On Off button Brewing unit Grind adjuster Coffee bean compartment 160 g Control panel Container for coffee grounds Leftover water tray Cover for the coffee bean compartment Drip grid Drip tray Steam wand Frother nozzle ...

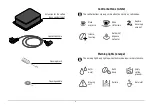
Страница 9: ... visible when the machine is switched on Make espresso Intense function Make caffè crema Froth milk dispense hot water Double beverage amount Warning lights orange The warning lights only light up when the machine requires maintenance Refill water Brewing unit Refill beans Descale Empty coffee grounds Hot water Cleaning needle ...

Страница 10: ...ets 150 mm 150 mm 150 mm 3 Pull the water tank up and out of the machine 4 Fill the water tank with fresh cold tap or drinking water up to the MAX mark Never fill water directly into the tank while the water tank is still in the machine When you reinsert the water tank into the machine push it down as far as it will go 5 Remove the lid from the coffee bean compartment 6 Pour as many coffee beans i...

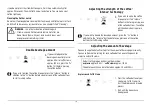
Страница 11: ...e machine will begin to heat up The pump starts after a few seconds A small amount of water is flushed through the system and dispensed into the drip tray The machine is ready for use as soon as all the buttons are lit up continuously Adjusting the height of the coffee spout You can adjust the height of the coffee spout to match the size of the cup For espresso cups slide the coffee spout down For...

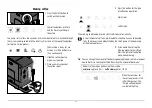
Страница 12: ...d Adjusting the amount of beverage When the container for the coffee grounds is full after 10 brewings the Empty coffee grounds symbol will light up m Default settings upon purchasing the machine espresso approx 40 ml caffè crema approx 125 ml Making coffee 1 Press the On Off button to switch on the machine The coffee buttons will flash and the machine will begin to heat up The pump starts after a...

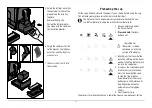
Страница 13: ...spensed is only suitable for heating the cup It is NOT suitable for making tea or other instant beverages 1 Place an empty cup under the frother nozzle 2 Press and hold the steam button until the symbol for Hot water is shown continuously in the top section of the display 3 Briefly press the steam button once The LED ring on the steam wand will light up Hot water will run into the cup below 4 As s...

Страница 14: ...am or hot water jet Do not touch any hot parts of the machine such as the steam wand or the metal on the frother nozzle Only use the steam froth functions if a suitable heat resistant container has been placed under the frother nozzle The LED ring on the steam wand will flash and the heating process for frothing milk will begin Press the steam button again to interrupt the heating process You will...

Страница 15: ... not touch them with your bare hands Always wear oven gloves or something similar m Adjusting the strength of the coffee Intense technology If you wish to make the coffee stronger press the Intense button first before pressing one of the coffee buttons The coffee will then be made using more beans If you wish to double the beverage amount press the 2x button in addition to the Intense button befor...

Страница 16: ...for the water quantity have been restored Customising the automatic rinse The default setting of the machine is for the automatic rinse to only start when the machine is cold If the machine was used shortly before it is switched on and is thus still warm the rinsing process will not restart A new rinsing process will only start once the machine has cooled down sufficiently You can customise the ri...

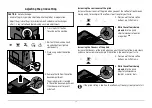
Страница 17: ...djustments Increasing the coarseness of the grind Increase the coarseness of the grind when you want the coffee to flow through more quickly for example if the coffee is too strong for your taste 5 Press one of the two coffee buttons e g Caffè Crema 6 While the coffee is being ground turn the grind adjuster clockwise towards a larger dot Increasing the fineness of the grind Increase the fineness o...

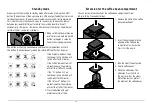
Страница 18: ... switch off time that has been set If the Espresso button is lit up continuously the machine will switch off after 10 minutes If the Caffè Crema button is lit up continuously the machine will switch off after 20 minutes If the 2x button is lit up continuously the machine will switch off after 30 minutes If the Intense button is lit up continuously the machine will switch off after 120 minutes 2 Pr...

Страница 19: ... connection cable in water or any other liquids Do not clean the machine with a water jet Clean it only as described in the following instructions CAUTION material damage Do not use any caustic aggressive or abrasive products for cleaning m 3 Then reinsert it into the opening in the water tank pressing it in as far as it will go Rinse the water tank under running water daily This will prevent lime...

Страница 20: ...ewing unit straight forwards out of the machine 4 Rinse the brewing unit under warm running water 5 Then let the brewing unit dry completely 6 Use the cleaning brush provided to remove any leftover coffee grounds or powder from the brewing unit compartment 7 Press the brewing unit back into the machine using some force and without pressing the orange coloured buttons You should hear and feel the b...

Страница 21: ...Descaling The descaling process cannot be interrupted However if it is interrupted e g due to a power outage it must be completed the next time the machine is switched on The machine will not be able to brew coffee again until the process is completed When the Descale symbol appears on the display the machine needs to be descaled Descale the machine within the next few days Do not wait any longer ...

Страница 22: ...everal times during the descaling process 5 Press the On Off button to switch on the machine 6 Wait until the machine heats up and all buttons light up continuously 7 At the same time press and hold the On Off button and the Espresso button for approx 5 seconds until you hear 2 beeps 8 Release the buttons The Descale symbol will appear and the Espresso button will flash 9 Press the Espresso button...

Страница 23: ... the coffee spout and the frother nozzle Remove the drip tray if necessary This container will need to be emptied several times during the rinsing process 14 Fill the water tank with cold tap water up to the MAX mark 15 Reinsert the water tank into the machine and push it down as far as it will go The Refill water symbol will disappear and the rinsing process will begin automatically after a few s...

Страница 24: ...pump transports the remaining water out of the pipes of the machine It stops automatically as soon as there is no more water inside The leftover water is caught in the drip tray Afterwards the machine will automatically switch to standby mode When you wish to use the machine again at a later time proceed as described in the chapter titled Initial operation prior to first use Problems solutions The...

Страница 25: ...ress the Intense button before pressing the coffee button if necessary The coffee flows very slowly out of the coffee spout Adjust the grinder to a coarser setting When hot water is required a large amount of steam is emitted from the frother nozzle before hot water dispensed If you have frothed milk shortly beforehand it is normal for steam to be emitted first and then hot water This cools the ma...

Страница 26: ...urg Germany In the course of product improvement we reserve the right to make technical and optical modifications to the product Declaration of Conformity Tchibo GmbH hereby declares that this product complies with all basic require ments and the remaining relevant regulations of the following guidelines at the time of its being placed on the market 2006 42 EG Machinery Directive 2014 30 EU EMC Di...

Страница 27: ... order for the warranty to be granted all warranty claims must be accompanied by proof of purchase from Tchibo or from an authorised Tchibo distribution partner This warranty is valid within the EU Switzerland and Turkey Damage due to improper use failure to decalcify as well as worn parts and consumables are not covered by the warranty These can be ordered via our customer care service This warra...

Страница 28: ...t well so that the machine is sufficiently protected Secure any loose parts Copy and include the proof of purchase If not covered by the warranty please tick box Please send back the machine unrepaired Please send a cost estimate You will be responsible for the cost of returning any products which are not covered by the warranty Please fill out the form in capital letters and send it along with th...

Отзывы: