The data described in this handbook are purely a guide. TAU reserves the right to change them in any moment.
The manufacturer reserves the right to modify or improve products without prior notice. Any inaccuracies or errors found in this handbook will be corrected
in the next edition.
When opening the packing please check that the product is intact. Please recycle materials in compliance with current regulations.
This product may only be installed by a qualified fitter. The manufacturer declines all liability for damage to property and/or personal injury
deriving from the incorrect installation of the system or its non-compliance with current law (see Machinery Directive).
pict. 7
pict. 6
pict. 8
pict. 11
pict. 13
1
2
pict. 9
pict. 10
pict. 14
pict. 15
pict. 16
LEFT
180°
RIGHT
180°
0 mm
pict. 12
USE AND MAINTENANCE MANUAL
EKOSWING
Swing Gate Operator - Residential/Communities
English
TECHNICAL CHARACTERISTICS OF THE EKOSWING SERIES
EKOSWING
EKOSWING-B
Power input
230V AC ±10%
230V AC ±10%
Motor power input
230V AC ±10%
18V DC
Frequency
50/60 Hz
50/60 Hz
Capacitor
8 µf
-
Absorbed current (no load)
1,2 ÷ 1,7 A
0,6 A
Absorbed power (no load)
280 W
100 W
Motor speed (no load)
900 rpm
2100 rpm
Useful travel
443 mm
443 mm
Thermal protection trips at
150 °C (autoreset)
-
Reduction ratio
1/27
1/34
Operating temperature
from –20 °C to +55 °C from –20 °C to +55 °C
Weight
6,9 Kg
6,8 Kg
Motor IP
IP 53
IP 53
Work cycle
40 %
100 %
90° travel time
17 sec.
15 sec.
EK
OS
W
IN
G
EK
OS
W
ING
-B
For The installation of blank swing gates,
functioning cannot be guaranteed in the
presence of wind.
D_MNL0EKOSWING
23-11-2012 - Rev.05
DESCRIPTION
The
EKOSWING
automated system for swing gates is an electro-mechanical non-
reversing actuator that transmits motion to the leaf via a worm screw system.
The actuator is available in 12V DC and 230V AC versions.
The non-reversing system ensures the leaf is mechanically locked when the motor is
not operating. A convenient and safe release system with customised key makes it
possible to manually move the leaf in the event of a malfunction or of a power failure.
ATTENTION:
The correct operation and the declared specifications only apply if
TAU accessories and safety devices are used.
In the absence of a mechanical clutch, the use of a control unit with an
adjustable electronic clutch, or the installation of a sensitive edge, is
required in order to ensure crush-proof safety.
The EKOSWING automated system was designed and built for con-
trolling vehicle access. Avoid any other use whatever.
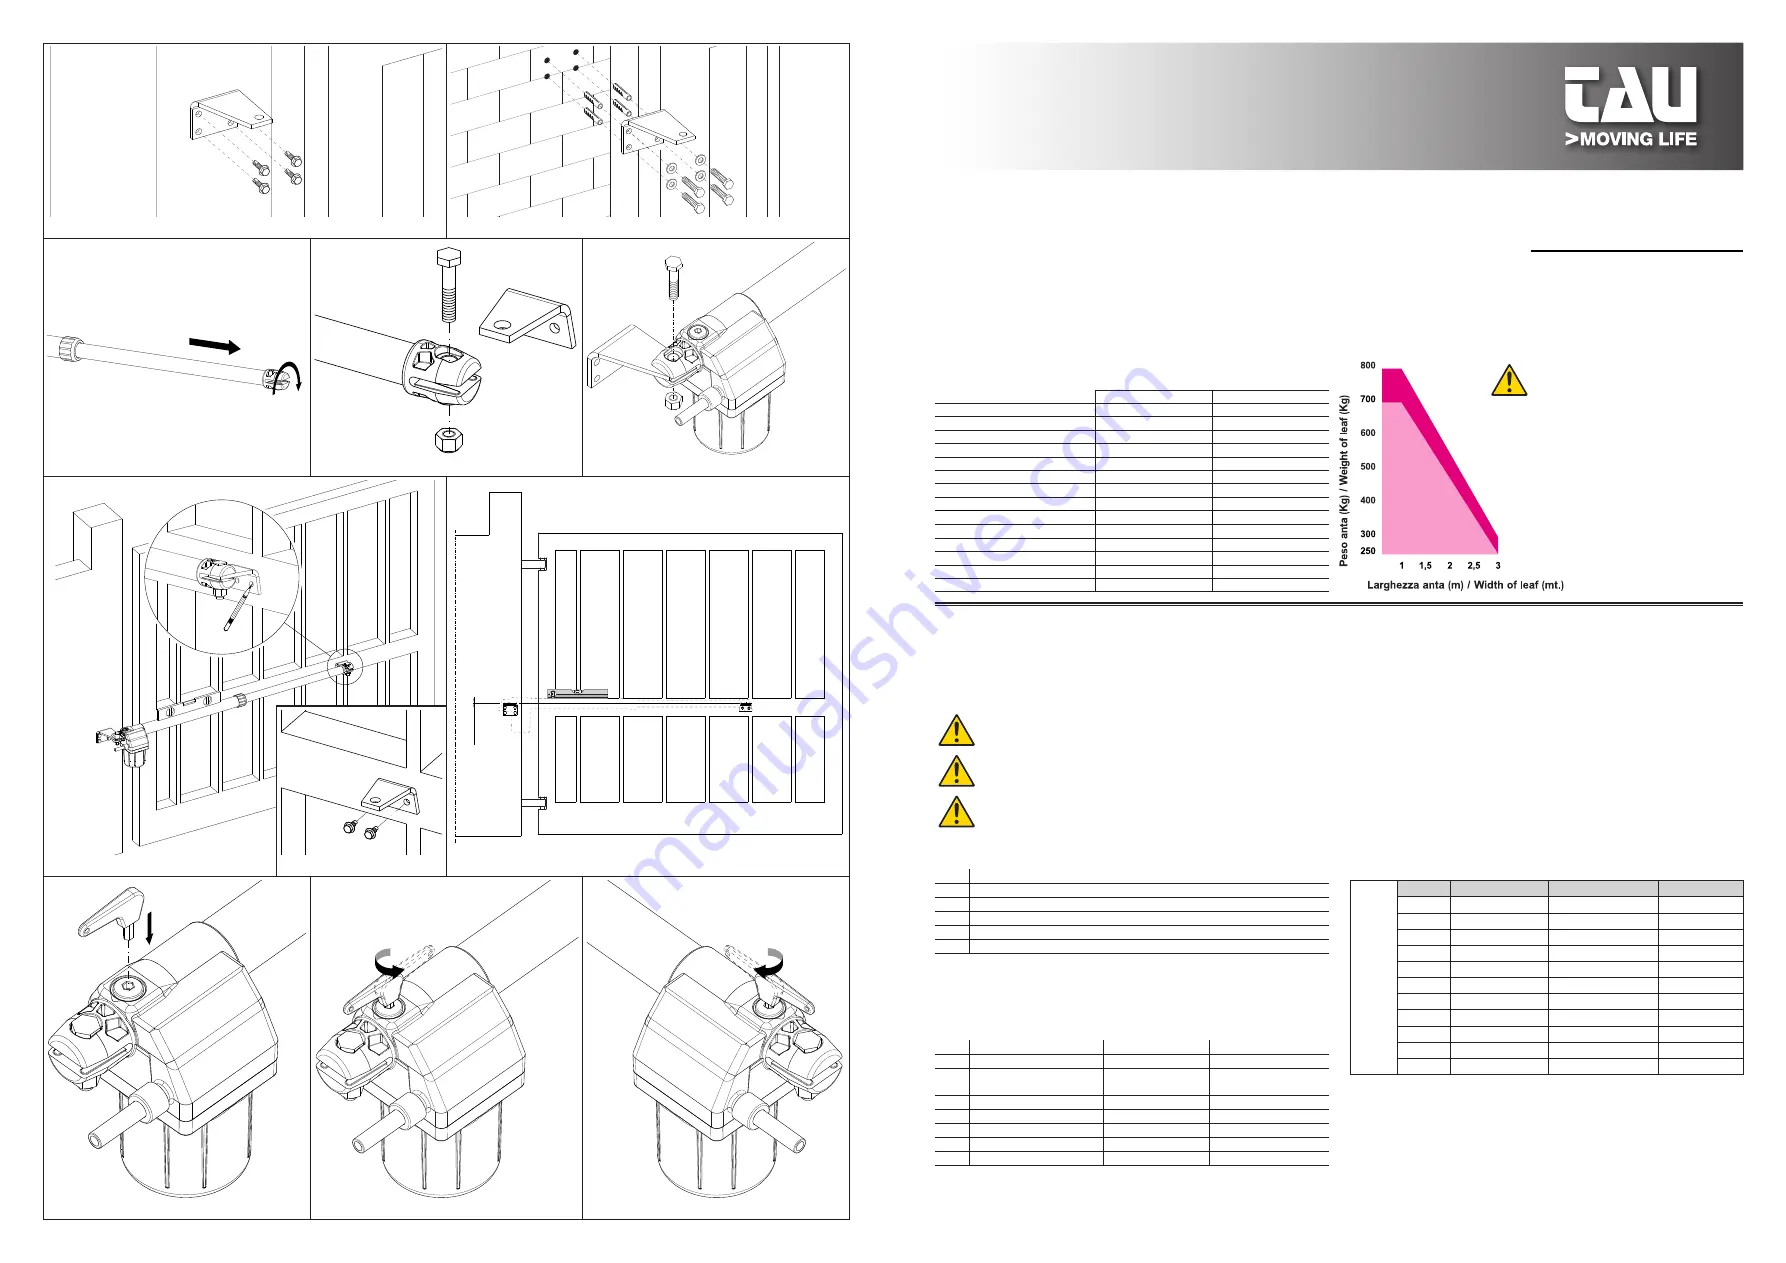
ACTUATOR PARTS (pict.1)
Pos. Description
1
Actuator
2
Release device
3
Rod
4
Wing connection bracket
5
Rear bracket
DIMENSIONS (pict
.2)
INSTALLATION (pict
.3)
Electrical set-up (standard system - EKOSWING)
Pos. Description
Cables (230V AC)
Cables (12V DC)
1 Actuator
4x1,5 mm²
2x2,5 mm² + 3x0,5 mm²
2 Control unit
3x1,5 mm²
(power supply)
3x1,5 mm²
(power supply)
3 TX photocells
4x0,5 mm²
4x0,5 mm²
4 RX photocells
2x0,5 mm²
2x0,5 mm²
5 Key-operated selector switch
3x0,5 mm²
3x0,5 mm²
6 Flashing light and aerial
2x1 mm² + 1RG58
2x1 mm² + 1RG58
7 Mechanical stops
-
-
Notes:
• Use suitable tubes and/or hoses to lay electric cables
• Choose short routes for cables and keep power cables separate from control
cables.
Preliminary checks
Prior to installing the automation, make all structural modifications in order to ensure
safety distances and protect and segregate areas in which people may be exposed to
the risk of crushing, shearing, dragging or similar dangers.
• Make sure the existing structure is sufficiently sturdy and stable;
• the mechanical parts must conform to the provisions of current Safety Standards;
• leaf length in compliance with the actuator specifications;
• regular and uniform movement of the leaves, without any friction and dragging
during their entire travel;
• stiff hinges in good conditions;
• presence of both opening and closing mechanical limit stops;
• presence of an efficient earthing for electrical connection of the actuator.
Perform any necessary metalwork job before installing the automated system.
The condition of the gate structure directly affects the reliability and safety of
the automated system.
Installation dimensions (pict.4)
Determine the fitting position of the actuator with reference to pict.4.
Check with care if the distance between the open leaf and any obstacles (walls, fenc-
es etc.) is higher than the actuator dimensions.
E
K
O
S
W
I
N
G
X°
A (mm)
B (mm)
C (mm)
90
150
200 ÷ 260
20 mm
90
200
160 ÷ 220
20 mm
90
250
120 ÷ 220
20 mm
90
300
85 ÷ 155
20 mm
100
150
175 ÷ 235
20 mm
100
180
140 ÷ 205
20 mm
100
200
120 ÷ 190
20 mm
100
230
95 ÷ 160
20 mm
110
175
120 ÷ 190
20 mm
110
200
95 ÷ 160
20 mm
110
225
60 ÷ 130
20 mm
When measurement “C” is greater/smaller than 20 mm, increase/diminish measure
-
ment “B” by the difference (e.g.: if C= 25mm, increase “B” by 5mm), making sure that
it does not exceed the limits shown in the table.
If the pillar dimensions or the hinge position do not allow the installation of the actua-
tor, a niche on the pillar, as shown in pict. 5, should be created in order to maintain
the A dimension as determined. The niche should be dimensioned in such a way to
enable easy installation, actuator rotation and operation of the release device.
GB - Translation of original instructions


