4 – Mixer configuration and settings
8
SOLO TYPE buttons
Tap these buttons to set the solo function type.
Option
Meaning
PFL (default)
Pre-fader signals are used for solo
monitoring.
AFL
Signals after panning (post-fader for the
MAIN L/R Master module) are used for
solo monitoring.
The selected button will be highlighted.
9
DIM LEVEL knob
This adjusts the amount of monitoring signal attenuation
when the DIM function is on.
Range: -40 dB - 0 dB (default: -20 dB)
Turn LCD knob 3 (lit red) to adjust it.
0
DELAY TIME
This adjusts the delay time used to correct the timing of
monitoring signals, for example.
The highlighted unit will be used for operation, so tap the
button for the desired unit.
Unit options
Range
meter
0 - 117.3 (meter)
feet
0 - 384.8 (feet)
msec (default)
0 - 341.32 (msec)
Turn LCD knob 4 (lit green) to adjust it.
q
SOLO LEVEL knob
Use this to adjust the output level from the SOLO L/R bus.
Range: - ∞ dB - +10 dB (default: 0 dB)
Turn LCD knob 7 (lit red) to adjust it.
w
SOLO CLEAR button
o
This button will appear highlighted when soloing is on for
any of the modules.
o
When this button is highlighted, tap it to end soloing on
all channels.
NOTE
This has the same function as the SOLO CLEAR key on the top
panel.
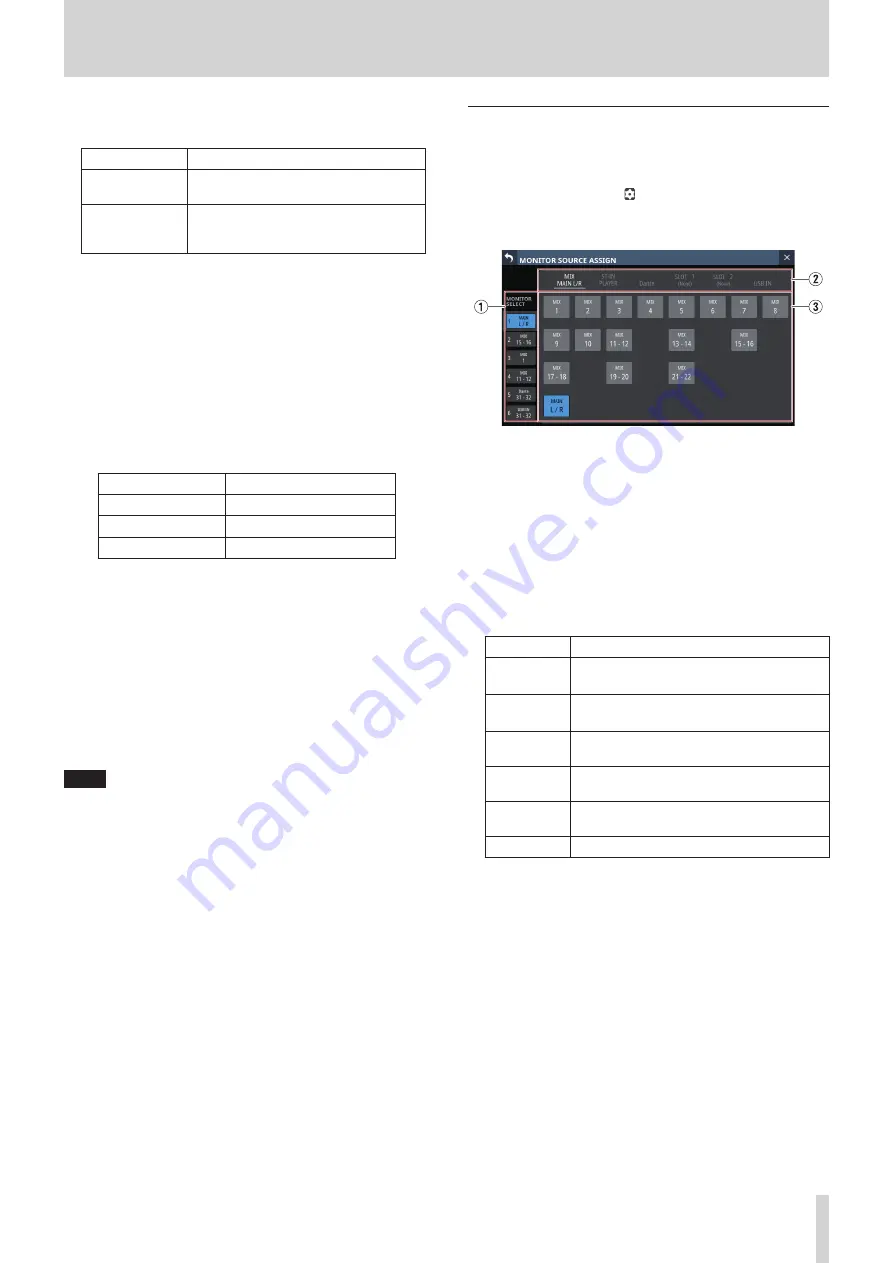
MONITOR SOURCE ASSIGN screen
On this screen, assign monitoring sources for monitoring from
the front panel headphone jacks and the rear panel MONITOR
OUT L/R jacks to the 6 MONITOR SELECT buttons.
To open this screen, tap the icon in the MONITOR SELECT area
on the left side of the MONITOR/SOLO page of the MONITOR
SETUP screen.
1
MONITOR SELECT page switches
Monitoring sources can be assigned on each MONITOR
SELECT page separately.
The names of the assigned monitoring sources are shown on
the MONITOR SELECT page.
Tap this area to switch open MONITOR SELECT pages.
2
Monitoring source group page switches
These show monitor source group page names.
Tap a page name to switch to the page with the
corresponding monitoring sources.
The name of the selected page will be highlighted.
Page name
Contents
MIX
MAIN L/R
Select output signals from MIX 1–22 and
MAIN L/R Master modules.
ST IN
PLAYER
Select input signals from the two pairs of ST
IN jacks and the internal player.
Dante
Select input signals from the Dante
connectors.
SLOT 1
Select the inputs of the expansion card
installed in SLOT 1.
SLOT 2
Select the inputs of the expansion card
installed in SLOT 2.
USB IN
Select USB audio interface inputs.
3
Monitoring source assignment buttons
Tap these buttons to select monitor sources to assign to the
selected MONITOR SELECT button.
Assigned buttons will be highlighted.
TASCAM Sonicview 16/Sonicview 24
51


