background image

3 - Preparation

Connecting microphones

Connect mics to the MIC INPUT 1–4 jacks on the back.
Point the mics at the sound sources and place the unit in a stable loca-
tion where there is little vibration.
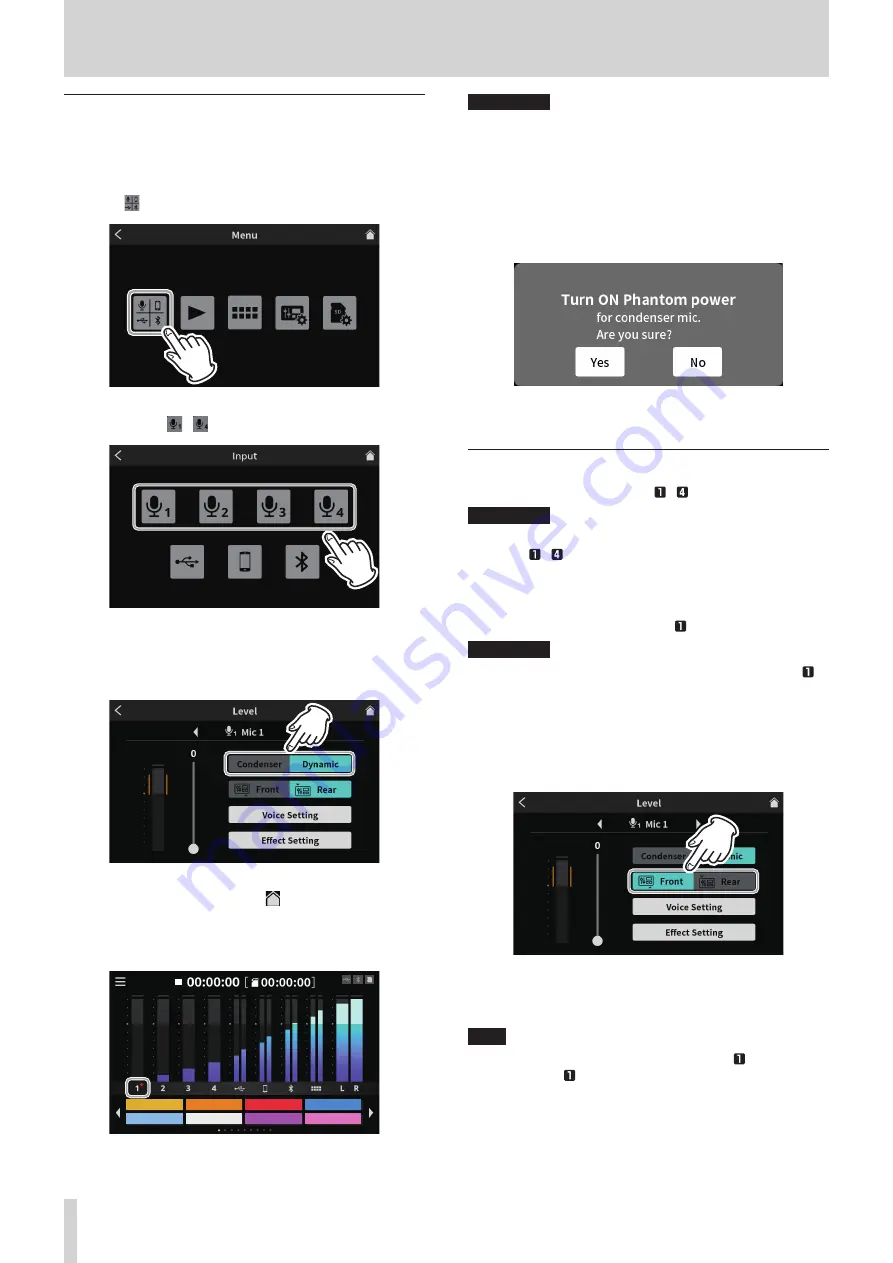
1.  Select the mic type.

Tap the 

 input icon on the Menu Screen to open the Input Screen

Menu Screen

2.  Select and tap a 

 – 

 mic icon.

Input Screen

3.  This will open the Level Screen. Tap the Condenser or Dynamic 

(default) button to set the mic type.
(The following illustration example shows “Mic1”.)

Level Screen (MIC INPUT 1 example)

After selecting the mic type, tap the   home icon at the top right 
to return to the Home Screen.
Red dots will be shown on the Home Screen next to mic channel 
numbers set to “Condenser” in the mic settings.

Applause

Drumbeat

Alarm

AirHorn

Brass

Heartbeat

Bleep

Effect

Home Screen

CAUTION


i

Do not connect mics that are compatible with plug-in power.  
Doing so could cause damage.


i

When “Condenser” is selected as the mic setting for a MIC INPUT jack, 
phantom power (+48V) will be turned on. Doing so could damage 
dynamic mics if they are connected.
Be careful when connecting mics and selecting mic types.


i

If “Condenser” has been selected, the following message will appear 
the next time the unit is turned on.

Tap “Yes” to supply phantom power (+48V) to mic inputs that have 
been set to “Condenser”.
Tap “No” to change the settings of all mic inputs to “Dynamic”.

Connecting headphones

Connect headphones to the PHONES   –   jacks (

a

) on the back.

CAUTION

Before connecting headphones, minimize the volumes with the 
PHONES   –   knobs (

6

). Failure to do so might cause sudden loud 

noises from the headphones, which could harm hearing or result in 
other trouble.

Switching the Mic 1 input (connecting a headset)

Connect a headset to the PHONES (TRRS)   jack (

q

) on the front.

CAUTION

Before connecting a headset, minimize the level of the PHONES   
knob (

6

) on the top.

Failure to do so might cause sudden loud noises from the headset, 
which could harm hearing or result in other trouble.

1.  Using a headset mic

To use the headset mic input as channel 1, set the input to “Front” 
on the Mic 1 Level Screen.

Level Screen (MIC INPUT 1)


o

To use the MIC INPUT 1 jack (

g

) on the back of the unit set the 

input to “Rear” (default) on the Mic 1 Level Screen.

NOTE

Output volume could be reduced if both PHONES   jacks (

a

) and 

PHONES (TRRS)   jack (

q

) are used at the same time.

10

  TASCAM  Mixcast 4

Содержание Mixcast 4

Страница 1: ...D01396920A Podcast Recording Console Reference Manual...

Страница 2: ...ds while recording 18 Adding marks while recording 18 Playing recordings 18 Changing the names of podcasts 19 Deleting podcasts 19 Adding marks during playback 19 Advanced playback functions 20 Overwr...

Страница 3: ...ON Failure to follow these instructions could result in injury Trademarks o o TASCAM is a registered trademark of TEAC Corporation o o SDXC Logo is a trademark of SD 3C LLC o o The Bluetooth word mark...

Страница 4: ...This unit supports the following codecs It will automatically select one of them during audio transfer o o SBC o o AAC The unit will select the appropriate codec to use according to the codec compati...

Страница 5: ...hts blue during playback and recording as well as when recording is paused 8 STOP button Press this to stop playback or recording o o This lights orange during playback and recording as well as when r...

Страница 6: ...st the output levels o o MONITOR OUT L R jacks Connectors 6 3mm 1 4 standard TRS jacks o o LINE OUT jack Connector 3 5mm 1 8 stereo mini jack See Connecting recording devices and monitor speakers on p...

Страница 7: ...g time available for recording on the SD card in hours minutes seconds 5 USB icon The icon appears when connected by USB 6 Bluetooth icon The icon appears when a Bluetooth device is connected The icon...

Страница 8: ...strip or similar device be sure to use one that has high current capacity thick cable in order to minimize fluctuations in power voltage V CAUTION Before turning the power on or connecting audio equip...

Страница 9: ...Adjust in See 4 Other settings on page 36 2 When startup completes the Home Screen will appear on the touchscreen as shown below Applause Drumbeat Alarm AirHorn Brass Heartbeat Bleep E ect Home Screen...

Страница 10: ...when connecting mics and selecting mic types i i If Condenser has been selected the following message will appear the next time the unit is turned on Tap Yes to supply phantom power 48V to mic inputs...

Страница 11: ...on to make voice settings referring to See 3 Smartphone settings on page 33 Input Screen Connecting recording devices and monitor speakers Sound mixed or played back on this unit can be output through...

Страница 12: ...accessing the TEAC Global Site http teac global com Check the page for this product You can also contact TASCAM cus tomer support 1 Open the SD card slot cover on the back and insert the card in the s...

Страница 13: ...the Home Screen to open the Menu Screen Applause Drumbeat Alarm AirHorn Brass Heartbeat Bleep E ect Home Screen 2 Tap the input icon Menu Screen 3 On the Input Screen select and tap the mic icon for...

Страница 14: ...t on Two presets can be selected for the Compressor Select Manual to make adjustments instead of using a preset Tapping one of the Compressor setting icons selects it highlight ing it and turning the...

Страница 15: ...unction to adjust the reverberations and make related settings Effect Setting Screen page 1 Tap the Reverb switch to open the following message Tap OK to turn the switch on and enable the Reverb funct...

Страница 16: ...unction Use the slider and the and buttons to change the voice by setting the pitch 5 This completes mic input settings for MIC INPUT1 6 Next make mic input settings for MIC INPUT2 4 in the same way a...

Страница 17: ...sed icon will appear next to the 0 recording icon Screen when recording is paused 4 To stop recording press the STOP 8 button 7 when recording or paused The following message will appear 5 Tap Yes to...

Страница 18: ...to change it after recording The necessary points can be found quickly when editing recorded con tent in the dedicated software or to overwrite it on the Advanced Screen opened from the PLAY Screen A...

Страница 19: ...input a new name for the podcast RENAME Screen o o Tap Aa on the keyboard to switch between uppercase letters lowercase letters and numbers and symbols o o If wrong characters are input tap Del to de...

Страница 20: ...te starting position to the slider position 4 CLEAR button This clears the mark overwrite starting position shown by the SET button 5 Mark jump controls When playing a podcast that already has marks a...

Страница 21: ...press the STOP 8 button 7 The following message will appear 5 Tap Yes to stop recording and open the confirmation screen Advanced Screen 6 Tap the 7 play icon on the confirmation screen to check the...

Страница 22: ...utton o o To use TASCAM Podcast Editor or other software that supports multiple channels select a 14 channel setting o o Select a 2 channel setting when using OBS Studio or another application that su...

Страница 23: ...highlighted 3 Sound Pad Bank switch icons Tap the icon to switch to the lower numbered bank Tap the icon to switch to the higher numbered bank 4 Pad color setting The color of the selected pad can be...

Страница 24: ...age of the Sound Pad Screen and activate Bank 1 Applause Drumbeat Alarm AirHorn Brass Heartbeat Bleep E ect Sound Pad Screen PAD Settings page NOTE i i Since Bank 0 is preset with the sound sources in...

Страница 25: ...PAD Settings page o o Effect is shown in the audio source file name field o o Tap the garbage icon to clear the assigned effect function Recording sounds and assigning them to Sound Pads Sound Pad aud...

Страница 26: ...the Sound Pad Screen will reopen with PAD Rec activated PAD11 001 Sound Pad Screen ready to record This completes assigning the recorded sound to Pad 1 of Bank 1 12 Next tap PAD Settings to reopen th...

Страница 27: ...en the Input Screen Input Screen 1 Mic settings Tap Mic icon to open the Level Screen This is an example of procedures to adjust MIC INPUT 1 Level Screen Example MIC INPUT 1 jack Mic input level Use t...

Страница 28: ...Tapping the icon again will make the setting icon disappear o o Noise Suppressor The range of noise that is blocked can be adjusted Tap to show the settings icon o o Tapping the icon again will make t...

Страница 29: ...ts the time before compression starts o o Release This sets the time until compression stops o o Gain Use this to adjust the MIC INPUT input level o o De esser manual settings MIC This shows the De es...

Страница 30: ...the MIC INPUT1 input level o o Attack This sets the time before MIC INPUT1 ducking starts o o Release This sets the time until MIC INPUT1 ducking stops o o Attenuate This adjusts the amount of level r...

Страница 31: ...the longer they continue o o Pre Delay This adjusts the amount of time before the reflections and reverb sound start The larger the value the larger the reverberations make the room sound o o Diffusio...

Страница 32: ...his to restore changed settings to default values o o Bypass Tap to bypass Noise Suppressor adjustments Use the slider and the and buttons to adjust the levels of the following setting values o o Low...

Страница 33: ...Voice Setting Screen Playback settings Tap the play icon to open the podcast PLAY Screen PODCAST_001 2021 4 1 TestName_001 2021 4 1 PODCAST_002 2021 4 1 PLAY Screen 1 Playback list This shows the name...

Страница 34: ...ed bank Tap the icon to switch to the higher numbered bank 4 Pad color setting The color of the selected pad can be changed 5 Trash icon Tap this icon to clear the settings and functions assigned to t...

Страница 35: ...ed during recording Hardware Settings Tap the hardware settings icon to access the following settings Hardware Settings Screen 1 AUDIO Tap the AUDIO icon to open the Audio Settings Screen Audio Settin...

Страница 36: ...ian Use Chinese Use Korean 1 Date Time Adjust Tap this to open the Date Time Adjust Screen shown below Date Time Adjust Screen Swipe the year last two digits of Western calendar month date and time up...

Страница 37: ...i i When connection is made this unit will appear as the Mixcast4 drive on the device connected by USB i i It will appear in Explorer on Windows OS and on the desktop in Mac OS i i It will appear ins...

Страница 38: ...sure Write Timeout Writing to the SD card timed out and recording stopped SD card writing performance has become worse Execute the erase format function or change the SD card Write error REC continue...

Страница 39: ...ns of this unit and the other Bluetooth device o o Depending on the settings of the device connected by smartphone the operation of apps other than for music playback could cause the sound to break up...

Страница 40: ...ver on Windows confirm that the driver is the latest version 4 When using Windows disable all devices other than this one for Recording and Playback in the Windows Sound settings Sound Control Panel 5...

Страница 41: ...o o PHONES TRRS output splits from PHONES output LINE OUT TRRS jack CTIA standard Connector 3 5 mm 1 8 4 pole mini jack Maximum output level 25 dBu Nominal output level 45 dBu Output impedance 100 MO...

Страница 42: ...igher Note Operation is not guaranteed using the TASCAM driver with ARM64 CPUs Mac Supported operating systems macOS Big Sur 11 macOS Catalina 10 15 Computer hardware requirements Mac with a USB 2 0 o...

Страница 43: ...TASCAM Mixcast 4 43 11 Specifications and Ratings Dimensional drawings 266 7 mm 263 6 mm 374 8 mm 71 2 mm 56 5 mm...

Страница 44: ...EREO SOLO Sound Pad 1 8 MIX POST OFF PRE POST OFF PRE ON OFF ON OFF Meter INPUT BLOCK PAD FX Bypass Fader Level USB SOLO 48V MIC IN 1 4 ADC EFFECT BLOCK 1 only MIC IN 1 POST OFF PRE ON OFF Meter SD IN...

Страница 45: ...0 8dBu 20 8Bu 0dBFS 20dBFS ADC Smart Phone inputs 20dB Headroom 11dB Input Max 8dBV Typ 12dBV 20 10 0 10 20 dBu 0dBu 20 Bu 1dBu 21Bu 0dBFS 20dBFS 20dB 1dB 1dB Bluetooth inputs Input Max 0dBu Typ 20dB...

Страница 46: ...dB Single Line OUT Unbalanced 20dB 17 8dBu 20dBV 2 2dBu 0dBV Mixcast4 Level Diagram OUTPUT Line output Balanced Output Max 20dBu Typ 0dBu Line output Unbalanced Output Max 6dBV Typ 14dBV Head Phone ou...

Страница 47: ...TASCAM Mixcast 4 47...

Страница 48: ...ps www tascam eu en Phone 44 1923 797205 Luminous House 300 South Row Milton Keynes Buckinghamshire MK9 2FR United Kingdom TEAC EUROPE GmbH https www tascam eu de Phone 49 611 71580 Bahnstrasse 12 652...

Отзывы: