background image

92

  TASCAM DR-40

10 – Tuning a Musical Instrument (Tuner)

TASCAM DR-40 has a built-in tuner. The unit receives a sound 
from a musical instrument and allows you to tune it accurately 
on the tuning meter shown in the display.

Using the tuner

Setting the tuner

1  Press the MENU button to open the 

MENU

 screen. 

2  Use the + or − button to select 

OTHERS

, and press 

the ENTER/MARK or 

/

 button to open the 

OTHERS


submenu. 

3  Use the + or − button to select 

TUNER

, and press the 

ENTER/MARK or 

/

 button. 

TUNER

 screen appears.

The 

TUNER

 screen contains the 

CALIB

 option to set the 

fundamental frequency of the A. Press the 

.

 or 

/


button to decrease or increase the fundamental frequency.
Setting range: 

435Hz

 - 

445Hz

 (in 1 Hz increments, default: 

440Hz

)

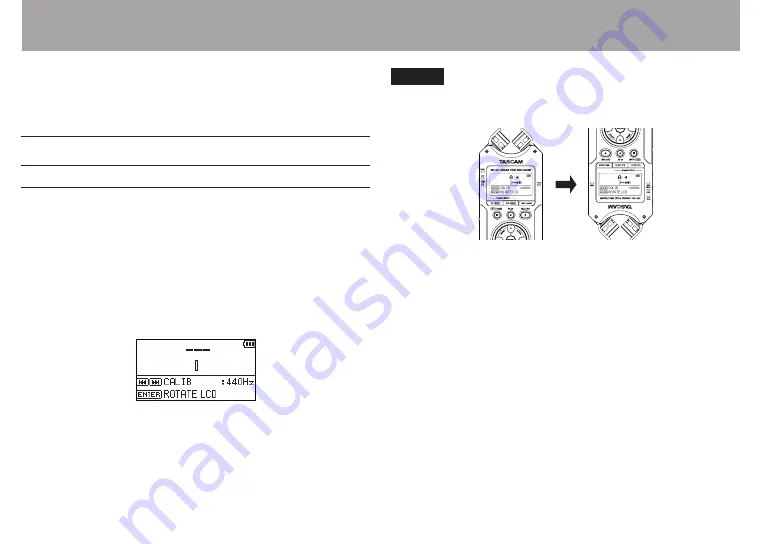
NOTE

When the TUNER screen is open, press the ENTER/MARK 
button to reverse the screen orientation. 

Содержание DR-40

Страница 1: ...D01242120C REFERENCE MANUAL DR 40 Linear PCM Recorder ...

Страница 2: ... 31 Using the built in speaker 31 Connecting monitors and headphones 32 Using the built in microphone 32 Setting the mics to record a wide stereo sound A B position 32 Setting the mics to record a clear stereo sound X Y position 33 Swapping the left right channels of the built in microphone pair 33 Microphone position detection 34 Attaching the tilt foot 34 4 Recording 36 Selecting file format sam...

Страница 3: ...ing 57 Adding marks automatically to a recording 57 Moving to a mark position 57 Setting the low cut filter 58 Recording the moment before pushing RECORD PRE REC 58 Using the AUTO TONE function 59 Setting the AUTO TONE function 60 Setting auto tone length 60 Adjusting the AUTO TONE volume 60 Self timer function 61 Solo function 61 Recording duration 62 5 Working with Files and Folders BROWSE scree...

Страница 4: ... 90 Decoding the playback sound 90 MS decoder settings 91 Using the tuner 92 Setting the tuner 92 Tuning a musical instrument 93 11 Connecting with a computer 94 Transferring files to a computer 95 Transferring files from a computer 95 Disconnecting from a computer 95 12 Settings and Information 96 Viewing File Information 96 File information page 96 Card information page 97 System information pag...

Страница 5: ...sing the wired remote control 104 Overview of mode functions 104 14 Messages 105 15 Troubleshooting 108 16 Specifications 110 Ratings 110 Input output ratings 110 Analog audio input output ratings 110 Control input output ratings 110 Audio performance 111 Other specifications 112 Dimensional drawings 114 ...

Страница 6: ...PCM WAV format recording possible Compatible with BWF format 32 320 kbps MP3 format recording possible compatible with ID3 tag v2 4 Dual recording allows two files to be recorded simultaneously at different levels Overdubbing in mix mode allows the playback signal and the input signal to be mixed and recorded as a new file Overdubbing in separate mode allows the playback signal and the input signa...

Страница 7: ...eral seconds of the currently played file to be replayed again by simply pressing a button Delay compensation function that eliminates time lags caused by differences in the distances of two sets of inputs from the sound source Playlist function DIVIDE function allows files to be split where desired only for WAV files MARK function convenient for moving to specific locations Equalizers function fo...

Страница 8: ...rademarks and copyrights TASCAM is a trademark of TEAC CORPORATION registered in the U S and other countries SDXC Logo is a trademark of SD 3C LLC MPEG Layer 3 audio coding technology licensed from Fraunhofer IIS and Thomson Supply of this product does not convey a license nor imply any right to distribute MPEG Layer 3 compliant content created with this product in revenue generating broadcast sys...

Страница 9: ...ording in overdubbing mode 5 3 4 SOLO button When in 4 channel recording mode press this to open a display pull up that shows meters with the input level settings for 3 4 Press when the 1 2 input level meter pull up is displayed to switch to the 3 4 input level meter pull up Press and hold when recording or playing back in DUAL or 4CH mode to use the solo function which switches the monitored soun...

Страница 10: ...djustment a volume indicator will be displayed in a pull up window When the Playback Control screen is displayed press this button to increase the playback speed When a setting screen is open use the button to change the setting of the selected item 9 MENU button When the Home Screen is displayed press this button to open the MENU Screen Press this button to return to the MENU Screen from the vari...

Страница 11: ...icator Lights when the input volume is too high t REC MODE button Press this button to open the REC MODE screen When the REC MODE screen is open press this button to return to the Home Screen y RECORD 0 button indicator Press this button when stopped to start recording standby The recording indicator will blink when in standby Press this button when in recording standby to start recording The reco...

Страница 12: ...ing the ENTER MARK button to move to the next mark On the BROWSE Screen press this button to move down a level If a file is selected the file is loaded and the unit returns to the Home Screen and stops p ENTER MARK button Use this to confirm the selection of a setting item or to answer YES to a confirmation message When recording use it to add markers manually Press the or button while pressing an...

Страница 13: ...d might damage this unit and connected equipment Set the phantom power switch to ON only when using a condenser microphone that requires phantom power Turning phantom power on when a dynamic mic or other mic that does not require it is connected could damage this unit and connected equipment When using condenser mics that require phantom power and dynamic mics together be sure to use balanced dyna...

Страница 14: ...nction All buttons are inoperative when hold is ON j INPUT LEVEL buttons Use these to adjust the input level During adjustment the input level setting status will be displayed in a pop up window Right side panel k USB port Use the included USB cable to connect with a computer USB port See 11 Connecting with a computer on page 94 Power can be supplied through the USB cable provided with the unit or...

Страница 15: ...rdubbing mode z Mounting thread for tripod or tilt foot 1 4 inch Use this to attach a tripod or the included tilt foot to the recorder CAUTION Tighten the unit securely to the tripod or microphone stand to prevent it from falling off Place the tripod or microphone stand on a level surface when using it with this unit x Battery compartment cover When not using the included tilt foot it can be store...

Страница 16: ...layback area ALL All files in the MUSIC folder FOLDER All files in the selected folder P LIST All files added to the playlist 2 Loop repeat playback status Single playback Single file repeat playback All file repeat playback Loop playback 3 Current playback file number total number of files This shows the current file number and total number of files in the current playback area ...

Страница 17: ...tion status 8 Stopped 9 Paused 7 Playing back Fast forwarding m Fast rewinding Skipping forward Skipping backward 8 Level meter The level of the input or playback sounds is shown During OVER DUB MIX this shows the mixed level of the input and playback signals 9 Track status display The display changes according to the recording mode Playing a file recorded in MONO or STEREO mode Playing a file rec...

Страница 18: ... back or its tag information ID3 tag information is shown when available for an MP3 file being played Two project names are shown when there are two files that have been recorded in 4 channel recording mode dual recording mode or overdub separate mode NOTE ID3 tag information includes the titles and artists names that can be saved in MP3 files y Playback position display The current playback posit...

Страница 19: ... X Y L R Open A B R L 7 Recorder operation status 09 Recording standby or Recording paused 0 Recording 8 Input source This icon shows the input source Input source set to built in mics Input source set to EXT MIC LINE IN jacks Second recording level setting 6 12 when dual recording enabled When in OVERDUB SEPARATE mode this shows that channels 1 2 are a playback file When in OVERDUB MIX mode this ...

Страница 20: ... w Low cut filter status This shows whether the low cut filter is ON OFF The icon appears highlighted when set to 40Hz 80Hz or 120Hz Low cut filter off Low cut filter on e Level control function status Level control off Peak reduction on Automatic level control on Limiter on r Effect status Shows whether the effect function is ON or OFF Effect off Effect on t Peak value in decibels dB Peak input l...

Страница 21: ...d buttons can be used to skip to loop IN starting and OUT ending points and the beginnings and ends of files but not to the previous or next tracks 4 Loop playback IN starting and OUT ending points The set starting and ending points of the loop are shown The icon appears at the playback position on the bar when the starting point is set The icon appears at the playback position on the bar when the...

Страница 22: ...reens and items are shown LOW CUT and AUTO REC setting MODE and LEVEL on the REC SETTING screen AUTO REC settings are shown but cannot be changed EFFECT PRESET LEVEL and SOURCE on EFFECT screen The MENU button is disabled in the Playback Control screen but works to change over between ON and OFF status of the loop playback function See Repeated Playback of Selection Loop Playback on page 76 Using ...

Страница 23: ...n press the HOME 8 button Basic operation Use the following buttons to operate the various screens MENU button Opens the MENU screen PB CONT button This opens the Playback Control screen HOME 8 button When any other screen is open press this to return to the Home Screen Use this to answer NO to a confirmation message ENTER MARK button Use this to confirm the selection of a setting item or to answe...

Страница 24: ...t swapping function A popup menu is turned on or off in the BROWSE screen or PLAYLIST screen Press when the MIXER screen is open to set the MS decoder REC MODE button Opens the REC MODE screen When the REC MODE screen is open returns to the Home Screen MIXER button Opens the MIXER screen When the MIXER screen is open returns to the Home Screen 1 2 SOLO button Opens a meter display that shows the 1...

Страница 25: ...eries on page 98 NOTE Manganese dry cell batteries R6 cannot be used with this unit This unit cannot recharge Ni MH batteries Use a commercially available recharger The included alkaline batteries are for confirming operation of the unit and might not last very long Before putting the bottom battery in put the ribbon inside the compartment first Failure to do so could make removing the batteries d...

Страница 26: ...r is connected power will be supplied from the AC adaptor Using USB bus power Connect the unit to a PC using the attached USB cable as shown in the illustration USB Mini B USB plug Computer The USB SELECT screen appears to choose between USB bus power for power supply or connection with a PC through the USB cable when USB cable is connected after the unit is turned on or when the unit is turned on...

Страница 27: ...HOME 8 button until TASCAM DR 40 start up screen is displayed on the display The Home Screen appears when the unit starts up Start Up Screen Home Screen Selecting a language The first time you turn a new unit on after purchase the following setting must be made A screen appears to set the language shown on the display Press the or button to move the cursor and select highlight with light letters o...

Страница 28: ...ton until LINEAR PCM RECORDER appears on the display The power turns off after the unit completes its shutdown process CAUTION Always use the HOME 8 button to shutdown the unit Do not remove the batteries or disconnect the power cable AC adaptor TASCAM PS P520E or USB cable accidently while the unit is operating If you do so the unit cannot shut down properly and all recordings settings and other ...

Страница 29: ...the ENTER MARK or button The DATE TIME screen is displayed 4 Press the or button to move the cursor highlighted area and use the or button to change values 5 Press the ENTER MARK button to confirm the change and return to the OTHERS screen NOTE You can set the unit to automatically add the date to file names See File name format on page 101 CAUTION The date and time setting can only be maintained ...

Страница 30: ...ork with this unit can be found on our website http tascam com 1 Open the SD slot cover on the right side panel 2 Insert the SD Card into the slot as shown in the following illustration until it clicks into place Removing the card 1 Open the SD slot cover on the right side panel 2 Press the SD card in gently and then release it to allow it to come out CAUTION Do not remove the SD card from the uni...

Страница 31: ...ge appears when a new card or a card formatted for use with another device is installed in the unit 3 Press the ENTER MARK button to start formatting 4 When formatting ends the Home Screen opens You can also reformat the card in this unit at any time See System Settings and Formatting on page 98 Using the built in speaker Enable SPEAKER on the MENU screen to allow the unit to play over the built i...

Страница 32: ...mics to record a wide stereo sound A B position Spread the stereo microphone to the left and right A B position Set this way the two microphones are spread widely left and right and recording is possible with a strong stereo field that is good for music for example If you open or close the microphone pair while using the built in stereo microphone and the left right channels does not suit the angl...

Страница 33: ...the left right channels of the built in microphone pair below Swapping the left right channels of the built in microphone pair Depending on the angles at which the microphones are set the recording channels of the left and right microphones can be swapped When the microphone pair is open the left microphone should be set to the left channel and the right microphone should be set to the right chann...

Страница 34: ...ting as it is NOTE When you change the microphone angle setting and the pop up message appears you must press the ENTER MARK button to change the L R setting press the HOME 8 button to keep this setting as is or restore the previous microphone angle to close the pop up message before you can begin recording The pop up message does not appear if you change the microphone position when recording If ...

Страница 35: ...TASCAM DR 40 35 3 Preparation When not using the tilt foot it can be stored by inserting it between the two protrusions on the inside of the battery compartment cover ...

Страница 36: ... two different levels You can also use external mics with the built in mics for 4 channel recording Selecting file format sampling frequency Select the audio file type that you want to record before you start recording 1 Press the MENU button to open the MENU Screen 2 Use the or button to select REC SETTING and press the ENTER MARK or button REC SETTING screen appears 3 Use the or button to select...

Страница 37: ...TE 96k cannot be selected if FORMAT is set to MP3 8 Press the HOME 8 button to return to the Home Screen Preparing the recording inputs Recording with the built in mics Point the mics at the sound source and place the unit in a stable location where there is little vibration Recording with external mics EXT MIC IN Connect external mics to the EXT MIC LINE IN connectors Point the mics at the sound ...

Страница 38: ... or other level controllable output for connection to the unit Setting the external input type When using an external input source set the EXT IN switch on the left side panel according to the type of equipment connected LINE Use this setting when connecting line output jacks of external devices to the analog inputs of this recorder MIC Use this setting when connecting mics to the recorder MIC PHA...

Страница 39: ...me types of ribbon microphones could break them Do not supply phantom power to a ribbon microphone if you are in doubt When using USB bus power the unit might not be able to supply phantom power depending on the computer In this case use a TASCAM PS P520E AC adaptor sold separately Some condenser microphones will not operate when phantom power is set to 24V Do not connect or disconnect the USB cab...

Страница 40: ...he INPUT LEVEL or button a pull up menu screen appears to indicate the input level setting The PEAK indicator to the right of the display lights red when the input level is too high A b mark is provided at 12 dB on the level meters Set the input level so that the indicator bars move to and fro with this mark at about the center without causing the PEAK indicator to light red when the loudest sound...

Страница 41: ... Use the and buttons to select SOURCE or EXT IN in 4CH MODE and press the ENTER MARK or button 3 Use the and buttons to set the input source to EXT INDEP 4 Press the HOME button to return to the Home Screen 5 Press the RECORD 0 button to enter recording standby 6 Press an INPUT LEVEL button on the left side of the unit to open a pull up with a meter showing the input level setting at the bottom of...

Страница 42: ...el setting to be performed easily The input level can be raised manually if required TIP When recording live performances for example test for peak reduction may be performed before actual recording Select the peak reduction mode in recording standby and maximize the input level As a test performance is given subsequently the input gain for recording is reduced to an appropriate level to meet the ...

Страница 43: ...no recording STEREO mode default This is a mode for stereo recording of two independent left and right channels DUAL mode This mode uses one input source mono or stereo pair to create two files with different input level settings LEVEL CTRL setting screen Either two mono or two stereo recording files are created 4CH mode This mode uses both the built in mics and the external inputs to record two p...

Страница 44: ...NDEP Use two external input channels with independent level setting 7 Press the button to select the other item 8 If REC MODE is set to STEREO you can also set MS mic decoding When using MS mics use the and buttons to select the MS DECODE item and press the ENTER MARK or button Use the and buttons to set MS DECODE to ON 9 Press the HOME 8 button to return to the Home Screen Set where to save the f...

Страница 45: ... keep sufficient distance between the AC adaptor and the unit File names when recording in MONO STEREO TASCAM_0001 WAV 1 Set with the WORD item on the FILE NAME screen 2 Recording file base number Simultaneously recording two files at different input levels DUAL REC This unit can simultaneously make two recordings at different input levels dual recording For example when recording with mics you ca...

Страница 46: ...uttons to set the input source SOURCE Explanation INT MIC ST default value Stereo recording with built in mics INT MIC MONO L R signals of built in mics are mixed and recorded in mono EXT IN 1 Mono recording with external mics or equipment EXT IN 1 2 Stereo recording with external mics or equipment EXT INDEP Use two external input channels with independent level setting 7 Press the button to retur...

Страница 47: ...ortion if the input level becomes too loud suddenly This is useful for live performances and other recordings when extreme volume changes occur 13Press the button to return to setting item selection 14If using MS mics use the and buttons to select MS DECODE and press the ENTER MARK or button Use the and buttons to set MS DECODE to ON default value OFF 15When setting is complete press the HOME 8 bu...

Страница 48: ...ding might not have the expected result If LVL CTRL is set to AUTO LVL or PEAK REDUCTION then the DUAL LVL cannot be changed Recording 3 or 4 channels You can use the built in mics and connect external mics or other equipment to record three or four channels The recordings will be saved as two stereo files channels 1 2 and channels 3 4 If the INT MIC EXT IN L channel and EXT IN R channel are diffe...

Страница 49: ...EXT IN 1 the effect function will be disabled during recording 6 Press the button to return to setting item selection 7 Use the and buttons to select the EXT L DLY item and press the ENTRY MARK or button 8 Use the and buttons to set the DELAY time for the EXT L channel Range 150ms 51m 0ms 0m default 150ms 51m 9 Press the button to highlight the item 10Use the and buttons to select the EXT R DLY it...

Страница 50: ...ted as a set TASCAM_0002S12 WAV TASCAM_0002S34 WAV 1 Set with the WORD item on the FILE NAME screen 2 Recording file base number 3 S is the source file 4 Assigned channels 12 is channels 1 2 and 34 is channels 3 4 Recording playback and input sounds together overdubbing Overdubbing has two modes Using the overdubbing function you can mix input signals with an audio file that is played back and rec...

Страница 51: ...ARK or button 3 Use the and buttons to set it to OVERDUB 4 Press the button to return to setting item selection 5 Use the and buttons to select DUB MODE and press the ENTER MARK or button 6 Use the and buttons to set the overdubbing mode DUB MODE Explanation MIX The playback signals of the files on channels 1 2 and 3 4 and the input signals are mixed and recorded as a new file The playback file wi...

Страница 52: ...Select the file you want to overdub Use the and buttons and the BROWSE screen to select that files that you want to overdub NOTE See 5 Working with Files and Folders BROWSE screen on page 63 for selecting files using the BROWSE screen Start the overdubbing 1 Press the RECORD 0 button to set the unit to record standby MIX recording Separate recording When in MIX mode press the 1 2 SOLO button to mu...

Страница 53: ...name below File C and the new recording file is given the File B file name File C TASCAM_0004V34t1 WAV If you record one more time using the same playback file File A and File B and File C above are saved the file name for File B changes as shown below with the number at 6 increased by one and the new recording file given the File B file name File D TASCAM_0004V34t2 WAV 8 8 MIX mode Playback file ...

Страница 54: ...AUTION If you overdub record in separate mode a file recorded by this unit with dual recording its file name will change and it will no longer be handled as a dual recording file See Playback of files recorded using dual recording on page 78 Recording automatically AUTO REC This function allows the unit to respond to input sound levels and start and pause recording as well as set marks and create ...

Страница 55: ...ds which is set on LEVEL the unit goes into in recording standby When the input signal level becomes higher than the standard level the unit restarts recording on a new file MARK If the input signal level falls below the standard level for more than five seconds which is set on LEVEL the unit adds marks when the input signal level becomes higher than the standard level again 11Press the HOME 8 but...

Страница 56: ... track incrementation by set time Without pausing recording a new file can be created automatically during recording when the time set on the TRACK INC screen is reached Follow these procedures to set the amount of time that triggers track incrementation 1 Press the MENU button to open the MENU screen 2 Use the and buttons to select the REC SETTING item and press the ENTRY MARK or button The REC S...

Страница 57: ...software etc When using the built in mics the sound of pressing the button when adding a mark could be recorded To avoid this use a remote control to add marks Adding marks automatically to a recording This function allows the unit to add marks automatically using AUTO REC On the REC SETTING screen set the AUTO REC section MODE item to MARK See Recording automatically AUTO REC on page 54 Moving to...

Страница 58: ...tor when you are recording with a microphone If you use speakers to monitor the sound output from the speakers may also be recorded causing a poor recording and even feedback NOTE LOW CUT can be set when recording in recording standby TIP Use the built in effects of this unit as necessary on the input source See 8 Using the Effects on page 87 Recording the moment before pushing RECORD PRE REC By u...

Страница 59: ...ecording function is disabled in OVERDUB mode Using the AUTO TONE function The AUTO TONE function can be used to automatically insert a tone signal whenever recording starts and stops Connect the LINE OUT jack on the left side of the unit to the external mic input jack of a video camera or digital camera capable of recording video Then use the AUTO TONE function to allow both units to record the s...

Страница 60: ...N When recording is stopped by the AUTO REC function no tone signal will be recorded when it stops Setting auto tone length You can set the length of the auto tone 1 Press the MENU button to open the MENU screen 2 Use the and buttons to select the REC SETTING menu and press the ENTER MARK or button to open the REC SETTING screen 3 Use the and buttons to select the TONE SECS item and press the ENTE...

Страница 61: ... self timer icon appears in the recorder status screen and time is shown on the right Each time you press the PB CONT button the setting changes as follows OFF default q 5S 5 seconds q 10S 10 seconds q OFF 3 Set the time period and press the RECORD 0 or PLAY 7 button Recording will start after the set time period NOTE This function cannot be used when recording is paused in the middle of recording...

Страница 62: ...kHz 48 kHz 24 50 49 40 99 20 198 40 128 kbps 44 1 kHz 48 kHz 18 38 37 16 74 32 149 04 192 kbps 44 1 kHz 48 kHz 12 25 24 50 49 40 99 20 256 kbps 44 1 kHz 48 kHz 9 19 18 37 37 16 74 32 320 kbps 44 1 kHz 48 kHz 7 27 14 54 29 48 59 36 The recording times shown above are estimates They might differ depending on the SD SDHC SDXC card in use The recording times shown above are not continuous recording ti...

Страница 63: ... a hierarchical structure much like they would appear on a computer On the DR 40 folders can only be used to two levels Use the or button to select files and folders When a folder is selected press the button to show the contents of that folder When a file or folder is selected press the button to exit the currently open folder and go to a higher level in the folder structure When a file or folder...

Страница 64: ...on shows folders that do not contain subfolders Open folder The contents of the folder marked with this icon currently appear on this screen File operations Select the desired audio file on the BROWSE Screen and press the QUICK button to open the pop up window that is shown below Use the or button to select the item you want from the following list and press ENTER MARK button to execute it INFO In...

Страница 65: ..._0004S12 WAV The above is the same as swapping File A and File B as described on page 53 2 A newly recorded file and a virtual file saved based on it can be swapped Example TASCAM_0004S34 WAV q TASCAM_0004V34t1 WAV TASCAM_0004V34t1 WAV q TASCAM_0004S34 WAV The above is the same as swapping File B and File C as described on page 53 In addition since you can choose the virtual file freely when swapp...

Страница 66: ...led and the pop up menu is closed NOTE The pop up menu can also be closed by pressing the QUICK button Folder operations Select the desired folder on the BROWSE Screen and press the QUICK button to open the pop up window that is shown below Use the or button to select the item you want from the following list and press the ENTER MARK button to execute it SELECT Returns to the Home Screen and selec...

Страница 67: ...p up menu can also be closed by pressing the QUICK button Creating a new folder In the file list NEW FOLDER appears at the bottom Select highlight NEW FOLDER and press the ENTER MARK or button A pop up appears to confirm that you want to create a new folder Press the ENTER MARK button to create a new folder or press the HOME 8 button to cancel Note that the unit supports only a two level folder st...

Страница 68: ...ea setting you can select any file on the card that you want Adjusting playback volume The volume of output through the built in speaker or the LINE OUT connector can be adjusted using the or button while the Home Screen is shown A pull up volume indicator appears Setting the playback area AREA Set the playback area for repeat and ordinary playback on the PLAY SETTING screen 1 Press the MENU butto...

Страница 69: ... for the playback area 1 Regardless of the current playback area if you select a folder on the BROWSE Screen the playback area changes to the selected folder 1 Press the MENU button to open the MENU screen 2 Use the or button to select BROWSE and press the ENTER MARK or button BROWSE screen appears A file list of the folder that contains the file selected in the Home Screen is displayed 3 Use the ...

Страница 70: ...tton to open the MENU screen 2 Use the or button to select BROWSE and press the ENTER MARK or button BROWSE screen appears A file list of the folder that contains the file selected in the Home Screen is displayed 3 Use the or button to select a folder level and use the or button to select the folder that contains the file you want to play For an explanation of how to use the BROWSE Screen see Scre...

Страница 71: ...t and press the QUICK button NOTE For details about how to select the file see Screen navigation on page 63 A pop up window appears 4 Use the or button to select ADD LIST 5 Press the ENTER MARK button The file is added to the playlist and the popup window closes 6 Repeat steps 3 4 and 5 as necessary to add more files to the playlist The files are numbered in the order that they are added Editing t...

Страница 72: ... the playlist Press the ENTER MARK button to remove all the files or the HOME 8 button to cancel this operation For this operation it does not matter which file you select in step 5 All the files are removed from the playlist but they are not erased from the SD card DELETE Remove the selected file from the playlist The file is removed from the playlist but it is not erased from the SD card MOVE Se...

Страница 73: ...ted at the beginning of or middle of a file the playback position will skip to the beginning of the next file NOTE Only files in the playback area that is currently set can be selected for playback The track name file number and other file information for the currently playing file appear on the display The 8 icon appears on the display when playback is stopped at the beginning of a file and the 9...

Страница 74: ...ld the or button to rewind or fast forward and search the playback file NOTE Press and hold the or button to accelerate the search speed Repeat playback REPEAT You can repeatedly playback one file or multiple files within a designated area 1 Press the MENU button to open the MENU screen 2 Use the or button to select PLAY SETTING and press the ENTER MARK or button PLAY SETTING screen appears 3 Use ...

Страница 75: ...section of a file repeatedly or change the tempo of music without changing the pitch You can also enhance the perceived overall sound pressure for comfortable listening when the playback is indiscernible These playback control functions serve for effective practice on musical instruments and analysis of musical passages Playback Control Screen Use the Playback Control screen to set the playback co...

Страница 76: ...ints starts During loop playback the indicator also appears Press the PB CONT button to return to the Home Screen while maintaining the I O and loop settings effective Even after returning to the Home Screen the icon continue to be shown along with the and marks shown at the points corresponding to the IN and OUT points on the playback indicator bar NOTE The pop up message of I O Too Short appears...

Страница 77: ...normal speed Press the PB CONT button to return to the Home Screen while maintaining the set playback speed effective The or icon appears if the playback speed is set to a value larger or smaller than 1 0 respectively Using the playback equalizer PLAY EQ You can choose from different sound types to enhance the listenability PLAY EQ playback equalizer Set the playback equalizer in the PLAY SETTING ...

Страница 78: ...ss the ENTER MARK or button 4 Use the or button to set the jump back time The setting options include 1SEC 1 second to 10SEC 10 seconds in increments of 1 second and 20SEC 20 seconds and 30SEC 30 seconds default 3SEC 5 When finished press the HOME 8 button to return to the Home Screen Playback of files recorded using dual recording When dual recording has been used press and hold the 1 2 SOLO butt...

Страница 79: ... this to listen to the recorded file MIX MODE Press the 1 2 SOLO button to mute the input sound Solo function Press and hold the 1 2 SOLO button or 3 4 SOLO button to enable the solo function Use for projects that have been recorded in 4 channel mode and in other cases when multiple files are being played back to monitor only one of the files You can check the solo status with the track status ind...

Страница 80: ...to work with a selected file or folder appears if the BROWSE screen or the PLAYLIST screen is open NOTE The QUICK button is disabled if the MENU screen OTHERS submenu REC SETTING screen or a settings screen is open for various settings Actions of the QUICK button for different screens and states are as follows Screen State Action Home Stop Pause Opens Quick menu for deletion division level alignme...

Страница 81: ...cted file automatically at marks AUTO DIVIDE on page 84 LEVEL ALIGN The perceived overall sound pressure can be increased to enhance listenability See Increasing the perceived overall sound pressure to enhance listenability Level Alignment on page 85 MIX DOWN This function combines four channels with a file each for channels 1 2 and channels 3 4 into one 2 channel L R file When using this you can ...

Страница 82: ...put For details of the level control function see Using the Level Control Function on page 42 NOTE The input level cannot be changed if the level control function is set to AUTO LEVEL Closing the Quick menu screen Press the QUICK button to close the Quick menu screen Deleting the selected file Quick Delete The currently selected file can be deleted without using the BROWSE screen 1 To delete a fil...

Страница 83: ...e file NOTE When the DIVIDE screen is open you can press the PLAY 7 button and set the divide position while playing the file When the DIVIDE screen is open press the PLAY 7 button to pause resume playback and press the or button to move to the beginning or the end of the playback file Adjust the position for file division using the or button Press and hold the or button to move the position conti...

Страница 84: ...d during recording into multiple files 1 Select a file to be divided using the and buttons or the BROWSE screen 2 While the Home Screen is open when stopped press the QUICK button to open the Quick menu 3 Use the and buttons to select AUTO DIVIDE and press the ENTER MARK button The AUTO DIVIDE screen will open NOTE If the file does not have any marks a Can t Divide No Mark pop up message appears 4...

Страница 85: ...ven to a new file is the same as the name of an existing file If you divide a project that has virtual files those files will also be divided simultaneously TIP Add marks during recording at positions where you want to divide a file See Mark function on page 57 Increasing the perceived overall sound pressure to enhance listenability Level Alignment If the playback sound is very small and indiscern...

Страница 86: ...r mono and volume level LVL settings freely on the MIXER screen see 9 Mixer on page 89 1 Use the and buttons or the BROWSE screen to select the file that you want to mix down 2 From the Home Screen when stopped press the QUICK button to open the Quick Menu screen 3 Use the and buttons to select MIXDOWN and press the ENTER MARK button to open the MIXDOWN screen 4 Press the ENTER MARK button to star...

Страница 87: ...etting items on the EFFECT screen Set each item using the or buttons or or buttons EFFECT Use this to turn the effect on or off The default setting is OFF PRESET Select the preset for the effect being used default Hall 1 See the Effects Preset List on page 88 for details about the preset effects LEVEL Use this to change the output level of the preset effect selected in the PRESET item Setting rang...

Страница 88: ...8 button to return to the Home Screen NOTE When the sampling frequency is set to 96 kHz or a WAV file with a sampling frequency of 96 kHz is played the built in effects do not work However you can still set the built in effects Effects Preset List Preset name Effects Hall 1 default value This is a bright reverb modeled after a large hall like space Hall 2 This is a warm reverb modeled after a larg...

Страница 89: ...e item that you want to adjust Each column is a channel and each row is a setting type 3 Press the ENTER MARK button to open the setting name and value in a pop up window at the top right 4 Use the and buttons to change the setting value Item Setting range Operation details SEND 0 100 Adjusts the send level of the selected effect is used on the signal see 8 Using the Effects on page 87 0 min 100 m...

Страница 90: ...S mics to the external input connectors Connect the mid mic to the EXT MIC L connector and the side mic to the EXT MIC R connector Decoding cannot be conducted properly if the mid and side mics are connected in reverse 2 On the REC MODE screen set the REC MODE to STEREO DUAL or 4CH and set the SOURCE to EXT IN 1 2 in 4CH mode this item does not appear 3 Set MS DECODE to ON 4 Start recording to rec...

Страница 91: ...n the MIXER screen When decoding playback MS MONITOR appears on the MIXER screen Item Setting range Operation details WIDE 0 100 Adjusts the width of the sound At 0 mid is 100 As the number increases the amount of side signal increases NOTE If MS DECODE is set to ON on the REC MODE screen it cannot be selected on the MIXER screen Using by Input appears To use the MS decoder during playback set MS ...

Страница 92: ...2 Use the or button to select OTHERS and press the ENTER MARK or button to open the OTHERS submenu 3 Use the or button to select TUNER and press the ENTER MARK or button TUNER screen appears The TUNER screen contains the CALIB option to set the fundamental frequency of the A Press the or button to decrease or increase the fundamental frequency Setting range 435Hz 445Hz in 1 Hz increments default 4...

Страница 93: ...ument so that the target pitch name appears and the center of the tuner lights Bars appear to the left if the pitch is lower than the target or to the right if higher The bars increase as the pitch shifts away from the target NOTE The tuner can only be used with the built in mics 10 Tuning a Musical Instrument Tuner ...

Страница 94: ...SD card slot or by using a card reader CAUTION When connected by USB and set to STORAGE the other functions of the recorder are disabled The unit should be connected directly with the computer instead of via a USB hub When the unit is connected through USB after being turned on or when the unit is turned on after being connecting through USB the USB SELECT screen appears to choose between bus powe...

Страница 95: ... the unit to the MUSIC folder TIP You can manage the MUSIC folder from the computer You can create subfolders in the MUSIC folder up to the second level for use with this unit The DR 40 cannot recognize subfolders and audio files on the third level or below Since you can set the DR 40 to only play the contents of a specific folder you can organize files into genres artists or other categories as y...

Страница 96: ...LE Shows information about the currently loaded file Card information page CARD Shows the use status of the currently inserted SD card System information page SYSTEM Shows the unit s system setting information and firmware version File information page The FILE page shows information about the currently selected file WAV BWF or MP3 Shows the audio file type For WAV or BWF files bit length stereo m...

Страница 97: ...EMAIN SIZE USED SIZE Shows the amount of unused used capacity on the SD card Press the or button to switch between REMAIN SIZE and USED SIZE System information page The SYSTEM page shows information about the DR 40 s system settings and firmware version AUTO PWR SAVE This shows the setting of the automatic power saving function BACKLIGHT Shows the automatic backlight OFF setting BATTERY Shows the ...

Страница 98: ...WR SAVE item to set the time before the unit power automatically turns OFF after the last activity or use when powered by the battery Options OFF factory setting the unit does not automatically turn OFF 3min 5min 10min 30min Setting the backlight Use BACKLIGHT to set the time until the backlight automatically turns OFF after the last operation when powered by the internal battery Options OFF turne...

Страница 99: ...ench ESP use Spanish DEU use German ITA use Italian RUS use Russian 中文 use Chinese 2 Press the ENTER MARK button to open a pop up confirmation window 3 Press the ENTER MARK button to confirm the language selection To cancel language selection press the HOME 8 button Restoring the factory settings Use the INITIALIZE item to restore the various settings of this unit to their factory settings 1 Use t...

Страница 100: ...me than quick formatting Using ERASE FORMAT erases all music files on the card and automatically creates new MUSIC and UTILITY folders as well as the dr 1 sys file that is necessary to use the SD card with the DR 40 1 Use the or button to select ERASE FORMAT and press the ENTER MARK or button to highlight Exec 2 Press the ENTER MARK button to open a pop up confirmation window 3 Press the ENTER MAR...

Страница 101: ...em can be set to either WORD default setting or DATE WORD When set to WORD a 6 character file name is used as the beginning of each file name Example TASCAM_0001S12 wav DATE The date is used as the file name in yymmdd format Example 110101_0000 wav NOTE The date is set using the unit s internal clock See Setting the date and time on page 29 Setting the WORD item To set the WORD item use the and bu...

Страница 102: ...U screen 2 Use the or button to select OTHERS and press the ENTER MARK or button to open the OTHERS submenu 3 Use the or button to select highlight REMOTE menu item and press the ENTER MARK or button to open the REMOTE screen 4 Use the or button to select highlight CONTROLLER menu item and press the ENTER MARK or button 5 Use the or button to change the CONTROLLER item to RC 3F Default RC 3F 6 Use...

Страница 103: ...ARK MINUTES 7 9 VSA Remote control TASCAM RC 10 Wired remote control TASCAM RC 10 sold separately Setting the wired remote control Make wired remote control settings on the REMOTE screen 1 Press the MENU button to open the MENU screen 2 Use the and buttons to select the OTHERS menu and press the ENTER MARK or button to open the OTHERS submenu 3 Use the and buttons to select REMOTE and press the EN...

Страница 104: ...n setting is complete press the HOME button to return to the Home Screen Using the wired remote control Press the function buttons F1 and F2 on the wired remote control to use the function assigned on the REMOTE screen Overview of mode functions MODES Function buttons F1 F2 F3 F4 1 2 SOLO 3 4 SOLO INPUT VOL INPUT VOL ...

Страница 105: ...n use Battery Empty The battery is almost out of power Replace the AA batteries I O Too Short The IN and OUT points are too close together Reset the IN and OUT points with at least 1 second between them File Not Found PLAYLIST The file in the Playlist cannot be found Please confirm that the file is still in the Music Folder No PLAYLIST No files have been added to the Playlist Add a file to the Pla...

Страница 106: ...he file is larger than the designated size or the recording time has exceeded 24 hours when the total number of folders and files was already at the limit 5000 File Full The total number of folders and files exceeds 5000 Erase unnecessary files or move them to your computer Card Error The card could not be handled properly Replace the card Current File MP3 MP3 files cannot be divided File Protecte...

Страница 107: ...ecording is enabled the Self Timer does not function Set AUTO REC OFF on the REC SETTING screen Not Continued If any of these errors occurs turn the unit s power off and restart it If the power cannot be turned off remove the batteries disconnect the AC adaptor TASCAM PS P520E and or disconnect the USB cable for bus power supply If the error message continues to appear frequently please contact a ...

Страница 108: ...the European Standby Power Regulations ErP the automatic power saving function operates regardless of whether the unit is being powered by an AC adapter or batteries If you do not want to use the automatic power saving function set it to OFF The factory default setting is 30min 8 8 The unit does not function Confirm that the HOLD switch is not set in the direction of the arrow Is the unit connecte...

Страница 109: ... speed is not being adjusted Confirm the setting of the playback equalizer Confirm that the level alignment function is not enabled Do the built in effects work 8 8 I cannot erase a file Confirm that you are not trying to erase a file that has been copied from a computer after being write protected 8 8 This unit s files do not appear on the computer Confirm that the unit is connected to the comput...

Страница 110: ...ard jack Tip HOT Ring COLD Sleeve GND When EXT IN switch set to MIC MIC PHANTOM Input impedance 2 2 kΩ Nominal input level 19 dBV Maximum input level 3 dBV When EXT IN switch set to LINE Input impedance 10 kΩ or more Nominal input level 4 dBu Maximum input level 20 dBu LINE OUT jack Connector 1 8 3 5 mm stereo mini Output impedance 12Ω Nominal output level 14 dBV 10 kΩ load Maximum output level 2 ...

Страница 111: ...0 22 kHz 1 3 dB EXT IN to LINE OUT Fs 48 kHz JEITA 20 40 kHz 1 3 dB EXT IN to LINE OUT Fs 96 kHz JEITA Total harmonic distortion 0 05 or lower EXT IN to LINE OUT Fs 44 1 48 96 kHz JEITA S N ratio 92 dB or higher EXT IN to LINE OUT Fs 44 1 48 96kHz JEITA Note JEITA Conforming to JEITA CP 2150 16 Specifications ...

Страница 112: ...ine Format Continuous operation time Note Recording 4 ch WAV 44 1 kHz 16 bit About 9 hours Built in stereo microphone line Recording 4 ch MP3 44 1 kHz 128 kbps About 9 5 hours Built in stereo microphone line Playback 2 ch WAV 96 kHz 24 bit About 16 hours Headphones Playback 2 ch WAV 44 1 kHz 16 bit About 21 5 hours Headphones Playback 2 ch MP3 44 1 kHz 128 kbps About 17 5 hours Headphones Playback...

Страница 113: ...ck 2 ch MP3 44 1 kHz 128 kbps About 14 5 hours Headphones Playback 4 ch WAV 96 kH 24 bit About 13 hours Headphones Playback 4 ch WAV 44 1 kHz 16 bit About 15 hours Headphones Playback 4ch MP3 44 1 kHz 128 kbps About 15 hours Headphones NOTE The battery operation times during continuous operation could vary depending on the media being used Dimensions W x H x D 70 x 155 x 35 mm 2 756 x 6 102 x 1 37...

Страница 114: ...wings 70 mm 35 mm 2 mm 155 mm 4 mm 90 mm Dimension of the microphone opened Illustrations and other depictions may differ in part from the actual product Specifications and external appearance may be changed without notification to improve the product ...

Страница 115: ...0 Río Churubusco 364 Colonia Del Carmen Delegación Coyoacán CP 04100 México DF México TEAC UK Ltd http tascam eu Phone 44 8451 302511 2 Huxley Road Surrey Research Park Guildford GU2 7RE United Kingdom TEAC EUROPE GmbH http tascam eu Phone 49 611 71580 Bahnstrasse 12 65205 Wiesbaden Erbenheim Germany TEAC SALES TRADING SHENZHEN CO LTD http tascam cn Phone 86 755 88311561 2 Room 817 Block A Hailrun...

Отзывы: