background image

44


TASCAM  DR-05X

7 – Quick Operations

Overwrite recording

A recorded file can be overwritten from a desired position.

Selecting a file to overwrite record

On the BROWSE screen, select the file to overwrite record.

NOTE

File skipping cannot be used to select files in overwrite 

recording mode.

Activating overwrite recording mode

1. 

While the Home Screen is open when stopped, press the 

QUICK button to open the Quick menu.

2. 

Use the + or – button to select the 

OVERWRITE

 menu 

item, and press the 

7

 button.

This will activate overwrite recording mode.

3. 

Use the 

.

/

 and 

7

 buttons to stop at the 

position where you want to start overwrite recording.
At this time, using the 

.

 or 

/

 button will jump. (See 

"Using the jump function" on page 40)

Conducting overwrite recording

1. 

Press the RECORD [

0

] button.

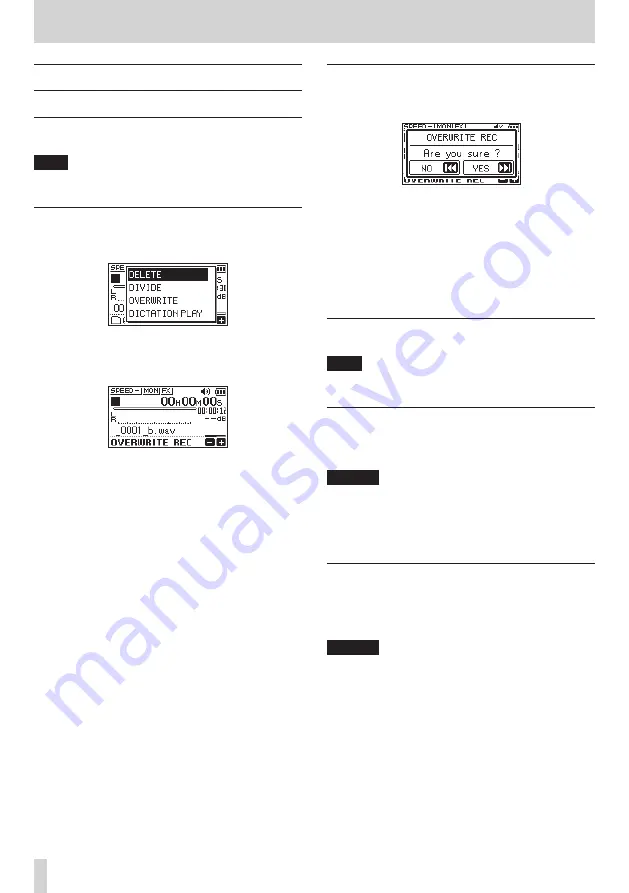
The following pop-up window appears.

Press the 

/

 button to close the pop-up window and 

start recording standby.

2. 

Press the RECORD [

0

] button again to start overwrite 

recording.

3. 

Press the 

¤

 (HOME) [

8

] button to stop overwrite 

recording.
After stopping recording, the unit will return to the 

overwrite recording starting point and stop.

Checking the result of recording

Play the recorded file to check it.

NOTE

To return to the starting point of overwrite recording, you 

can select 

TO EDIT POINT

 from the Quick menu.

Undoing and redoing

In overwrite recording mode, you can undo an overwrite 

recording once to return to the immediately previous state. 

You can also restore (REDO) an undone change.

CAUTION


i

Overwrite recording does not change the file name.


i

Overwrite recording can be done as many times as you 

like, but only the file before the most recent overwritten 

recording will be retained. Overwriting again will delete 

the earlier file.

Ending overwrite recording mode

When the Home Screen is open and the unit is stopped, 

use the Quick menu to select 

MODE EXIT

, and press the 

7


button.
This ends overwrite recording mode.

CAUTION

Ending overwrite recording mode will delete any file 

available for UNDO (REDO) operations.

Содержание DR-05X

Страница 1: ...D01353820B REFERENCE MANUAL DR 05X Linear PCM Recorder...

Страница 2: ...onducting overdubbing 27 Recording automatically AUTO REC 27 Continuing to record in a new file track incrementing 28 Manual track incrementation during recording 28 Automatic track incrementation by...

Страница 3: ...Disconnecting the unit from a computer 50 Transferring files from a computer 50 Using as a USB audio interface 50 Setting the connected device type 51 Connecting 51 12 Settings and Information 52 Vie...

Страница 4: ...e desired only for WAV files i i MARK function convenient for moving to specific locations i i Playback equalizer function and level alignment function to enhance the perceived overall sound pressure...

Страница 5: ...be used for any purpose other than personal enjoyment and the like without the permission of the right holders recognized by copyright law Always use this equipment properly TEAC Corporation will bear...

Страница 6: ...he end of the track press this button to skip to those points Press when a track is stopped at its beginning to skip to the beginning of the previous track Press and hold to search backwards Press thi...

Страница 7: ...button to move down a level If a file is selected the file is loaded the Home Screen reopens and the unit stops Press this button during recording or recording standby to increase the input level fro...

Страница 8: ...slot Use this slot to insert and remove microSD cards Bottom sMono speaker Use this built in speaker to listen to recordings Sound is not output during recording when the unit is in recording standby...

Страница 9: ...9 Paused 7 Playing back Searching forward m Searching backward Skipping to the beginning of the next file Skipping to the beginning of the current or previous file 7Playback position display The curre...

Страница 10: ...order operation status Icon Explanation 09 Recording paused recording standby Recording 6Recording level meters These show the input signal levels When overdubbing the levels of the mixed input and pl...

Страница 11: ...nu item Function Page REC SETTING FORMAT Set the recording format see page 20 SAMPLE Set the sampling frequency CHANNEL Set stereo or mono file SIZE Set the maximum file size MIC POWER Set plug in pow...

Страница 12: ...ge 53 BATTERY TYPE Set the type of batteries see page 53 LANGUAGE Set the language shown on the display see page 53 INITIALIZE Restore the default settings see page 54 QUICK FORMAT Format an SD card s...

Страница 13: ...eturn to the Home Screen press the HOME 8 button Basic operation Use the following buttons to operate the various screens MENU button This opens the MENU screen PB CONT button This opens the Playback...

Страница 14: ...Ni MH batteries Use a commer cially available recharger i i The included alkaline batteries are for confirming operation of the unit and might not last very long Using an AC adapter sold separately As...

Страница 15: ...ge this setting with the SYSTEM screen LANGUAGE item See Set the language on page 53 2 A screen for setting the built in clock will open Press the or button to move the cursor highlighted area and use...

Страница 16: ...IME screen opens 4 Press the or button to move the cursor highlighted area and use the or button to change values 5 Press the 7 button to confirm the change and return to the OTHERS screen NOTE You ca...

Страница 17: ...D cards that have been confirmed for use with this unit can be found on the TEAC Global Site http teac global com Preparing microSD cards for use In order to use a microSD card in this unit you must f...

Страница 18: ...m and press the ENTER MARK button 4 Use the or button to select ON 5 After completing the setting press the HOME 8 button to return to the Home Screen Operation from the Quick menu 1 During playback w...

Страница 19: ...TASCAM DR 05X 19 3 Preparation...

Страница 20: ...mes than WAV i i MP3 formats with higher values provide better recording quality 4 Press the button to enable selection of settings 5 Use the or button to select highlight SAMPLE and press the 7 or bu...

Страница 21: ...plug in power set this to ON Default OFF LOW CUT Set the cutoff frequency of the low cut filter during input Options OFF default 40Hz 80Hz 120Hz 220Hz CAUTION i i Set MIC POWER to OFF when using the b...

Страница 22: ...rting recording the input level should be adjusted to prevent the recorded sounds from being distorted due to excessively loud input signals or from being inaudible due to excessively small input sign...

Страница 23: ...ess the or button to show a pull up MENU screen for input level setting If the input is too high the PEAK indicator on the upper left above the display lights A 5 mark is provided at 12dB on the level...

Страница 24: ...e input suddenly This mode is also suited for recording live performances with large volume changes In this mode the input level can be changed manually during recording CAUTION Distortion of sounds m...

Страница 25: ...nit Recording playback and input sounds together overdubbing By overdubbing you can play an instrument or sing as you play back a saved track and mix and record both sounds in a new file NOTE i i You...

Страница 26: ...adjust the playback volume level This can be set from 0 20 9 After completing the setting press the HOME 8 button to return to the Home Screen NOTE You cannot change the MONITOR MIX screen INPUT ON OF...

Страница 27: ...ut signal level 1 Press the MENU button to open the MENU screen 2 Use the or button to select highlight the REC SETTING menu item and press the 7 button The REC SETTING screen opens 3 Use the or butto...

Страница 28: ...new file and continue recording 1 Press the QUICK button while recording NOTE Numbers at the end of file name will increment each time when a new file is created CAUTION i i A new file cannot be crea...

Страница 29: ...ecord standby mode is turned ON recording will begin from the moment of record standby i i The pre recording function cannot be used during overdub or overwrite recording Self timer Similar to a camer...

Страница 30: ...return to the Home Screen CAUTION i i When recording is stopped by the AUTO REC function no tone signal will be recorded when it stops i i During overwrite recording the automatic tone function cannot...

Страница 31: ...16 72 32 149 04 298 08 96 kbps 44 1 kHz 48 kHz 24 50 49 40 99 20 198 40 128 kbps 44 1 kHz 48 kHz 18 38 37 16 74 32 149 04 192 kbps 44 1 kHz 48 kHz 12 25 24 50 49 40 99 20 256 kbps 44 1 kHz 48 kHz 9 1...

Страница 32: ...ture i i When a file or folder is selected press the QUICK button to open the pop up window i i When a file is selected press the 7 button to return to the Home Screen and play the file This folder th...

Страница 33: ...onfirm that you want to delete all the files in the selected folder at once To delete the file press the button To cancel deletion press the button FOLDER DELETE A pop up message appears to confirm im...

Страница 34: ...en A pull up volume indicator appears Setting the playback area AREA Set the playback area for repeat and ordinary playback on the PLAY SETTING screen 1 Press the MENU button to open the MENU screen 2...

Страница 35: ...area This folder becomes the current folder and new recorded files will be saved in this folder Selecting a folder for the playback area 2 When the playback area is set to FOLDER if you select a file...

Страница 36: ...button to open the MENU screen 2 Use the or button to select BROWSE and press the 7 button The BROWSE screen will open 3 Use the button to move to the top folder level 4 Use the or button to select PL...

Страница 37: ...t playback from that position Stopping When the Home Screen is open and a file is playing back press the HOME 8 button to pause playback Press the HOME 8 button again to return to the beginning of the...

Страница 38: ...B CONT button to open the Playback Control screen 18 2 Press the 7 button to start playback and press the MARK button at the start point of the section that you want to play repeatedly This position i...

Страница 39: ...lization settings to enhance listenability PLAY EQ Use the PLAY EQ item on the I O SETTING screen or the Quick menu to set the playback equalization Operation from the MENU screen 1 Press the MENU but...

Страница 40: ...ed Using the jump function During playback you can jump backward or forward from the current playback position by a set amount of time The same playback status will be retained after jumping The jump...

Страница 41: ...and press the 7 button The JUMP BACK time setting screen will open 4 Use the or button to select highlight a setting and press the 7 button to enable it and return to the Home Screen Setting the jump...

Страница 42: ...ure to enhance listenability see page 40 JUMP BACK Set the jump back time see page 41 JUMP FWD Set the jump forward time see page 41 MODE EXIT Exit DICTATION PLAY mode see page 45 Playback Control scr...

Страница 43: ...RECORD 0 button The following pop up window appears 5 Press the button to divide the file If you press the button the file will not be divided and the DIVIDE screen will reopen NOTE i i When the DIVID...

Страница 44: ...e RECORD 0 button again to start overwrite recording 3 Press the HOME 8 button to stop overwrite recording After stopping recording the unit will return to the overwrite recording starting point and s...

Страница 45: ...n Using the Quick menu you can make the audio easier to hear VOICE EQ This makes the vocal frequency range easier to hear LEVEL ALIGN The overall sound pressure is increased to enhance listenability C...

Страница 46: ...le are available when playing back the file using BWF compatible software for example Adding marks automatically to a recording This function allows the unit to add marks automatically using AUTO REC...

Страница 47: ...the output level of the preset effect selected in the PRESET item Setting range 0 20 Default 10 SOURCE Use this to set whether the effect is applied to the input signal INPUT or the output signal MONI...

Страница 48: ...Hz NOTE When the TUNER screen is open press the 7 button to reverse the screen orientation Tuning a musical instrument 1 Open the TUNER screen and sound a note near the unit The closest pitch name wil...

Страница 49: ...be powered from its USB port USB bus power is used first NOTE The same thing will also happen when using an AC adapter Using as an SD card reader By connecting this unit with a computer using a USB ca...

Страница 50: ...rd level or below i i Since you can set the DR 05X to only play the contents of a specific folder you can organize files into genres artists or other categories as you like i i If you name the subfold...

Страница 51: ...perate on batteries i i Lightning to USB Camera Adapter for example is necessary to connect to an iOS device Connecting 1 When the AUDIO I F screen is open use the or button to select highlight the CO...

Страница 52: ...d file WAV MP3 This hows the audio file format For WAV files bit length stereo mono and sampling frequency Hz also appear For MP3 files the bit rate kbps CBR constant bit rate or VBR variable bit rate...

Страница 53: ...off 5sec default 10sec 15sec 30sec ALWAYS always on Adjusting the display contrast Use CONTRAST to adjust the display contrast Options 1 20 default 5 Setting the battery type Use the BATTERY TYPE ite...

Страница 54: ...SD cards Use the FULL FORMAT item to completely format a microSD card Full formatting checks the memory for errors while formatting so it takes more time than quick formatting Full formatting a micro...

Страница 55: ...tons On this screen you can make the following settings for each item File name format The TYPE item can be set to either WORD or DATE Options WORD DATE default WORD The six characters set in WORD wil...

Страница 56: ...n while this message is being shown to FAT format the card CAUTION Execution of FAT formatting erases all data currently on the card Format Error Format Card Are you sure The FAT formatting of the car...

Страница 57: ...uted Cannot overdub See REC setting You cannot make an mp3 file when overdubbing a WAV file with a sampling frequency of 96kHz Change the recording format to WAV Not Continued If any of these errors o...

Страница 58: ...MONITOR MIX is on Recording is not possible i i Confirm that the REC indicator is lit If the REC indicator is blinking the unit is in recording standby i i Check the remaining available recording tim...

Страница 59: ...load Maximum output level 2 dBV with 10 k load Maximum output 20 mW 20mW 32 load Built in speaker 0 3 W mono Control input output ratings USB port Connector type Micro B Format USB 2 0 HIGH SPEED mass...

Страница 60: ...ing built in speaker Recording JEITA recording time Playback JEITA music playback time i i Using NiMH batteries eneloop Recording playback File format recording setting Operation time Note Recording W...

Страница 61: ...cluding batteries 165 g 5 82 oz including batteries Operating temperature 0 C 40 C 32 F 104 F Dimensional drawings 61mm 26mm 141mm i i Illustrations in this manual might differ in part from the actual...

Страница 62: ...rings California 90670 U S A TEAC UK Ltd Phone 44 1923 797205 https tascam eu Meridien House 69 71 Clarendon Road Watford Herts WD17 1DS United Kingdom TEAC EUROPE GmbH Phone 49 611 71580 https tascam...

Отзывы: