background image

20 

TASCAM  CD-400U

3 – Preparation

Preparing the remote control

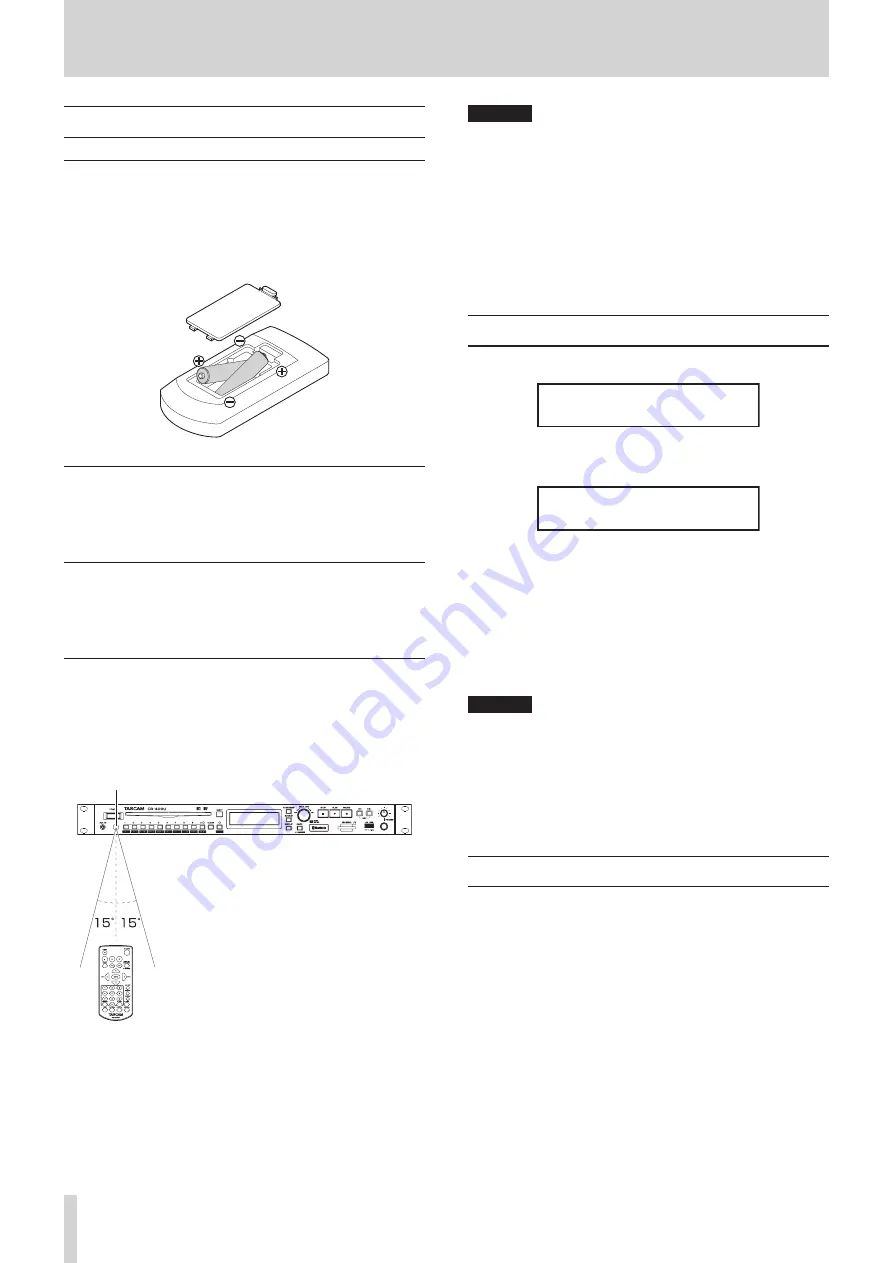
Installing batteries

1. 

Open the cover on the back.

2. 

Insert two AAA batteries, being certain to use the correct 

¥

 and 

^

 orientations.

3. 

Close the cover.

When to replace batteries

Replace both batteries with new ones if the distance from the 
main unit that the remote can be used decreases or if the unit 
stops responding to the remote buttons.

Battery precautions

Misuse of batteries could cause them to leak or rupture, for ex-
ample. Carefully read and follow the battery caution labels. (see 
“CAUTIONS ABOUT BATTERIES” on page 3)

Using the wireless remote control

See Wireless remote control (TASCAM RC-CD400)page 16 for 
the button functions.
When using the remote control, point it toward the receiver on 
the unit and use it within the range shown below.

Remote control signal receiver

Remote control operation range

From any angle within 15° of front:  5 m

CAUTION


i

The range will vary according to the angle.


i

Operation might not be possible if there are obstacles.


i

Remove the battery if not using the remote control for a long 
time (a month or more).


i

It battery fluid should leak, wipe away any fluid inside the 
case thoroughly and install a new battery.


i

When using other devices that can be controlled by infrared 
rays, operation of this remote control could cause those de-
vices to function improperly.

Turning the unit on and off

Press the POWER switch on the front of the unit.

     TASCAM
     CD-400U

Startup screen

CD
    No Disc

Home Screen

After the unit starts and the startup screen is shown, the Home 
Screen will open.

Turning the unit off
No special operations are necessary.
Press the POWER switch to turn the unit off.

CAUTION

Do not turn the power off or disconnect the power cord 
when the unit is operating (including playing back or writing 
data to an SD card or USB flash drive). Doing so could cause 
proper dubbing (copying) to fail, dubbed (copied) data to be 
lost, and sudden loud noises from monitoring equipment, 
which might damage the equipment, harm hearing or cause 
other trouble.

Adjusting the display brightness

Turn the MULTI JOG dial when the unit is in shift mode (SHIFT 
indicator lit), or press the remote control DIMMER button to ad-
just the display brightness.

Main unit operation:
 dim 

sw

 somewhat dim 

sw

 normal

Remote-control operation:
 normal 

w

 somewhat dim 

w

 dim 

w

 normal, etc.

Содержание CD-400U

Страница 1: ...OPCD400UTEA02 CD 400U CD MEMORY PLAYER OWNER S MANUAL...

Страница 2: ...se caution when moving the cart apparatus combination to avoid injury from tip over 13 Unplug this apparatus during lightning storms or when unused for long periods of time 14 Refer all servicing to q...

Страница 3: ...ide by the following precautions when using batteries Never recharge non rechargeable batteries The batteries could rupture or leak causing fire or injury When installing batteries pay attention to th...

Страница 4: ...e chemical symbols for those elements will be indicated beneath the WEEE symbol e Return and collection systems are available to end users For more detailed information about the disposal of old elect...

Страница 5: ...erference to radio com munications However there is no guarantee that inter ference will not occur in a particular installation If this equipment does cause harmful interference to radio or television...

Страница 6: ...onforme la norme NMB 003 du Canada Marquage d autorisation CAN ICES 3 B NMB 3 B Exigences relatives l exposition aux rayonnements Le dispositif rencontre l exemption des limites courantes d valuation...

Страница 7: ...ting the playback area 24 Basic playback operations 24 Playing tracks 24 Selecting tracks for playback 24 Skipping to earlier and later tracks 24 Selecting tracks directly 25 Folder playback SD cards...

Страница 8: ...ables audio monitoring 0 01U rackmount size Items included with this product This product includes the following items Take care when opening the package to avoid damaging the items Keep the packing m...

Страница 9: ...s With the exception of personal enjoyment and similar uses copyrighted materials belonging to third parties cannot be used without permission from the rights holders in accordance with copyright law...

Страница 10: ...ar pro motional etc discs 0 0Copy Control CDs have been sold by several record compa nies in an attempt to protect their copyrights Since some of these discs do not comply with the CD specifications t...

Страница 11: ...to the codec compatibility of the other Bluetooth device and com munication conditions NOTE i i You cannot select the codec to be used by pressing a button for example i i Due to characteristics of Bl...

Страница 12: ...ta tions on page 32 i i When the current source is AM FM and preset mode is en abled turn the MULTI JOG dial to move to the previous or next preset number see Setting radio station presets on page 32...

Страница 13: ...ge 25 i i When the current source is AM or FM press to tune in a pre set station i i When in SHIFT mode SHIFT indicator lit press to turn the power on play function on off see Using the power on play...

Страница 14: ...ss to close a warning message that has appeared on the Home Screen i i When the current source is AM or FM press and hold to clear all preset stations for that source see Clearing preset as signments...

Страница 15: ...is a 9 pin D sub RS 422 control input output connector Connect a computer for example here see Using the RS 232C connector on page 38 b Option slot This slot is for installation of an Ethernet card so...

Страница 16: ...on page 32 9 DUB button Press when stopped to start dubbing copying preparation see Dubbing procedures on page 36 0 FM MODE button When the current source is FM press to switch between ste reo and mo...

Страница 17: ...tion on page 28 Home Screen CD PLAY 01 00 10 Home Screen when CD USB SD selected BLUETOOTH Connected Home Screen when Bluetooth selected FM STEREO P01 80 00MHz Home Screen when AM FM selected 1 Curren...

Страница 18: ...follows Selecting items moving vertically on a page Turn the MULTI JOG dial on the main unit Use the l buttons on the remote control Confirming a selected item Press the MULTI JOG dial on the main un...

Страница 19: ...he same line When using a power strip or similar de vice be sure to use one that has high current capacity thick cable in order to minimize fluctuations in power voltage AC IN 100 240V 50 60Hz 20W AC...

Страница 20: ...ol for a long time a month or more i i It battery fluid should leak wipe away any fluid inside the case thoroughly and install a new battery i i When using other devices that can be controlled by infr...

Страница 21: ...he EJECT button for at least 10 seconds to force the disc to eject This will eject discs even when No Disc ap pears on the Home Screen Inserting and removing SD cards Inserting SD cards Insert an SD c...

Страница 22: ...n the unit is turned off Panel lock functions When the unit is in shift mode SHIFT indicator lit press the 1 LOCK button to turn the front panel lock function on off This disables front panel button o...

Страница 23: ...ot play files that have the mp3 extension if they are not in the MP3 data format i i WAV files are recognized by the wav extension Always add the wav extension to file names This unit cannot play file...

Страница 24: ...te control 9 but ton Selecting tracks for playback This is an explanation of how to select tracks if there are multiple tracks when the current source is CD and an audio CD is loaded as well as when t...

Страница 25: ...ack number exceeds 1000 will be shown i i In random mode the number buttons cannot be used to set tracks Folder playback SD cards and USB flash drives only When the current source is USB or SD and the...

Страница 26: ...r remote control ENTER button to make S disappear and return to ordinary folder mode Playback modes This unit has three playback modes The current playback mode is shown on the Home Screen Continuous...

Страница 27: ...ing backward forward by pressing the m button press and hold the other m button for the opposite direction to search at high speed Audio CDs only Using the repeat playback function All tracks in the p...

Страница 28: ...ntrol 8 button to stop the unit and clear the set A B repeat interval Chang ing the track or the current source will also clear the repeat interval i i The A B repeat playback interval cannot include...

Страница 29: ...n off setting is retained even when the unit is turned off Using the incremental playback func tion When the incremental playback function is on press the main unit PLAY button or remote control 7 but...

Страница 30: ...SB flash drives When playing back paused or stopped you can cycle through what is displayed track elapsed time w file name of current track w title of current track w name of current track artist w na...

Страница 31: ...tooth device is not turned on or its Bluetooth function is turned off Usable controls Controls on the main unit and included wireless remote control RC CD400 can be used to control the connected Bluet...

Страница 32: ...t this mode The sound becomes mono but noise is also reduced making it sound better NOTE Mono reception mode will automatically be disabled when the received frequency is changed Setting radio station...

Страница 33: ...button to cancel the operation and return to the Home Screen Muting tuner broadcast sound The tuner can be muted when reception is poor or unpleasantly noisy 1 Select the Tuner AutoMute item on the M...

Страница 34: ...hing o o When the program type that you have selected is found searching stops and the program type will be displayed o o If a matching program type is not found during PTY Search it will stop at the...

Страница 35: ...sic NATION M National music OLDIES Music from the so called golden age of popular music FOLK M Folk music DOCUMENT Documentaries TEST Broadcast when testing emergency broadcast equipment or receivers...

Страница 36: ...tooth devices or the AUX input Dubbing to write protected media Write Protected will appear on the Home Screen for several seconds before the display returns to the previous state Dubbing to media tha...

Страница 37: ...he MENU screen to open the MP3 Bit rate screen see Menu operation pro cedures on page 18 Dubbing Format mp3 128 kbps 2 Set the dubbing format Options 96 kbps 128 kbps default 192 kbps 320 kbps wav 3 C...

Страница 38: ...set independently i i The analog output level of the input signal from the AUX IN jack cannot be adjusted Serial mode setting when sold sepa rately Ethernet card installed This unit can be set to all...

Страница 39: ...ontent and return to the MENU screen Restoring factory default settings You can restore the various settings stored in the backup memo ry of the unit to their factory default values Use the following...

Страница 40: ...equipment nearby Keep such devices as far away as possible during use 0 0Try reducing the distance between this unit and the other Bluetooth device Try changing the positions of this unit and the oth...

Страница 41: ...minal input level 20 dBV 0 1 Vrms Maximum input level 4 dBV 0 63 Vrms Input impedance 10 k or higher Analog output balanced jacks Connectors XLR 3 32 1 GND 2 HOT 3 COLD Rated output level 4 dBu 1 23 V...

Страница 42: ...quency range US model FM 87 5 MHz to 108 0 MHz AM 520 kHz to 1 720 kHz Other models FM 87 5 MHz to 108 0 MHz AM 522 kHz to 1 629 kHz Antenna connectors FM F type female AM 2 pin push terminal Other Po...

Страница 43: ...ver if the necessary repairs are covered by the warranty we will pay return surface shipping charges to any destination within the United States LIMITATION OF IMPLIED WARRANTIES Any implied warranties...

Страница 44: ...817 Block A Hailrun Complex 6021 Shennan Blvd Futian District Shenzhen 518040 China Printed in China Model Mod le Modell Modello Modelo Serial No No de S rie Seriennummer Numero di serie N mero de ser...

Отзывы: