Tascam 0US-4x4TP Скачать руководство пользователя страница 11

TASCAM US-2x2/US-4x4

 11

5 – Connections

Connecting other equipment

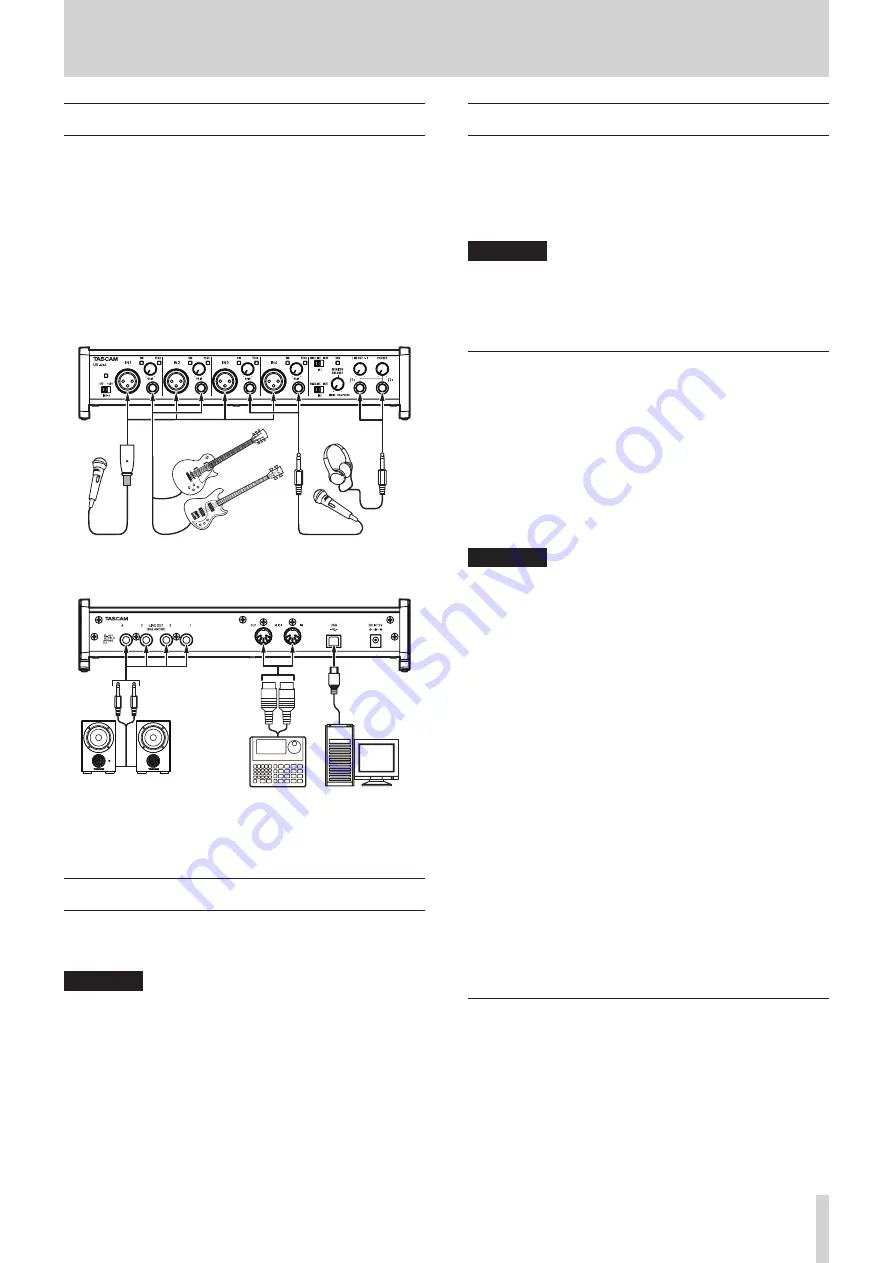
This is an example of US-4x4 connections.


8

Precautions before making connections


o

Carefully read the operation manuals of the devices to be 

connected and then connect them correctly.


o

Before making connections, turn this unit and all equipment 

to be connected off (standby).


o

If possible, install all connected devices so that they are 

powered from the same AC power supply line. When using a 

power strip or similar device, be sure to use one that has high 

current capacity in order to minimize voltage fluctuations in 

the AC power supply.

Vocal mic

Vocal mic

Headphones

Guitar

Bass Guitar

Examples of connections to a US-4x4 (front)

Powered monitor speakers 

with balanced connections 

Powered monitor speakers

Drum machine Computer

USB-B plug

Examples of connections to a US-4x4 (back)

Computer connections

Use the included USB cable to connect the unit to a computer 

USB 3.0/2.0 port. When the USB connection is working, the USB 

indicator on the front of the unit lights.

CAUTION

If you connect this unit to a computer via a USB hub, for 

example, audio signal dropouts, clicking noises and other 

interference could occur due to the influence of other USB 

devices connected to that hub. For this reason, we strongly 

recommend connecting this unit to a separate USB port. 

Connecting USB keyboards and mice, however, to the same 

bus should not be a problem.

Audio connections

Analog audio signals input into this device from mics, guitars, 

keyboards and other audio equipment can be converted into 

digital signals and transmitted to the computer via USB. In 

addition, by connecting speakers (through an amplifier if not 

powered) or headphones to this unit, you can monitor audio 

signals that are input to this unit and output from the computer.

CAUTION

Before connecting audio equipment, set the 

GAIN

LINE 

OUT

 and 

PHONES

 knobs to their lowest values. Failure 

to do so could cause sudden loud noises from monitoring 

equipment, and this could damage the equipment or harm 

hearing.

Microphones


o

Dynamic mics

Connect these to the IN1/IN2 jacks (and US-4x4 IN3/IN4 

jacks) on the front of the unit


o

Condenser mics

When using condenser mics that require phantom power, 

connect them to the IN1/IN2 jacks (and US-4x4 IN3/IN4 

jacks) on the front of the unit, and set the phantom power 

switch to +48V

When the phantom power switch is set to +48V, the phantom 

power indicator on the front of the unit lights. 

CAUTION

•  Before making connections, turn this unit and all equipment 

to be connected off (standby).

•  The phantom power switch changes the setting for both 

US-2x2 input channels (all four US-4x4 input channels) 

simultaneously. Do not turn phantom power 

+48V

 when 

connecting a mic that does not require phantom power.

•  Do not connect or disconnect mics while phantom power is 

+48V

. Doing so could cause a loud noise and might damage 

this unit and connected equipment.

•  Set the 

LINE OUT

 and 

PHONES

 knobs to their minimum 

values before turning phantom power 

+48V

/OFF. 

Depending on the connected mics, sudden loud noises from 

monitoring equipment could occur, and this could damage 

the equipment or harm hearing.

•  Set the phantom power switch to 

+48V

 only when using a 

condenser microphone that requires phantom power.  

Turning phantom power 

+48V

 when a dynamic mic or other 

mic that does not require it is connected could damage this 

unit and connected equipment.

•  When using condenser mics that require phantom power 

and dynamic mics together, be sure to use balanced 

dynamic mics. Unbalanced dynamic mics cannot be used 

when phantom power is enabled.

•  Supplying phantom power to some ribbon mics will break 

them. If you are unsure, do not supply phantom power to a 

ribbon mic.

Guitar

When connecting a guitar or bass guitar directly to this unit, use 

the IN1 or IN2 jack on the front of the unit and set the MIC/LINE 

INST switch for that jack to INST.

Содержание 0US-4x4TP

Страница 1: ...D01236020G US 2x2 US 4x4 USB Audio MIDI Interface REFERENCE MANUAL Before connecting this unit to a computer you must download and install dedicated software on the computer...

Страница 2: ...d other audio equipment 12 Analog record players 12 Monitor speakers 12 Headphones 12 MIDI connections 12 Connecting with iOS devices 12 6 Using the Settings Panel 13 Opening the Settings Panel 13 Win...

Страница 3: ...n an explanation in this manual please refer to the computer operation manual To use this unit with a computer dedicated software must be installed on the computer For details about software installat...

Страница 4: ...when a dynamic mic or other mic that does not require it is connected could damage this unit and connected equipment When using condenser mics that require phantom power and dynamic mics together be...

Страница 5: ...connect the unit to a computer Supports USB 2 0 CAUTION When using a US 2x2 that is connected to a computer it will receive power from the computer s USB port Depending on the computer the USB port mi...

Страница 6: ...the operating system you are using from the TEAC Global Site http teac global com o o On a Windows computer this will install the Windows driver and Settings Panel application o o Installing the dedic...

Страница 7: ...Mac dedicated software NOTE Before starting to install the Mac dedicated software quit other applications While installing the Mac dedicated software a warning message like this might appear US 2x2_U...

Страница 8: ...ht click the file and click Open Click the Open button if the following security warning message appears US 2x2_US 4x4 Installer dmg can t be opened because it was not downloaded from the Mac App Stor...

Страница 9: ...tware do this after installing the firmware update Uninstalling the dedicated software NOTE Normally there is no need to uninstall the dedicated software Follow these procedures if a problem occurs or...

Страница 10: ...l power supply device use one with the following specifications Power supply voltage 5 V Power supply current 700 mA or more Using a power supply device with specifications other than the above could...

Страница 11: ...ipment set the GAIN LINE OUT and PHONES knobs to their lowest values Failure to do so could cause sudden loud noises from monitoring equipment and this could damage the equipment or harm hearing Micro...

Страница 12: ...DI connections Connect sound modules keyboards synthesizers drum machines and other MIDI devices to the unit in the following manner o o If you want to monitor sound from a MIDI device connect its out...

Страница 13: ...able for specific operations Settings Make detailed settings for the US 2x2 or US 4x4 on this page Custom Make software mixer settings HOME page Windows Settings Panel screen 1 Status display area Thi...

Страница 14: ...HONES jacks Computer Out 3 4 US 4x4 only Only the Computer Out 3 4 signals sent from the computer by USB are output from the LINE OUT BALANCED and PHONES jacks NOTE Set the MONITOR BALANCE knob all th...

Страница 15: ...the audio from the left side can be handled when using some applications When using an application like this audio from the right side cannot be transmitted or recorded Set to Mono to mix both left an...

Страница 16: ...n an input is off signals on that channel will not be input 4 Line Outputs items LINE OUT 1 2 i i Select the signals output from the unit s LINE OUT 1 2 and PHONES 1 and 2 jacks on US 4x4 jacks LINE O...

Страница 17: ...e firmware is released a notification about automatic updating will appear when the Settings Panel is launched Settings Panel update notification Firmware update notification Click the Update now butt...

Страница 18: ...res to open the Control Panel Windows 10 Windows 8 1 Right click the Windows Start button and select Control Panel Windows 7 Left click the Windows Start button and select Control Panel from the Start...

Страница 19: ...CAM US 4x4 Audio Device to select it and right click or control click it Then click Use this device for sound output in the pop up menu The speaker mark appears next to TASCAM US 2x2 Audio Device or T...

Страница 20: ...for details Settings in standalone mode When operating in standalone mode input signals pass through the built in digital mixer and output selector which are set at fixed values and are output from t...

Страница 21: ...umber Range Thru Velocity Note on Thru Note off Aftertouch Polyphonic Thru Channel Pitch bend Thru Control change Thru Program change Thru Setting range System exclusive Thru System common Position Th...

Страница 22: ...unit directly to a USB port on the computer o o If the above methods do not resolve the problem connect the unit to a different USB port on the computer 8 8 I cannot hear any sound even when audio is...

Страница 23: ...ystem icon o o In Windows 8 1 right click the ordinary Start screen Metro user interface screen and then click All apps Then right click Computer and select Properties o o In Windows 7 right click Com...

Страница 24: ...57 dB Analog outputs Line Outputs balanced US 2x2 LINE OUT 1 2 US 4x4 LINE OUT 1 4 Connectors 6 3mm 1 4 standard TRS stereo jacks Tip HOT Ring COLD Sleeve GND Output impedance 110 Rated output level...

Страница 25: ...10 or later OS X Mavericks 10 9 1 or later OS X Mountain Lion 10 8 4 or later Computer hardware requirements Mac with a USB 2 0 port CPU processor speed 2 GHz or faster dual core processor Memory 2 G...

Страница 26: ...R o Churubusco 364 Colonia Del Carmen Delegaci n Coyoac n CP 04100 M xico DF M xico TEAC UK Ltd http tascam eu Phone 44 8451 302511 2 Huxley Road Surrey Research Park Guildford GU2 7RE United Kingdom...

Отзывы: