SPEED COBRA DRUM PEDAL
取扱説明書
ご使用になる前に、必ず説明書をお読み下さい。
この度はスピードコブラ・ドラムペダルをお買い上げ頂き、誠にありがとうございます。製品の機能を十分
に発揮し、安全にご使用頂くために、組み立て前に必ず本説明書をお読み下さい。また本書は大切に保管し
て下さい。
• This pedal should be used for musical-performance purposes only.
• Retighten screws, bolts, and nuts before starting each session.
• Exercise due caution to avoid injury.
Keep hands and feet away from blade tip (on the twin-pedal model), gears, chains, and plate hinges.
• Avoid physical contact with areas where metal is rusted or otherwise damaged.
• Do not operate pedal without appropriate footwear.
• To avoid clothing stains, keep clothes clear of chain, bearings, and other lubricated areas.
• Take care to avoid damage to fl ooring.
Note that the twin-pedal blade tip can cause damage to fl ooring. Note also that the non-slip rubber on
the pedal underplate can cause discoloration of fl ooring if left in the same position for a prolonged period
of time. It is recommended that you set this equipment up on thick carpeting or on an appropriate mat.
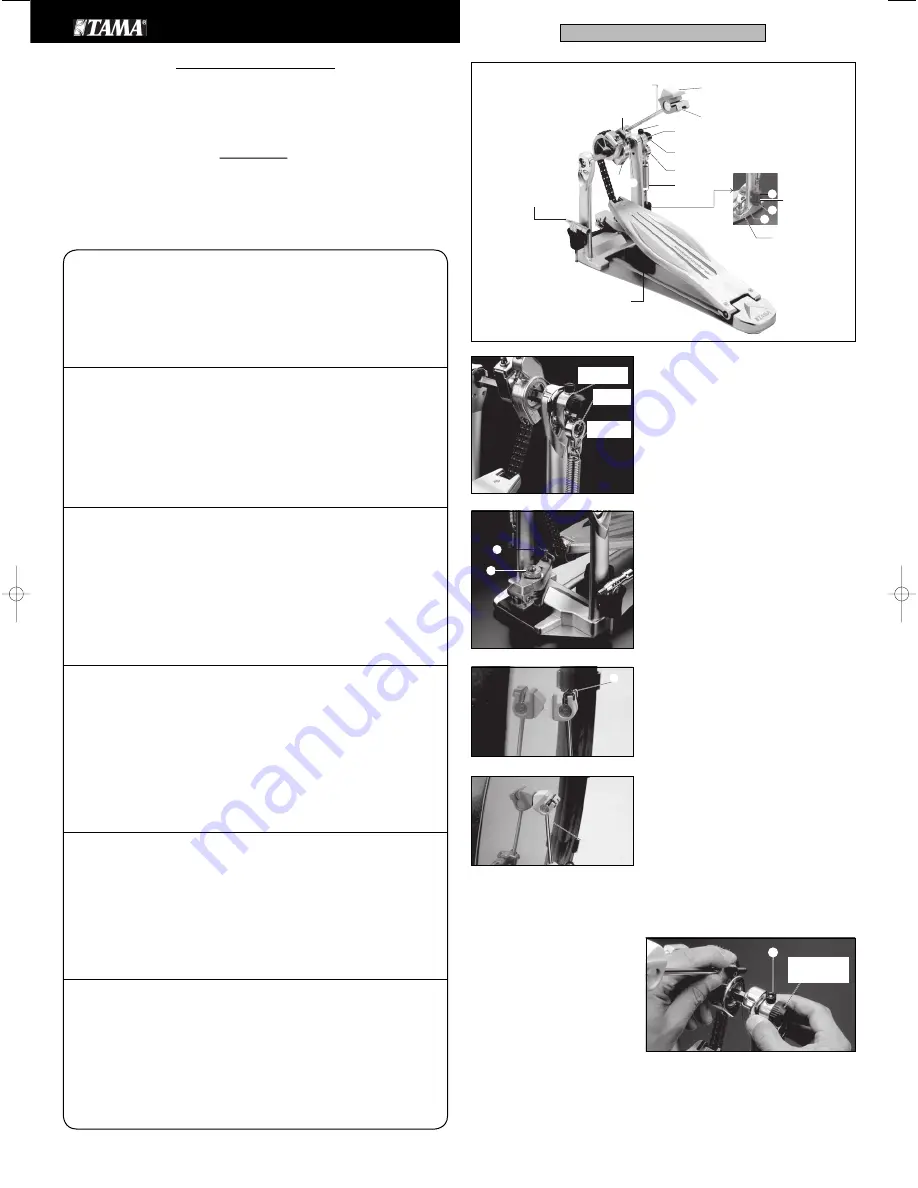
1. Spring Hook (Quick Hook)
Fit the Quick Hook onto the Speedo-Ring Bearing.
1. スプリングフック(クイックフック)
まずクイックフックを、スピードリングのベアリング
部にセットします。
・演奏以外の目的に使用しないで下さい。
・ネジ類は演奏する前に、しっかりと締めて下さい。
・取り扱いには十分注意して下さい。
ツインペダルの剣先や、ギアー、チェーン部、プレートのヒンジ部などに触れる場合は、ケガをす
る恐れがありますので、十分に注意して下さい。
・サビや金属の劣化により傷ついた部分に触れてケガをしないように注意して下さい。
・はだしで演奏しないで下さい。
・チェーンやベアリング部には潤滑油が使われています。衣服に付着する恐れがありますので、十分
にご注意下さい。
・床面を傷つけないように、ご注意下さい。
ツインペダルの剣先等を使用する場合、床面を傷つけます。またペダルのアンダープレートの裏には、
すべり防止のためのゴムが貼り付けてあり、長期間同じ場所に設置すると、床面に色移りします。ご使
用の際はあらかじめ厚手のカーペットや専用マットを敷いた上で設置されることをお勧めします。
SPEED COBRA SINGLE PEDAL
HP910LS
4. Adjusting the Beater and Footboad
Angle (Speedo-Ring)
The angle of the Beater can be adjusted
along with the angle of the footboard by
loosening the bolt
4
on top of the Speedo-
Ring. You may test the gradations of the
Angle Memory Cap, attached to the end of
the shaft (The longer line on Angle Memory
Cap shows the factory set-up position), by
adjusting it a bit at a time.
As the angle of the Beater is lowered, the
footboard rises. Once the desired angle is
reached, while keeping the Speedo-Ring
in contact with the Angle Memory Cap
as shown in the photo, tighten the bolt
4
fi rmly to secure it (photo 6).
3. ビーター (プロジェクター・ビーター)
プロジェクタービーターは、ビーターヘッドの角度を調整
することでヘッドとの接触面積を変え、音色を変える事が
出来ます(写真4, 5)。写真4のように先端をヘッドに当てる
とソリッドなサウンド、写真5のように面で当てるとより
アタック感の強いサウンドが得られます。ビーターヘッド
の角度は角頭ボルト②を緩めて調整して下さい。
2. Hoop Clamp (Para-Clamp 2)
Adjust the Para-Clamp opening by turning nut
A
.
Adjust as necessary to match the thickness of the bass
drum’s hoop. Then loosen the T-bolt
1
and set the
pedal onto the drum hoop. Then retighten the T-bolt.
2. フープクランプ(パラ・クランプ2)
パラ・クランプのナット
A
で、クランプの開き具合を調
整できます。バスドラム・フープの厚みに合わせて、ク
ランプの開き具合をあらかじめ調整して下さい。次にT
型ボルト
1
を緩め、バスドラムフープにペダル本体を
セットし、しっかりと締めて固定して下さい。
• Dieses Pedal sollte nur für musikalische Anwendungen benutzt werden.
• Ziehen Sie Schrauben und Muttern vor jedem Gebrauch nach.
• Gehen Sie mit größter Vorsicht vor, um Verletzungen zu vermeiden.
Halten Sie Ihre Hände und Füße von der Pedalspitze (beim Doppelpedal-Modell), von den
Kettentrieben und den Pedalscharnieren fern.
• Vermeiden Sie direkten Kontakt mit angerosteten oder sonstwie beschädigten Metallteilen.
• Betätigen Sie das Pedal nicht ohne entsprechendes Schuhwerk.
• Um Flecken auf der Kleidung zu vermeiden, halten Sie Kleidungsstücke von den Ketten, Zahnrädern
und Scharnieren und anderen gefetteten oder geölten Teilen fern.
• Achten Sie darauf, mit der Fußmaschine nicht den Fußboden zu beschädigen.
Beachten Sie, daß die Pedalspitze des Doppelpedals den Fußboden beschädigen kann. Beachten Sie
auch, daß die rutschsichere Gummiaufl age der Pedalunterseite zu einer Verfärbung der Bodenaufl age
(Teppich) führen kann, wenn das Pedal längere Zeit an der gleichen Position steht. Es wird empfohlen,
das Set einschließlich der Fußmaschine auf einem separaten, dicken Teppich oder einer geeigneten
Matte aufzustellen.
•
Este pedal debería utilizarse únicamente para la interpretación de música.
• Vuelva a apretar los tornillos, bulones y tuercas antes de iniciar cada sesión.
• Para evitar lesiones, tenga sumo cuidado.
Mantenga las manos y los pies lejos del extremo de la lámina (modelo de pedal doble), engranajes,
cadenas y las bisagras de placa.
•
Evite el contacto físico con las zonas en las que el metal está oxidado o dañado de alguna otra forma.
• No haga funcionar el pedal sin el calzado apropiado.
• Para no mancharse la ropa, no la acerque demasiado de las cadenas, de los cojinetes o de otras zonas
engrasadas.
• Tenga cuidad de no deteriorar el piso.
Observe que el extremo de la lámina del pedal doble puede deteriorar el piso. Observe igualmente
que el caucho antideslizante de la placa inferior del pedal puede provocar una decoloración del suelo
si se deja en la misma posición durante un período prolongado. Le recomendamos que instale este
equipo sobre un suelo de moqueta espesa o un tapiz adecuado.
• Questo pedale deve essere utilizzato solo per effettuare performance musicali.
• Riserrare le viti, i bulloni ed i dadi prima di ogni sessione musicale.
• Agire con estrema cautela per evitare lesioni
.
Tenere le mani ed i piedi lontano dalla punta della lama (sul modello con doppio pedale), dagli
ingranaggi, dalle catene e dalle cerniere della piastra.
• Evitare il contatto fi sico con le parti in cui il metallo è arrugginito o che sono danneggiate.
• Non azionare il pedale senza calzature appropriate.
• Per evitare di macchiare gli indumenti, tenerli lontano dalle catene, dai cuscinetti e dalle altre parti
lubrifi cate.
• Evitare di danneggiare il pavimento.
Notare che la punta della lama del doppio pedale può causare danni al pavimento. Notare anche
che la gomma antiscivolo situata sulla sottopiastra del pedale può causare uno scolorimento del
pavimento, se lasciata nella stessa posizione per un lungo periodo di tempo. Si raccomanda quindi di
appoggiare questo equipaggiamento su un tappeto spesso o su una base appropriata.
• Cette pédale est exclusivement destinée à être employée en combinaison avec une grosse caisse.
• Avant chaque séance d’entraînement ou chaque performance, veillez à resserrer les vis, boulons et
écrous de la pédale.
• Soyez prudent afi n d’éviter toute blessure.
Veillez à ne pas vous blesser les mains ou les pieds sur le crampon (double pédale), les pignons, les
chaînes et les articulations.
• Veillez à ne pas érafler ou blesser vos mains ou vos pieds sur des pièces rouillées ou autrement
endommagées.
• Ne jouez jamais de la batterie sans porter des chaussures adéquates.
• Afi n d’éviter de souiller vos vêtements, veillez à ne pas laisser ces derniers entrer en contact avec la
chaîne, les roulements, ou d’autres pièces lubrifi ées.
• Veillez à protéger le sol.
Notez que le crampon de la double pédale pourrait endommager le sol. De même, le revêtement en
caoutchouc couvrant la plaque inférieure de la pédale pourrait entraîner une décoloration du sol si
la pédale est installée au même endroit pendant une longue période. Veuillez placer un morceau de
moquette épaisse ou un tapis prévu à cet effet sous la pédale de grosse caisse afi n de protéger le sol.
INSTRUCTION MANUAL
Please read through this manual fi rst before starting to use your Speed Cobra Drum Pedal.
Thank you for your purchase of the Speed Cobra Drum Pedal. To ensure safe and effi cient use of
this product, please read through this manual before beginning assembly. Store the manual in a
convenient place for future reference.
3. Beater (Projector Beater)
The Projector Beater is designed to change the contact
area with the head by adjusting the angle of the Beater
Head and to adjust the tone (photos 4 and 5). Hit the tip
against the head as shown in photo 4 to get a solid sound.
Hit flat as shown in photo 5, to get a more attacking
sound. Adjust the angle of the Beater Head by loosening
the square-headed bolt
2
.
4. ビーター/プレートアングル調整 (スピードリング)
スピードリング上端のボルト
4
を緩めるとビーター角度と
フットボード角度を連動して調整することが出来ます。
シャフトの端にあるアングルメモリー・キャップの目盛り
を目安に少しずつ調整して下さい(長い目盛りが出荷時の
位置です)。ビーター角度を倒すにしたがってフットボー
ドが上がります。好みの角度が決まったら、写真のように
スピードリングをアングルメモリーキャップに当てながら
ボルト
4
を締めて固定して下さい (写真6)。
Beater Head
ビーターヘッド
Speedo-Ring
スピードリング
Quick Hook
クイックフック
Angle Memory Cap
アングルメモリーキャップ
Spring
スプリング
Para-Clamp 2
パラ・クランプ 2
Vari-Pitch Beater Holder
バリピッチ・ビーターホルダー
4
6
7
1
2
Projector Beater
プロジェクター・ビーター
3
5
Drum Hammer
ドラムハンマー
8
Cobra Coil
コブラ・コイル
Spring-Tight
スプリング・タイト
Speedo-Ring
スピードリング
Quick Hook
クイックフック
Bearing
ベアリング
1
A
2
Projector Beater
プロジェクター・
ビーター
Photo 6
写真
6
continued on the back
裏面へ続く
4
Angle Memory Cap
アングルメモリー
キャップ
Photo 1
写真
1
Photo 2
写真
2
Photo 3
写真
3
Photo 5
写真
5
Photo 4
写真
4
SPEED COBRA DRUM PEDAL.indd 1
SPEED COBRA DRUM PEDAL.indd 1
2011-1-27 10:31:09
2011-1-27 10:31:09


