AU
4
• HOW TO MOW
1. To obtain the best results, cut area of grass by mov-
ing in a straight line proceeding slowly.
2. Cut your grass at least twice a week during the grow-
ing season.
3. Do not overload the mower. Mowing thick grass may
cause the motor speed to drop. If the motor speed
drops, you may overload the motor of the trimmer
your hover mower is attached to.
4. When mowing long thick grass a first cut with the cut-
ting height at its highest level will help reduce the
load.
• ADDITIONAL SAFETY PRECAUTIONS
WARNING / CAUTION
• IF UNFAMILIAR WITH mowing techniques, practice
the procedures with ENGINE in “OFF” position.
• ALWAYS CLEAR WORK area of debris such as cans,
bottles, rocks, etc. Striking objects can cause serious
injury to operator or bystanders and also damage
equipment. If an object is accidentally hit, immediately
TURN ENGINE OFF and examine equipment. Never
operate unit with damaged or defective equipment.
• ALWAYS TRIM OR CUT AT HIGH ENGINE SPEEDS.
Do not run engine slowly at start or during mowing
operations.
• DO NOT use equipment for purposes other than
trimming or mowing grass.
• NEVER raise hover mower above knee height during
operation.
• DO NOT operate unit with other people or animals in
the immediate vicinity. Allow a minimum of 50 feet (15
meters) between operator and other people and
animals when trimming or mowing. Allow a distance of
100 feet (30 meters) between operator and other
people and animals.
• IF OPERATING UNIT ON A SLOPE, stand below the
hover mower attachment. DO NOT OPERATE on a
slope or hilly incline if there is the slightest chance of
slipping or losing your footing.
1.
The cutting blades are made from high quality,
hardened steel and with normal usage, they will not
require resharpening. However, if you accidentally
hit a wire fence, stones, glass or other hard objects,
you may put a nick in the blade. There is no need to
remove this nick as long as it does not interfere with
the movement of the blade. If it does interfere, turn
the power source off and use a fine toothed file or
sharpening stone to remove the nick.
2.
If you drop the hover mower attachment, carefully
inspect it for damage. If the blade is bent, housing
cracked, or handles broken or if you see any other
condition that may affect operation contact a
professional service center for repairs before putting
it back into use.
3.
Fertilizers and other garden chemicals contain
agents which greatly accelerate the corrosion of
metals. Do not store the tool on or adjacent to
fertilizers or chemicals.
4.
With the unit powered off, use only mild soap and a
damp cloth to clean the tool. Never let any liquid get
inside the tool; never immerse any part of the tool
into a liquid.
NOTE:
To assure product SAFETY and RELIABILITY,
repairs, maintenance and adjustments should be per-
formed by a Talon authorised repair service center using
identical replacement parts.
OPERATING INSTRUCTIONS
MAINTENANCE AND REPAIR INSTRUCTIONS
AU
3
SPECIFICATIONS
Blade Length . . . . . . . . . . . . . . . . . . . . . . . . . . . . . . . . . . . . . . . . . . . . . . . . . . . . . . . . . . . . . . . . . . . . . . . . . . .12” (300mm)
Shaft Length . . . . . . . . . . . . . . . . . . . . . . . . . . . . . . . . . . . . . . . . . . . . . . . . . . . . . . . . . . . . . . . . . . . . . . . . . . . . . . .660mm
Shaft Diameter . . . . . . . . . . . . . . . . . . . . . . . . . . . . . . . . . . . . . . . . . . . . . . . . . . . . . . . . . . . . . . . . . . . . . . . . . . . . . . . .7/8”
Weight . . . . . . . . . . . . . . . . . . . . . . . . . . . . . . . . . . . . . . . . . . . . . . . . . . . . . . . . . . . . . . . . . . . . . . . . . . . . . . . . . . . .3.15 kg
•
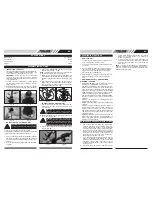
INSTALLING THE SHAFT
1. Insert the drive shaft assembly(A) into the flexible rub-
ber tube(B) so that the rivet (C) in the shaft rests in the
recess at the top of the rubber tube. (Fig. 1A)
IMPORTANT:
Ensure that the front of the hover
mower is facing an outwards direction. Incorrect
installation of the shaft will result in poor cutting and
hover performance.
2. To secure the drive shaft assembly in place, tighten
the adjustable clamp(D) with a screwdriver (not sup-
plied). (Fig. 1B)
3. Silde the rubber cover(A) over the end of the shaft(B)
and onto the hover mower housing. Insert the tabs(C)
into the slits.(Fig. 1C & 1D)
•
ADJUSTING THE CUTTING HEIGHT
Your hover mower comes with the two cutting
height adjustment spacers already installed. To adjust the
cutting height refer to the following instructions:
1. Using an adjustable spanner (not supplied), untighten
the bolt (A) by holding the impeller (B) firmly with one
hand and turn the bolt anti-clockwise with the other.
(Fig. 2A)
2. Remove the washers (F) and bolt (G) from the blade.
(Fig. 2B)
3. Remove the blade(E) from the pegs of the height
adjustment spacers(D). (Fig.2B)
NOTE:
To increase the height of the cut, remove spacers.
To decrease the hight of the cut, add spacers.
5. When you are staisfied with the cutting height, re-
install the blade (E) making sure that the pegs on the
spacers fit into the spacer holes in the blade (E). (Fig.
1B)
6. Insert washers (F) and bolt (G). To fasten bolt to
blade, using an adjustable spanner (not supplied),
hold the impeller (C) with one hand and turn the bolt
colckwise with the other. (Fig. 2B)
•
INSTALLING THE ATTACHMENT
1. Grip the lower shaft (A). Press the release lever (B)
while pushing the lower shaft into the tool-link coup-
ing. (Fig. 3A)
2. Locate and lock the release lever into the primary hole
(C) in the shaft. (Fig. 3A)
3. Tighten the knob (D) securely clockwise before using
the unit. (Fig. 3B)
CAUTION:
Always wear heavy-duty work
gloves when handling and installing a blade.
A
B
Fig. 1C
Fig. 1D
C
D
C
Fig. 2A
Fig. 2B
E
F
G
CAUTION:
Make sure the release lever is
locked in the primary hole and knob is
securely tightened before operating this unit.
CAUTION:
All attachments are designed to
be used in the primary hole unless otherwise
indicated in the specific attachment’s opera-
tor’s manual. If the incorrect hole is used, it
could result in injury, or damage to the unit.
B
A
Fig. 3A
Fig. 3B
C
D
ASSEMBLY INSTRUCTIONS
Fig. 1A
B
A
C
D
Fig. 1B
A
B


