


Tally Dascom DT-210/230 User Guide V1.3
58
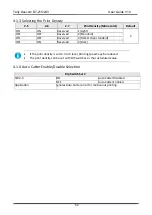
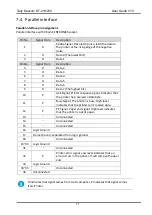
2-4
BUSY Condition
Receive Buffer Full
Offline or Receive
Buffer Full
OFF
2-5
Print Density
See “
” on page 48.
OFF
2-6
OFF
2-7
OFF
2-8
Near-End Sensor Status
Disable
Enable
OFF
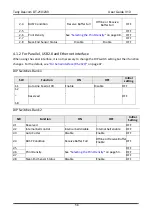
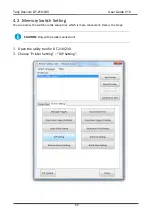
4.1.2
For Parallel, USB2.0 and Ethernet Interface
When using the serial interface, it is not necessary to change the DIP switch setting but their function
changes. For the details, see “
For Serial Interface (RS-232C)
” on page 47 .
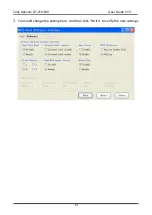
DIP Switches Bank 1
SW
Function
ON
OFF
Initial
setting
1-1
Auto Line Feed at CR
Enable
Disable
OFF
1-2
~
1-8
Reserved
-
-
OFF
DIP Switches Bank 2
SW
Function
ON
OFF
Initial
Setting
2-1
Reserved
-
-
OFF
2-2
Internal bell control
Internal bell disable
Internal bell enable
OFF
2-3
Auto Cutter
Disable
Enable
OFF
2-4
BUSY Condition
Receive Buffer Full
Offline or Receive Buffer
Enable
OFF
2-5
Print Density
See “
” on page 53.
OFF
2-6
OFF
2-7
OFF
2-8
Near-End Sensor Status
Disable
Enable
OFF
Содержание DT-210
Страница 1: ...User Guide DT 210 230 Thermal Receipt Printer ...
Страница 15: ...Tally Dascom DT 210 230 User Guide V1 3 DASCOM REPRESENTATIVES 96 ...
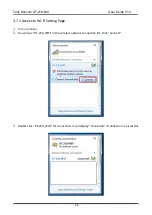
Страница 44: ...Tally Dascom DT 210 230 User Guide V1 3 29 3 Select the installation path to the tool 4 Click Next ...
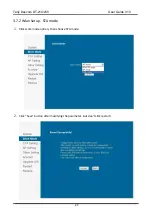
Страница 45: ...Tally Dascom DT 210 230 User Guide V1 3 30 5 Click Install 6 Wait for a sec ...
Страница 46: ...Tally Dascom DT 210 230 User Guide V1 3 31 7 Installation complete Click Finish ...
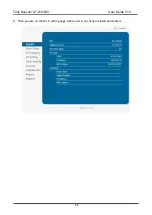
Страница 48: ...Tally Dascom DT 210 230 User Guide V1 3 33 Enable the Black Mark ...
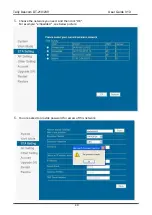
Страница 53: ...Tally Dascom DT 210 230 User Guide V1 3 38 9 Click Finish to complete the printer driver installation ...