


Hardware Installation Procedure
2-27
Eq
uip
m
ent Insta
lla
tio
n
2
0
The Input/Output (I/O) cables are described in further detail in
. Read the entire chapter before attempting to connect the I/O cables.
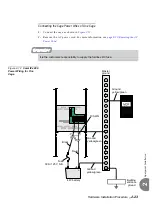
Champ Connections
1.
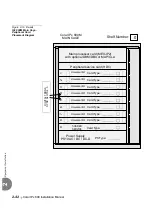
Determine the route of I/O cables from the MDF to the I/O Champ connectors of
the card cage and measure the longest distance from an I/O connector on the card
cage to the corresponding cable punch block on the MDF.
2.
Prepare cables that are the length determined above, with a male 25 pair connector
on one end, for each I/O connector on the card cage. Eight 25 pair cables are
required for main cages and twelve cables are required for expansion cages.
3.
Carefully route the connector end of the first cable to the left I/O connector. Insert
the cable connector firmly into the Coral I/O connector.
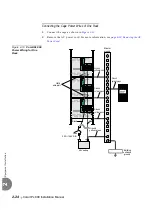
4.
Route the other end of the cable to the appropriate cable punch block on the MDF.
5.
Repeat this procedure for each I/O cable, moving from left to right across the
upper I/O connectors, and then from left to right across the lower I/O connectors,
until all cables are in place.
6.
Mark each I/O cable near the connector on the card cage rear panel with the
corresponding peripheral shelf and I/O connector number on the Coral system.
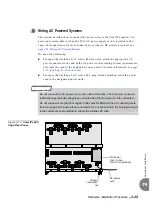
7.
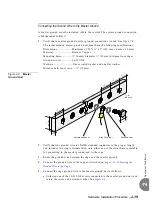
Terminate each of the cables in their respective cable punch blocks on the MDF.
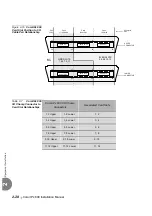
8.
Mark each cable punch block with the corresponding I/O connector number on
the Coral system. Optionally mark every eighth pair on the block, starting with
the first pair, with the number of the two card slots associated with the I/O cable,
according to
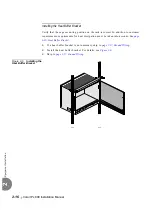
Ensure that each I/O cable is secured with its own hook-and-loop fastener
strap on the Coral cabinet rear, so that the cables do not accidentally pop out
of place.
6
Connecting the I/O Cables
Содержание Coral IPx 800 Series
Страница 2: ......
Страница 4: ......
Страница 10: ...vi...
Страница 16: ......
Страница 22: ......
Страница 28: ......
Страница 32: ...1 4 Coral IPx 800 Installation Manual Document Description 1 NOTES...
Страница 34: ...1 6 Coral IPx 800 Installation Manual Special Symbols Used in this Document 1 NOTES...
Страница 40: ......
Страница 48: ...2 8 Coral IPx 800 Installation Manual Site Inspection 2 NOTES...
Страница 90: ......
Страница 116: ...3 26 Coral IPx 800 Installation Manual Shared Service and Peripheral Card Test 3 NOTES...
Страница 118: ...3 28 Coral IPx 800 Installation Manual Installation Wrap up 3 NOTES...
Страница 120: ......
Страница 126: ......
Страница 142: ...5 16 Coral IPx 800 Installation Manual Protection Devices 5 NOTES...
Страница 150: ...5 24 Coral IPx 800 Installation Manual Terminal Data Communication Ports RS 232E 5 NOTES...
Страница 182: ...5 56 Coral IPx 800 Installation Manual I O RJ 45 Connections Via Rear Panel For Coral Interface Cards 5 NOTES...
Страница 242: ......
Страница 278: ...6 38 Coral IPx 800 Installation Manual Cage Description and Installation 6 NOTES...
Страница 292: ...6 52 Coral IPx 800 Installation Manual Coral IPx 800X Expansion Cage Description 6 NOTES...
Страница 312: ...6 72 Coral IPx 800 Installation Manual System Configuration Options Coral IPx 800 6 NOTES...
Страница 313: ...Coral Cor IPx 800 Installation Manual Chapter 7 Power Supplies 7 1 PS19 DC 7 1 7 2 PS19 DC D 7 17 7 3 PS19 AC 7 39...
Страница 314: ......
Страница 352: ...7 38 Coral IPx 800 Installation Manual PS19 DC D Power Supply Unit with Duplication 7 NOTES...
Страница 368: ......
Страница 372: ...8 4 Coral IPx 800 Installation Manual Common Control Cards 8 NOTES...
Страница 382: ...8 14 Coral IPx 800 Installation Manual Software Authorization Unit SAU 8 NOTES...
Страница 384: ...8 16 Coral IPx 800 Installation Manual MAP 8 NOTES...
Страница 386: ...8 18 Coral IPx 800 Installation Manual LIU 8 NOTES...
Страница 392: ......
Страница 396: ...8 26 Coral IPx 800 Installation Manual HDC Card High Density Control 8 NOTES...
Страница 399: ......