


Power Supplies
7-35
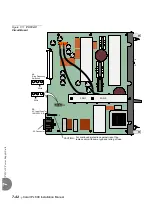
PS
19 D
C
-D
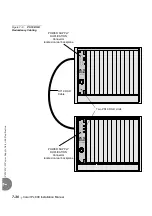
Po
wer Supp
ly Un
it wi
th D
upl
icati
on
7
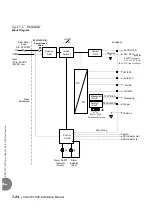
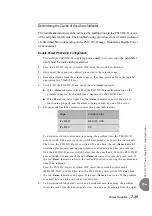
Determining the Cause of the Alarm Indicator
The red
Alarm
indicator can be activated by malfunctions in the PS19 DC-D or one
of the peripheral shelf cards. The Troubleshooting procedures for a lit Alarm indicator
are described below, depending on the PS19 DC-D usage: Redundant, Double Power
or Economical.
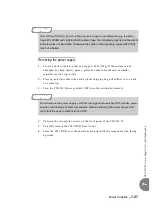
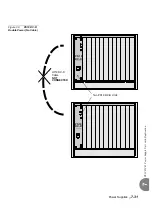
Double Power PS19 DC-D Configuration
For a single PS19 DC-D supplying power
only
to its own cage
the peripheral
cards must be individually examined.
1.
Turn the PS19 DC-D power switch OFF (turn the switch downwards).
2.
Disconnect the expansion cable(s) connected to the relevant cage.
3.
Remove all cards from the relevant cage so that they protrude from the cage by
approximately 1 inch (2.5 cm).
4.
Switch ON the PS19 DC-D and check the red Alarm indicator.
If the Alarm indicator is lit, either the PS19 DC-D is malfunctioning or the
problem is caused by the backplane. Replace the PS19 DC-D unit.
If the Power indicator lights but the Alarm indicator is not lit, the unit is
functioning properly and the alarm is being caused by one of the cards.
5.
For cages that include common control cards (see table below).
To determine which control card is causing the problem, turn the PS19 DC-D
power switch OFF again (turn the switch downwards), re-insert the control card.
Then turn the PS19 DC-D power switch ON, and check the red Alarm indicator.
Continue this process, adding one common control card at a time, and turning
OFF the PS19 DC-D power switch before inserting each card. Turn the PS19 DC-D
power switch ON and check the red Alarm indicator after inserting each card. If
the red Alarm indicator is lit on, the last card inserted is causing the problem and
should be replaced.
Turn the PS19 DC-D power switch OFF, insert the common control cards
(MEX-IP2, HDC, or PX). Then turn the PS19 DC-D power switch ON and check
the red Alarm indicator once again. If the red Alarm indicator is off, the problem
is caused by one of the cards that was removed.
6.
To determine which shared service and peripheral card is causing the problem,
insert the cards into their appropriate slots, one by one, beginning from the right
Cage
Control Cards
IPx 800M
MEX-IP2, HDC
IPx 800X
PX
Содержание Coral IPx 500X
Страница 2: ......
Страница 4: ......
Страница 10: ...vi...
Страница 16: ......
Страница 22: ......
Страница 28: ......
Страница 32: ...1 4 Coral IPx 800 Installation Manual Document Description 1 NOTES...
Страница 34: ...1 6 Coral IPx 800 Installation Manual Special Symbols Used in this Document 1 NOTES...
Страница 40: ......
Страница 48: ...2 8 Coral IPx 800 Installation Manual Site Inspection 2 NOTES...
Страница 90: ......
Страница 116: ...3 26 Coral IPx 800 Installation Manual Shared Service and Peripheral Card Test 3 NOTES...
Страница 118: ...3 28 Coral IPx 800 Installation Manual Installation Wrap up 3 NOTES...
Страница 120: ......
Страница 126: ......
Страница 142: ...5 16 Coral IPx 800 Installation Manual Protection Devices 5 NOTES...
Страница 150: ...5 24 Coral IPx 800 Installation Manual Terminal Data Communication Ports RS 232E 5 NOTES...
Страница 182: ...5 56 Coral IPx 800 Installation Manual I O RJ 45 Connections Via Rear Panel For Coral Interface Cards 5 NOTES...
Страница 242: ......
Страница 278: ...6 38 Coral IPx 800 Installation Manual Cage Description and Installation 6 NOTES...
Страница 292: ...6 52 Coral IPx 800 Installation Manual Coral IPx 800X Expansion Cage Description 6 NOTES...
Страница 312: ...6 72 Coral IPx 800 Installation Manual System Configuration Options Coral IPx 800 6 NOTES...
Страница 313: ...Coral Cor IPx 800 Installation Manual Chapter 7 Power Supplies 7 1 PS19 DC 7 1 7 2 PS19 DC D 7 17 7 3 PS19 AC 7 39...
Страница 314: ......
Страница 352: ...7 38 Coral IPx 800 Installation Manual PS19 DC D Power Supply Unit with Duplication 7 NOTES...
Страница 368: ......
Страница 372: ...8 4 Coral IPx 800 Installation Manual Common Control Cards 8 NOTES...
Страница 382: ...8 14 Coral IPx 800 Installation Manual Software Authorization Unit SAU 8 NOTES...
Страница 384: ...8 16 Coral IPx 800 Installation Manual MAP 8 NOTES...
Страница 386: ...8 18 Coral IPx 800 Installation Manual LIU 8 NOTES...
Страница 392: ......
Страница 396: ...8 26 Coral IPx 800 Installation Manual HDC Card High Density Control 8 NOTES...
Страница 399: ......


