


098-00172-000 Revision A – December, 2009
TimeProvider 500 2.0 User’s Guide
39
Chapter 2 Installation & Configuration
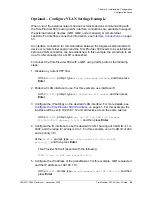
Configuration Setup
Apply Power
The TimeProvider 500 should be connected to –48 VDC Mains through the Branch
Circuit Over-Current Protection Device with a maximum 1 amp fuse. The
TimeProvider 500 is intended for installation in a Restricted Access Location in
Accordance with Articles 110-26, 110-27 or the National Electric Code
ANSI/NFPA70, or per the applicable code in the country of installation.
TimeProvider 500 has redundant power connection with a non-permanent
connection. No tool or mechanical device is required to remove the power
connection from the unit. Power to the unit is controlled by disconnecting the
appliance couplers on the front of the unit.
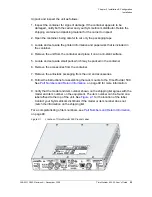
To connect power leads to the shelf, follow these steps:
1. Remove the fuse from the front panel of the Branch Circuit Over-Current
Protection Device. Replace the fuse at the end of the installation procedure.
2. Wire the provided Molex connector to 1 mm² /18 AWG UL1007 wire with the
crimp pins supplied. Insert Molex pins into the Molex connector provided. Wire
the other end of the power wires to the Branch Circuit Over-Current Protection
Device.
3. Plug the Molex connector into the TimeProvider 500 and replace the fuse in the
Branch Circuit Over-Current Protection Device. The TimeProvider 500 –48 VDC
power connector is keyed to only connect one way.
4. The connector has a latching mechanism. Push the connector in until it clicks into
place
.
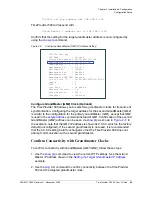
When power is successfully provided, the LED labeled “PWR” illuminates
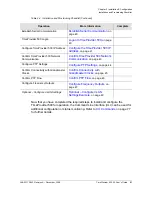
green. Descriptions of LED indicators are shown in
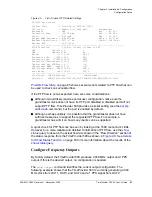
Note
: To use AC power, Symmetricom recommends using the
Compower Systems Inc. BE48-3 power supply with a A86400 rack
mount enclosure. This power supply has a terminal block for the -48
VDC output. Use the instructions in this section to construct a cable to
connect the AC supply to the TimeProvider 500.
Note
: When disconnecting, the latch arm needs to be tilted away from
the “catch” by pressing on the connector and then pulling.
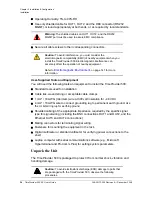
Warning:
To avoid serious personal injury or death, exercise caution
when working near high voltage lines and follow local building
electrical codes for grounding the shelf.
Содержание TimeProvider 500
Страница 10: ...Table of Contents 10 TimeProvider 500 2 0 User s Guide 098 00172 000 Revision A December 2009 ...
Страница 12: ...List of Figures 12 TimeProvider 500 2 0 User s Guide 098 00172 000 Revision A December 2009 ...
Страница 122: ...122 TimeProvider 500 2 0 User s Guide 098 00172 000 Revision A December 2009 Chapter 4 CLI Commands Show Commands ...
Страница 146: ...146 TimeProvider 500 2 0 User s Guide 098 00172 000 Revision A December 2009 T1 Format ...
Страница 174: ...Index W W 174 TimeProvider 500 2 0 User s Guide 098 00172 000 Revision A December 2009 ...


