


53
Chapter 3: Maintenance and Component Installation
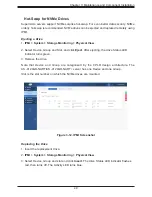
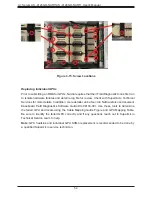
Replacing GPUs
Individual GPU and GPU baseboards are recommended to be serviced by Supermicro due
to the optimized density of the system.
Prior to submitting an RMA for GPUs, Nvidia requires that their Field Diagnostic tool is first run
to isolate hardware failures and obtain a log file for review. Check with Supermicro Technical
Services for more details. In addition, more details can be found in Nvidia reference document
Baseboard Field Diagnostics Software Guide DU-09163-001.
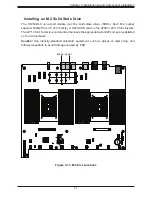
Replacing GPU Baseboard Module
1.
Run Nvidia's Field Diagnostic tool to isolate failures and obtain a log file for review.
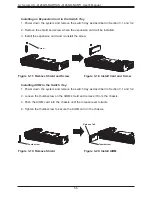
2. Disconnect the GPU baseboard module's 54V power cable.
3. Remove the two GPU air shrouds. Each air shroud has two quick-release latches.
4. Remove four fan modules. Remove the cross-bar and the fan board holder. It is not
necessary to remove the fan board from the fan board holder.
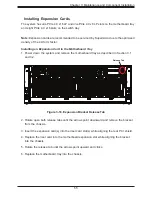
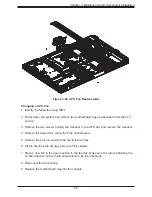
5. While holding the GPU module, remove the sixteen screws that secure the GPU
baseboard to the mechanical tray. See Figure 3-15 for the screw locations.
6. Once all screws are loose, grasp both handles of the GPU module and lift it up and out.
Be careful not to scratch the GPU baseboard or your hands on the chassis metal edges.
For installation reverse the above steps.
Figure 3-14. GPU Baseboard
2
3
3
4
4
4
4
6
6
Содержание A+
Страница 1: ...USER S MANUAL Revision 1 0b A Server AS 4124GO NART AS 4124GO NART ...
Страница 13: ...13 Chapter 1 Introduction 1 5 System Architecture Block Diagrams Figure 1 5 System Block Diagram ...
Страница 14: ...14 A Server AS 4124GO NART AS 4124GO NART User s Manual Figure 1 6 Motherboard Block Diagram ...
Страница 95: ...Chapter 4 UEFI BIOS 95 Save Changes and Exit Use this item to save the changes above and exit ...