background image

NOTE: DIAGRAMS & ILLUSTRATIONS ARE NOT TO SCALE.

13

ROUGH FRAMING FACE (UNFINISHED SHOWN)

2 X 3 MIN.

7’ Min"

Plywood 1/2”

11-1/4"

1-1/2"

23-1/2"

13-3/8"

9-3/8"

1"

22-3/8"

30-1/8"

21-1/4"

19-5/8"

FRAMING DIMENSIONS

Fireplace Opening Width

A

38-1/4"

972 mm

B

47-3/8"

1203 mm

C

30-1/8"

765 mm

D

15-1/8"

384 mm

E

77-1/8"

1959 mm

F

38-5/8"

981 mm

G

24"

610 mm

H

23"

504 mm

J

54-1/2"

1384 mm

K

8"

203 mm

L

1"

26mm

F

J

E

D

OUTSIDE CHASE

G

H

C

L

*

A

Back Wall of Chase/Enclosure

Including Finising Materials if any

Rough Framing Face (Unfinished Shown)

* Zero Clearance From Back Spacer to Wall 

Figure 14 - Framing Dimensions

Notes

Diagrams, illustrations and photo-

graphs are not to scale –  consult 

installation instructions. Product 

designs, materials, dimensions, 

specifications, colors and prices are 

subject to change or discontinuance 

without notice.
All framing dimensions calculated for 

1/2" dry wall at the fireplace face.  If 

sheathing the chase or finishing with 

other thickness materials, calculations 

will  need to be made.
* The fireplace must not be in contact 

with any insulation or loose filling 

material. Cover the insulation with 

Drywall panels around the fireplace.
Combustible materials can NOT be 

used in the space directly above the 

fireplace.  Do not fill the space above 

the fireplace with any material (Except 

the wood framing)

G

B

Corner Installation

Rough Framing Face

(dimension includes finish 

material inside framing, if any)

Top View

Front View

Heatflo Vent Outlets

K (allow space when framing)

Combustion Air Kit

K

45-1/8

(1146)

47-1/8

(1197)

38

(965)

22-1/2

(572)

19

(483)

Содержание WRT4826

Страница 1: ...nia to cause cancer and Carbon Monoxide which is known to the State of California to cause birth defects or other reproductive harm For more information go to www P65Warnings ca gov Wood Burning Fireplaces P N 901002 00 REV NC 07 2019 WRT4826WH WRT4826 This installation manual will enable you to obtain a safe efficient and dependable installation of your fireplace system Please read and understand...

Страница 2: ...eeds PARTS REQUIRED Fireplace model WRT4826WH Louver set See options on Page 22 7 diameter chimney United States Model IHP Snap Pak including Chimney lengths Elbows where necessary Associated components as per these installation instructions and vent manufacturer s instructions 7 diameter chimney Canada Models ASHT S2100 manufacture by Security Chimneys or DuraTech Canada DTC manufactured by DuraV...

Страница 3: ...ical systems generalconstructionconditions inadequate chimney heights adverse wind conditions and or unusualenvironmentalfactorsor conditions beyond our control WARNING TheWRT4826WHfireplacemust be installed with an outside air kitintake whichisincludedwith the fireplace WARNING THE FIREPLACE MUST BE OPER ATED WITH THE DOORS FULLY OPENEDORDOORSFULLYCLOSED IF THE DOORS ARE LEFT PARTLY OPENED GASAND...

Страница 4: ...per that allows the draft air to by pass the catalytic combustor Opening the by pass damper control increases the draft allowing the unit to achieve proper operating temperatures during a cold start up It also provides more draft to prevent smoke spillage when the door is opened Catalytic By Pass Gauge To determine when to close the By Pass the unit is equipped with a gauge see Figure 1 Thegaugeis...

Страница 5: ...any factors including chimney length and the moisture content of the wood This method of burning should be used only after operating the fireplace with the air control opened to produce a hot fire for about an hour Slow combustion can be used at night in order to reduce the heat output and prolong the burn The loading time will be between 6 10 hours Be aware that the glass will get dirty using thi...

Страница 6: ...nt women people with heart or lung disease or anemia those under the influence of alcohol and those at high altitudes It is against federal regulations to operate wood heaters in a manner inconsistent with operating instructions in the manual Dealing With A Chimney Fire Regular chimney maintenance and inspection canpreventchimneyfires Ifyouhaveachimney fire follow these steps 1 Close the fireplace...

Страница 7: ...ation will prevent chimneyfires Keepyourchimneyclean Donot allow more than 1 16 creosote build up in your chimney The amount of creosote will depend on variables such as frequency of use and type of fire We recommend that you FUEL What does Well Seasoned mean When a tree is cut down the wood is green full of sap and moisture This moisture content can exceed 80 which must be reduced to less than 20...

Страница 8: ... open and partially closed position after a hot fire has been started Burn hardwoods Masking Soot See Photo 8 Combustor has not maintained a light off Burning coal will cause a sulfur based compound to coat the catalyst Place combustor in a partially open and partially closed position after a hot fire has been started to burn off the soot accumulation Revert to burning wood and fire the combustor ...

Страница 9: ...o 6 Fly Ash Photo 7 Creosote Plugging Photo 8 Soot Masking These conditions are primarily related tosuchfactorsasdraft agingorfailure of the appliance components aging or fatigue of the combustor flue in stallation using the wrong fuel or to improper operation of the appliance Following the appliance s operating manual will prevent these conditions Figure 9 ...

Страница 10: ...essashes Leaveanashbed approximately1inchdeeponthefireboxbottom to help maintain a hot charcoal bed Remove ashes only when the fire is out and the ashes are cold 24 to 48 hours after the fire is out Open the bottom louver and the doors lift the door trap lever remove the plug on the doortrapoftheashtrayusingglovesorapoker Sweep the ashes in the opening with a brush or any similar tool Reinstall th...

Страница 11: ... screws see Figure 12 Figure 11 Figure 12 DO NOT USE CHEMICAL GLASS CLEANERS ON PAINTED SURFACES AS IT MAY CAUSE THE PAINT TO PEEL CAUTION DONOTALLOWWINDOWCLEANER TO GET IN CONTACT WITH DOOR GASKET OR PAINT ON FACADE OR DOOR ONCE CLOSED CONTACT OF GLASS CLEANER WITH THE FIREPLACE FACADE CAN PROVOKE PAINT PEELING OFF Gasket Replacement Remove the door from the unit and lay it on a cleanunabrasivesu...

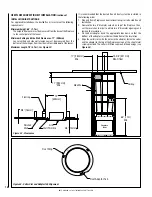
Страница 12: ...ept on the front facing Place headers only as required to support the facing and mantel The fireplace cannot be in contact with the house insulation material Cover the insula tion with drywall panels or any rigid material around the fireplace Hearth Extension Requirements The fireplace may be installed directly on a combustible floor The supplied safety metal strip must be positioned as follows On...

Страница 13: ...ation instructions Product designs materials dimensions specifications colors and prices are subject to change or discontinuance without notice All framing dimensions calculated for 1 2 dry wall at the fireplace face If sheathing the chase or finishing with otherthicknessmaterials calculations will need to be made The fireplace must not be in contact with any insulation or loose filling material C...

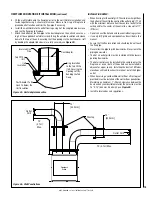
Страница 14: ...on materials must not be in contact with the fireplace or in theenclosureframeasdescribedin Enclosure section NOTE Localcodesmaynotrequirefirestopping at the ceiling levels for outside chase installa tions However it is recommended for safety and the reduction of heat loss WARNING Ifinsulationisused thefireplace must not be placed directly against it Insulation or vapor barriers if used must first...

Страница 15: ...it 38 and a height of 54 from the base of the appliance see Figure 19 3 Non combustible materials such as brick stone or ceramic tile may project in front of and onto the fireplace facing see Figure 18 2 x 3 MIN 54 1 2 GYPSUMBOARD SPACER MANTEL Figure 18 2 x 3 MIN SPACER 1 2 GYPSUMBOARD NON COMBUSTIBLE FACING Mantel The mantel must be installed at least 54 1372 mm above the base of the fireplace s...

Страница 16: ...le in the outside wall of the house at the chosen location From outside place the outside air register in the hole open side down and fasten the register to the wall with screws as shown see Figure 20 Slip the pipe into the insulated sleeve Place the insulated pipe over the register tube and over the fireplace s outside air connector see Figure 21 At each end carefully pull back the insulation and...

Страница 17: ...Kit Table 3 TOOLS NEEDED 5 16 hex driver and no 2 Phillips screwdriver GENERAL INFORMATION If you encounter any problems need clarification of these instructions or are not qualified to properly install this kit contact you local distribu tor or dealer Readthisinstructionsheetinitsentiretybeforebeginningtheinstallation ALL WARNINGS AND PRECAUTIONS IN THE INSTALLATION AND OPERATION MANUAL PROVIDED ...

Страница 18: ...e and outlet locations prior to ducted flex kit installation 2 Remove the two 8 diameter cutouts on top of the fireplace Then cut the insulation in order to obtain two 8 diameter openings and remove the insulation 3 On the duct adaptor bend the appropriate tabs down so that the bottom of the adaptor is just below the bottom of the insulation 4 Align the collar slots with the holes in the adaptor f...

Страница 19: ...1 7m with the minimum distance from the center of outlet to the ceiling and for the center of the outlet to a side wall of 11 279mm Do not connect the hot air ducts to a central heating system Use only IHP grills and components as described in this manual Ensure that the flex insulation and sheathing do not touch the flue pipe Never allow the pipe to pitch downwards Never route the piping downward...

Страница 20: ...ce expands This can be achieved by having the chimney supported by the supports The maximum chimney length that can be supported by the fireplace is nine 9 feet 2 75 m 6 The chimney must extend at least 3 feet 915 mm above its point of contact with the roof and at least 2 feet 610 mm higher than any wall roof or building within 10 feet 3m of it see Figure 21 7 If the chimney extends higher than 5 ...

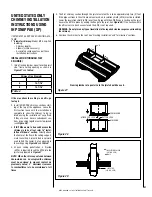
Страница 21: ...llation and Termination sections B A Framing lumber of equal size to the joist should be used Figure 28 FEMALE END MALE END BUTTON LOCK ATTACH FOR LOCK Figure 29 INSULATION SHIELD CAT NO SPIS NAIL FIRESTOP CAT NO SPFS Chimney Flue Diameter 7 A 13 7 16 B 13 7 16 Table 4 If the area above the ceiling is an attic go to step 5 2 Install SNAP PAK chimney sections start ing at the top of the appliance L...

Страница 22: ...d the adaptor on wall support to maintain 2 clearance to combustibles AT THIS POINT TIGHTEN CLAMPS 11 Slide IHP chimney pipe into top of tee Align male and female ends Push down on pipe sec tions until locked As sections are added it will be necessary to secure them to the outside wall with bands SPWB at eight foot intervals and 2 from combustibles Wall Bands SPWB are secured to the chimney by pla...

Страница 23: ...roof will vary depending on the roof pitch 2 Install the next SP chimney section through the roof See Figure 34 NOTE If your roof is already shingled be sure to slide the upper edge under the shingles to prevent leakage 3 Install a bead of caulk around the pipe at the top edge of the flash ing Wrap the storm collar around the pipe and imbed the edge in the caulk to prevent leakage around the pipe ...

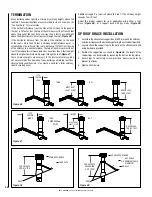
Страница 24: ...operation Trees buildings adjoining roof lines adverse wind conditions etc may create a need for a taller chimney should smoking occur Additional support is required above the roof if the chimney height exceeds four 4 feet Select the proper support for your application using either a roof brace Figure 38 or a support band with guy wires Figure 39 Figure 36 IF 10 FEET OR LESS L944 FIG21 THEN BUT MU...

Страница 25: ...18 460 mm 18 460 mm 16 410 mm Figure 40 Chimney Adaptor Canada only CHIMNEY ADAPTOR CANADA ONLY The fireplace is normally supplied with a chimney adaptor suitable for use with IHP SnapPak venting In Canada the use of Security Chimneys ASHT adaptor is required Security part number 7IHP1 or 7IHP2 One inch wall Two inch wall CANADA ONLY CHIMNEY INSTALLATION INSTRUCTIONS USING SECURITY CHIMNEYS ASHT C...

Страница 26: ...sonry chimney at 30º 3 Increase the size of the hole until a 30º liner elbow can be easily slipped through 4 Slide the liner down from the top of the masonry chimney until you reach the hole level 5 Slip through the hole a 30º liner elbow and connect it to the liner 6 Add a small liner section to the liner elbow which will allow the liner to extend at least 12 measured at the top of the liner from...

Страница 27: ...Kit Required Included with Fireplace Outside Air Coupler to Connect Outside Air UZI to Fireplace UZIAD UZIAD Outside Air Ducting Includes 4 in Insulated Flex x 10 ft long UZI UZI Central Forced Air Kit Accessories u Central Forced Air Kit Central forced air kit including blower BISZY flex adaptor BISAF 2 clamps variable speed control VRUW thermo disk VTU fan to flexible pipe adapter BISAVF back dr...

Страница 28: ...Output EPA Estimated Efficiency WRT4826WH 4 1 g hr 10 900 35 600 btu hr 72 Replacement Parts Description Cat No Front Refractory PR SR2113 Back Refractory PR SR2056 Right Side Refractory PR SR2057D Left Side Refractory PR SR2057G Bottom Refractory PR SR2055 Catalytic Combustor PR SR2110 Catalytic Combustor Stainless Steel Casing PR SR2111 Catalyst Air Tube front PR SR2053 Cast iron Log Supports 2 ...

Страница 29: ...r ordering information DuraTech DTC 1 High Temp Insulated Stainless Steel Chimney 7 I D and 11 O D Double Wall Stainless Steel Listed to CAN UCL S604 UL 103HT and CAN ULC S629 Description Part Cat No Lengths and Misc Chimney Components 8 length 7 Dia 7DTC 08SS 12 length 7 Dia 7DTC 12SS 18 length 7 Dia 7DTC 18SS 24 length 7 Dia 7DTC 24SS 36 length 7 Dia 7DTC 36SS 48 length 7 Dia 7DTC 48SS Adjustabl...

Страница 30: ... REMPLACER LA VITRE AVEC UN VERRE CÉRAMIQUE DE 5mm D ÉPAISSEUR POUR UNE UTILISATION SÉCURITAIRE INSTALLER CONFORMÉ MENT AUX DIRECTIVES DU FABRICANT ATTENTION NE PAS OBSTRUER LES ARRIVÉES D AIR COMBURANT NE PAS FAIRE SURCHAUFFER LE FOYER LA PORTE DU FOYER DOIT DEMEURER TOTALEMENT OUVERTE OU TOTALEMENT FERMÉE LORSQUE LE FOYER FONCTIONNE NE PAS UTILISER DE POÊLE ENCASTRABLE OU D AUTRES PRODUITS NON S...

Страница 31: ...al use with approved fuels listed in the Operation Manual provided with the product This includes burning such fireplace fuels as wood and natural or propane gas Fuel products with abnormal burning characteristics including but not limited to fuel such as driftwood coal or plywood and wood products using a binder may burn at excessive temperatures and may cause damage to the Product or may cause i...

Страница 32: ... Page 28 for a complete replacement parts list Use only parts sup plied from the manufacturer Normally all parts should be ordered through your IHP distributor or dealer Parts will be shipped at prevailing prices at time of order When ordering repair parts always give the following information 1 The model number of the appliance 2 The serial number of the appliance 3 The part number 4 The descript...

Отзывы: