background image


Step 3 

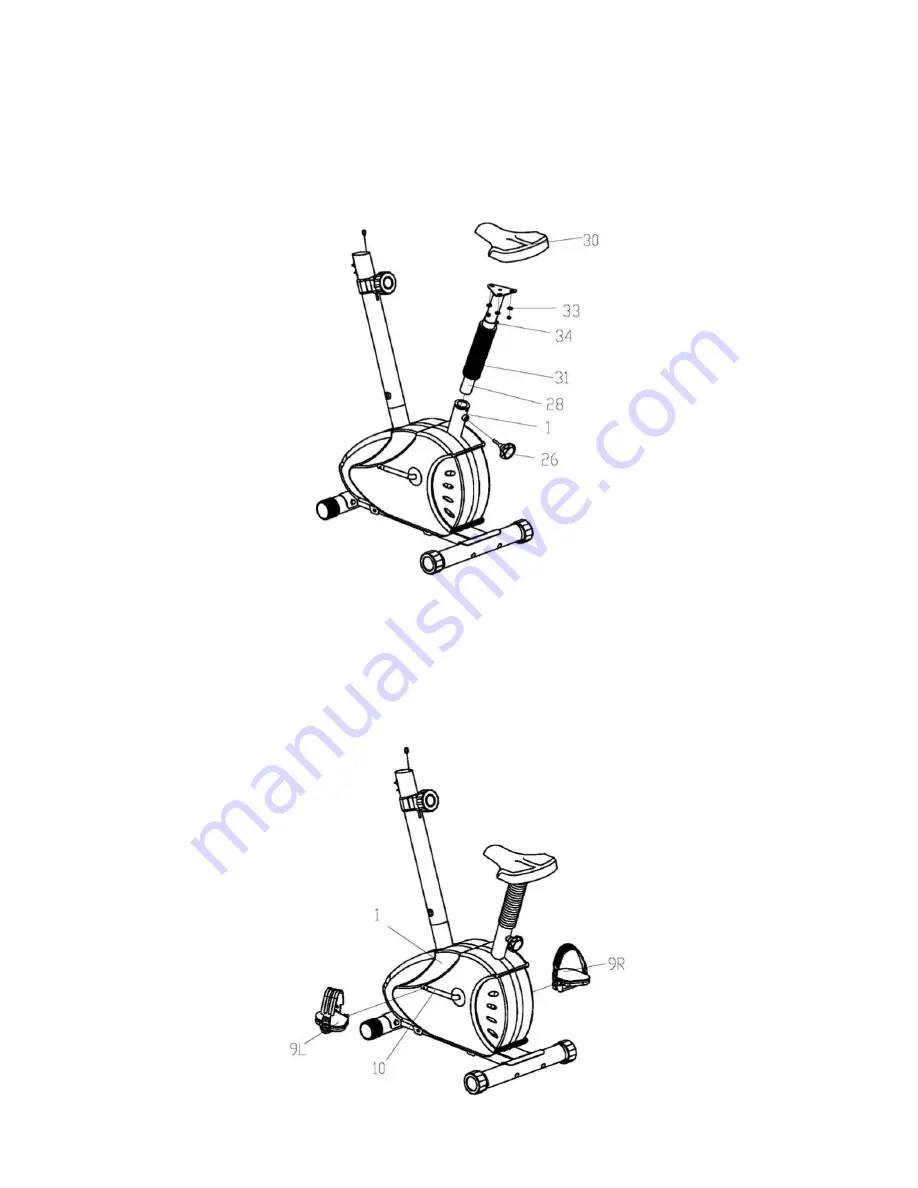
Attach the seat (30) to the seat post (28) with the nylon nuts (34) and flat washers (33). Then 
cover the seat post (28) with the plastic tube (31). At last, lock the seat post (28) on the main 
frame (1) with knob (26). 


Step 4


Attach the pedals (9L/R) to the crank (10). Each pedal is marked with L&R (for left & right) 
respectively, viewed from the rider’s seated position. 

Important 

Note: 

The 

left 

pedal 

has 

reversed 

threading; 

you 

must 

turn 

COUNTER-CLOCKWISE  to  tighten.  Failure  to  adhere  to  this  procedure  may  result  in 
permanent damage to your bike. 


Содержание SF-B915

Страница 1: ...Magnetic Upright Bike Model No SF B915 For Customer Service please contact support sunnyhealthfitness com ...

Страница 2: ... They can define the maximum setting Pulse Watts Duration of training etc to which you should train yourself This machine is not suitable for therapeutic purpose 8 Only do training on the machine when it is in correct working condition Use only original spare parts for any necessary repairs 9 This machine can be used for only one person s training at a time 10 Wear training clothes and shoes which...

Страница 3: ...3 EXPLODED DIAGRAM ...

Страница 4: ...k 1 11 Handlebar post 1 12 Sensor wire 1 13 Extension wire 1 14 Tension wire 1 15 Tension controller 1 16 Flat washer 1 17 Screw 1 18 Screw 4 19 Handlebar 1 20 Foam grip 2 21 Pulse wire 2 22 Washer 2 23 Screw 2 24 Handle chuck cover 1 25 End cap 2 26 Knob 1 27 Bushing 1 28 Seat post 1 29 End cap 1 30 Seat 1 31 Plastic tube 1 32 Computer 1 33 Flat washer 3 34 Nylon nut 3 35 Computer seat 1 36 Flat ...

Страница 5: ...it out from the front tension hole of the post then connect the extension wire 13 with sensor wire 12 insert the handlebar post 11 onto main frame 1 and lock it tightly with arc washers 5 and screws 18 Connect the tension controller 15 with tension wire 14 then lock the tension controller 15 on the handlebar post 11 tightly with flat washers 16 and screws 17 Important note Protect the cable inside...

Страница 6: ...eat post 28 on the main frame 1 with knob 26 Step 4 Attach the pedals 9L R to the crank 10 Each pedal is marked with L R for left right respectively viewed from the rider s seated position Important Note The left pedal has reversed threading you must turn COUNTER CLOCKWISE to tighten Failure to adhere to this procedure may result in permanent damage to your bike ...

Страница 7: ...computer seat 35 then cover the computer seat 35 on the handlebar post 11 Fix the computer 32 on the computer seat 35 once the computer wires are all connected well Installation completed After finishing installation please inspect all the screws and nuts carefully to make sure they are securely tightened Ensure that all the Nuts Nut Caps and Pedals are in safe condition Inspect the equipment peri...

Страница 8: ... strength or aerobic training session is very important Muscles stretch more easily at these times because of their elevated temperature which greatly reduces the risk of injury Stretches should be held for 15 to 30 seconds DO NOT BOUNCE Remember always to check with your physician before starting any exercise program EXERCISE PHASE This is the stage where you put the effort in After regular use t...

Отзывы: