


10
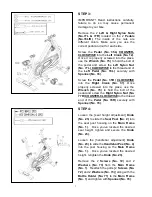
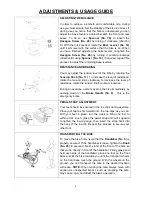
ADJUSTING THE SEAT
The seat of this bike is fully adjustable as it moves
Up
,
Down, Fore (forward), Aft (backward).
To adjust the height of the
Seat Post (No. 2),
loosen and
pull the
Knob (No. 23)
outward, then raise or lower the seat
to the desired height. Once adjusted, re-insert and tighten
the
Knob (No. 23)
to secure the seat in place.
To adjust the seat back and forth, loosen and pull
Knob (No.
23)
outward, then slide the
Seat Slider (No. 3)
to the desired
position. Once positioned, re-insert and tighten the
Knob
(No. 23)
to secure the seat slider tube in place.
ADJUSTING THE HANDLEBAR
It is important that the handlebar and seat are both set to the
correct height of your body. To adjust the handlebar height,
loosen and pull the
Knob (No. 23)
outward, then slide the
Handlebar Post (No. 4)
up or down to the desired height.
Once adjusted re-insert and tighten the
Knob (No. 23)
to
secure the handlebar post in place.
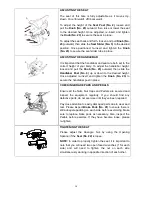
CHECKING BRAKE PADS AND PEDALS
Ensure all the Nuts, Nut Caps and Pedals are secured and
inspect the equipment regularly. If you should find any
defective parts, do not exercise until they’ve been repaired.
Pay close attention to easily damaged parts due to wear and
tear. Please inspect
Brake Pads (No. 41)
to ensure there is
still adequate padding on each side before exercising. Make
sure to replace brake pads as necessary. Also, inspect the
Pedals before exercise. If they have become loose, please
re-tighten.
TIGHTENING THE SEAT
Please adjust the Hexagon Nut by using the Opening
Spanner if the
Seat (No. 22)
is loose.
NOTE:
In order to properly tighten the seat, it is important to
note that you will need two open faced wrenches (1 for each
side) and will need to tighten the nut on each side
simultaneously working in opposite direction of each other.
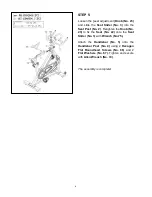
Содержание SF-B1401
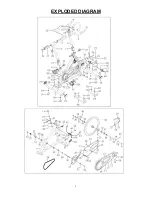
Страница 3: ...2 EXPLODED DIAGRAM ...