


5-6
Sun StorEdge 3000 Family FRU Installation Guide • May 2004
5.1.3
Installing an I/O Controller Module
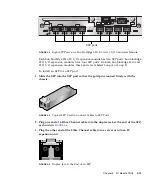
1. Keep the array powered on. Gently slide the I/O controller module into the unit
until it clicks and is seated in the backplane.
Caution –
Be sure that the module is properly inserted in the guide rails of the
array and that you keep the power on. If you power off and then replace the
module, you will have to continue with additional steps. Refer to
Replacement for a Single-Controller or Powered-Off Array” on page 5-10
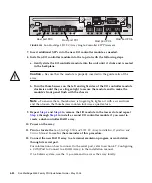
2. Turn the thumbscrews on the left and right sides of the I/O controller module
clockwise until they are finger-tight, to secure the module and to make the
module’s front panel flush with the chassis.
Note –
To ensure that a thumbscrew is finger-tight, tighten it with a screwdriver
and then loosen the thumbscrew counterclockwise a quarter-turn.
The new controller automatically becomes the secondary controller.
Caution –
Wait a minimum of 10 minutes for the firmware synchronization process
to be completed. If the newly installed controller is removed for ANY reason during
the period when the status LED is AMBER (for 10 minutes or more), the controller
can be rendered inoperable and must be returned for repair.
In a redundant controller configuration where a new controller FRU is installed, the
controller status LED will remain AMBER until the controllers complete the
redundant controller process which can take more than 10 minutes. The same
firmware versions must be installed on both controllers for proper redundant
controller operation.
The redundant controller process automatically synchronizes the firmware version
of the newly installed FRU to match the firmware version of the other running
controller. For example, if the running controller has firmware 3.27N and the new
controller has 3.27Q, the new controller will be synchronized to have the 3.27N
firmware of the running controller. To monitor this process, refer to
Automatic Firmware Update with a Recently Installed Controller FRU” on page 5-7
3. If you hear an audible alarm and see a blinking amber Event light on the front of
your array, the SES firmware or its associated PLD code in the new controller has
a version that is different from the code in the other I/O controller in your array.
Содержание StorEdge 3000 Series
Страница 12: ...1 6 Sun StorEdge 3000 Family FRU Installation Guide May 2004 3 Power off both power supply fan modules ...
Страница 34: ...3 8 Sun StorEdge 3000 Family FRU Installation Guide May 2004 ...
Страница 74: ...5 26 Sun StorEdge 3000 Family FRU Installation Guide May 2004 ...
Страница 94: ...6 20 Sun StorEdge 3000 Family FRU Installation Guide May 2004 ...


