

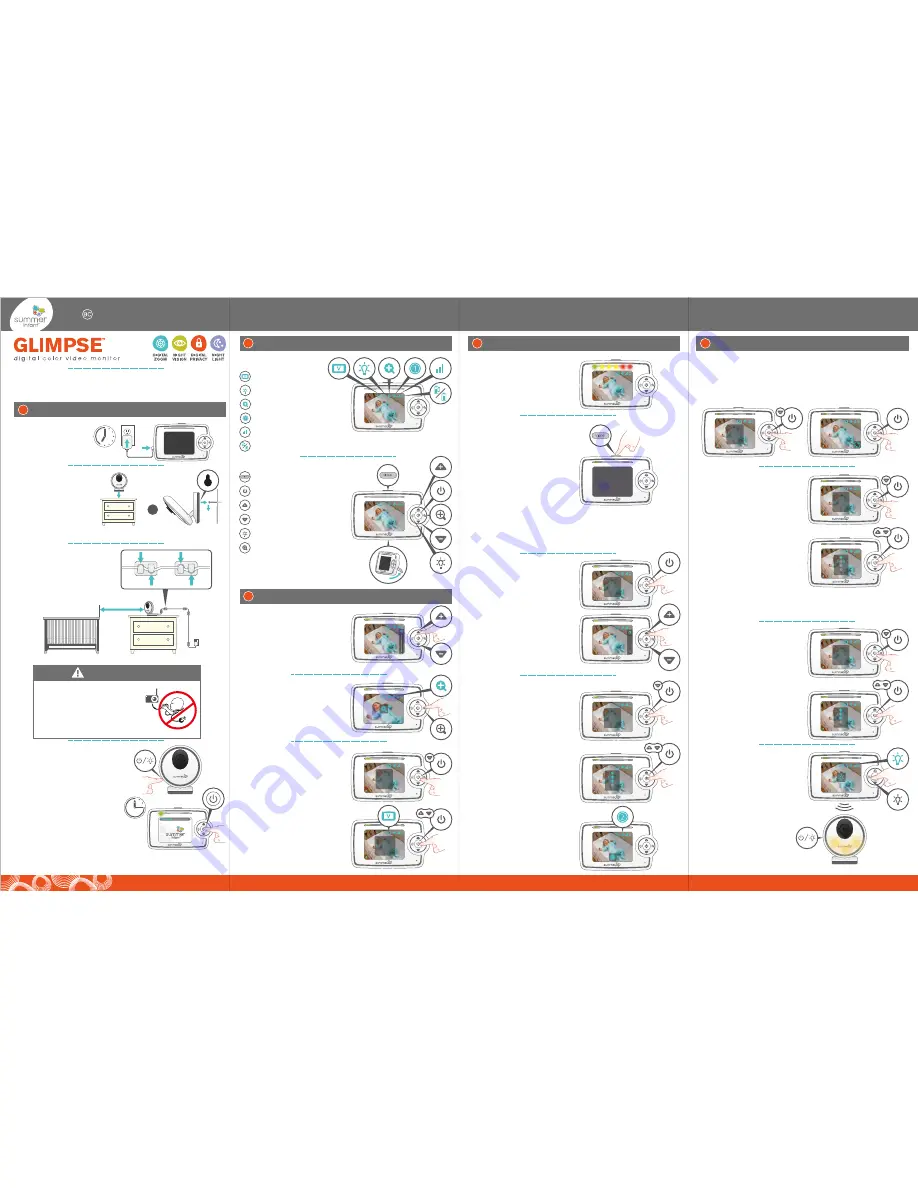
Flip out the kick-stand
and place the monitor on
a stable, level sur face.
v
Deleting a Camera:
Press the POWER/MENU button to
enter menu screen.
Using the
DOWN button, highlight DELETE
CAM. Use the UP/DOWN buttons
to highlight the camera you
would like to delete. Press the
POWER/MENU
button to delete
that cam.
Scanning Camera
When using multiple cameras, to enter scan mode, press the POWER/MENU
button to enter menu screen. Using the DOWN button, select SCAN, and
press the POWER/MENU button. Scanning cameras will begin. It will cycle
through each active camera every 8 seconds. To stop scanning, press the
POWER/MENU button.
Selecting Camera to View
Tap the POWER/MENU button to
enter menu screen. Using the
DOWN button, highlight VIEW
CAM and press the
POWER/MENU button. Use the
UP/DOWN buttons to select an
available camera (blue color
indicates synched cameras).
Press POWER/MENU button to
confir m selection.
The video will appear on the
handheld screen. An icon
showing camera number will
appear on the screen for 3
seconds. Camera number on
indicator bar will change to
selected camera.
Nightlight
Press the NIGHTLIGHT button on
the handheld to activate the
soft glow nightlite on the
camera. The light will glow.
Nightlights are comforting to
little ones, especially toddlers
who become scared in a pitch
black room. Press the
NIGHTLIGHT button again to
turn off.
Volume
Use the UP/DOWN arrow bottons to
increase and decrease the volume.
The nightlight can also be
turned on or off from the
camera by pressing the
POWER/NIGHTLIGHT button.
Thank you for purchasing the Glimpse™ Digital Color Video Monitor
by Summer Infant. Please read the following instructions and
warnings carefully. Keep this instruction manual for future reference.
Zoom
Press the ZOOM button to
magnify the screen. Press the
button again to zoom out.
Charge the Handheld
Charge for 7 hours before
first use.
Install the Camera
For best picture focus,
place camera 6 to 8 ft.
from crib. Plug in camera.
Place camera on a flat
sur face, such as a tabletop,
or shelf or mount the
camera on a wall using the
screw and wall anchor
provided.
tabletop
wall mount
MONITOR USER GUIDE
SET-UP
1
or
Sound Activated Lights
The LED light bar on the top of
the handheld will light up as it
picks up noises, even in power
save mode. When battery is low,
the first LED flashes red and
handheld beeps.
USING THE HANDHELD (continued)
3
USING THE HANDHELD
3
USING THE HANDHELD (continued)
3
Secure the Camera Cord
NEVER place the camera or
cords within 3-feet of the crib.
Secure the cord to your wall
using the 6 security clips included
to keep the cord away from
baby’s reach.
3ft.
Congratulations!
You are now ready to use your
Glimpse™ Digital Color Video Monitor!
3 sec.
Power on the Camera and
Handheld
Push the power/nightlight button on
the
camera
and hold for 3 seconds. A
green light will appear near the lens.
Push and hold the power button on
the
handheld
unit for 3 seconds. The
handheld will automatically sync with
the camera.
(The handheld unit and the
camera are paired at the factory for privacy
reasons. If the handheld and camera are not
synced with each other for any reason, see
Adding a Camera
in the user guide.)
Screen Icons
Function Buttons
Vox Indicator
Nightlight
Zoom
Camera Selection
Reception
Battery Life/ Plugged In
Video
Power/Menu
Volume Up
Volume Down
Nightlight
Zoom
SCREEN ICONS & FUNCTION BUTTONS
2
2 9 8 9 0
7hr.
Video On/Off Power Save
To conserve battery power, turn off
the handheld’s video by pressing
the VIDEO button. The screen will go
dark. This feature allows you to
preserve battery life when not
plugged into A/C adapter. The
audio feature will remain activated
allowing you to monitor sounds.
Press the VIDEO button again to
resume video monitoring. When
handheld is not plugged in, screen
will automatically turn off after 30
seconds. Press the video button to
turn screen back on. If Vox feature is
on, video will turn on automatically
when sound is detected.
Summer Infant, Inc.
| 1275 Park East Drive | Woonsocket, RI 02895 | 401-671-6551
9/17
Brightness
Adjust the handheld screen
brightness by pressing the
POWER/MENU button. Select
BRIGHTNESS from the menu. Use
the UP and DOWN arrow buttons
to adjust the brightness.
STRANGULATION HAZARD:
Children have strangled
in cords. Keep this cord
out of the reach of
children (more than 3 ft.
(0.9m) away).
WARNING
Read all warnings prior to using this product
.
Vox (Voice Activated
Video) On/Of f
The Vox feature, when on, will
turn on your screen when it is in
power save mode and the
camera picks up a sound. To
turn Vox mode off, press the
POWER/MENU button to enter
menu screen.
Using the DOWN
button, highlight vox ON/OFF.
Vox icon is displayed on
indicator bar when active.
Adding a Camera
Make sure the power is on for the
camera you would like to add.
Press the POWER/MENU button to
enter menu screen. Using the
DOWN button, scroll to ADD CAM
and press the POWER/MENU
button to select. Using the UP or
DOWN buttons, scroll to the
camera number you would like to
add and press POWER/MENU
button to select. Press the SYNCH
button on the back of the
camera. Three bars will appear
next to the camera icon to
indicate that it is synching.
(
Note: This product accepts up to 4 cameras and operates on audio and video auto-scan
to view each camera on an 8-second rotation. To order an additional camera (item
#29980), please contact our Consumer Relations Team by phone at: 401-671-6551 or via
email at: www.summerinfant.com/contact for details.)
v
BRIGHTNESS
VIEW CAM
SCAN
ADD CAM
DELETE CAM
VOX ON/OFF
EXIT MENU
SELECT
BRIGHTNESS
VIEW CAM
SCAN
ADD CAM
DELETE CAM
VOX ON/OFF
EXIT MENU
SELECT
SELECT
EXIT MENU
SELECT
EXIT MENU
SELECT
EXIT MENU
BRIGHTNESS
VIEW CAM
SCAN
ADD CAM
DELETE CAM
VOX ON/OFF
EXIT MENU
SELECT
BRIGHTNESS
VIEW CAM
SCAN
ADD CAM
DELETE CAM
VOX ON/OFF
EXIT MENU
SELECT
SELECT
SELECT
BRIGHTNESS
VIEW CAM
SCAN
ADD CAM
DELETE CAM
VOX ON/OFF
EXIT MENU
SELECT
OFF
ON
VOX
EXIT MENU
BRIGHTNESS
VIEW CAM
SCAN
ADD CAM
DELETE CAM
VOX ON/OFF
EXIT MENU
SELECT


