background image

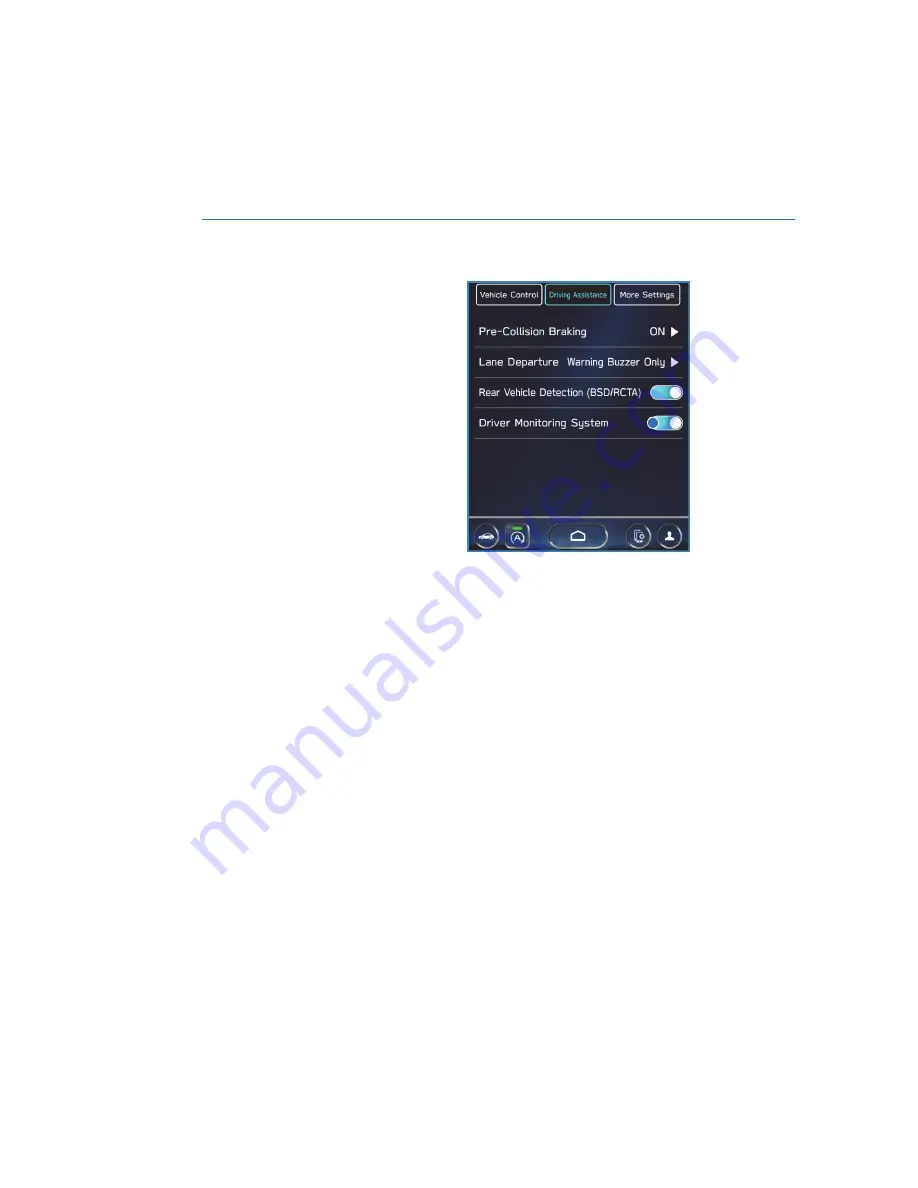
DRIVER MONITORING SYSTEM OFF

The Center Information Display (CID) is used to

turn the Driver Monitoring System off or on

and to customize settings. You can quickly

turn the Driver Monitoring System off or on by

selecting the “Car Settings” icon, and then in

the “Driving Assistance” menu, selecting

“Driver Monitoring System.”

DRIVERFOCUS DISTRACTION MITIGATION SYSTEM

112

Содержание Legacy 2023

Страница 1: ...Subaru of America Inc One Subaru Drive Camden NJ 08103 9800 MSA5B2303A Issued July 2022 Printed in USA 07 22 2023 Getting Started Guide Legacy Love It s what makes Subaru Subaru...

Страница 2: ...ark of HARMAN International Industries Incorporated Harman Kardon is a registered trademark of Harman International Industries Incorporated Quantum logic is a trademark of Harman International Industr...

Страница 3: ...TROLS 16 TURN SIGNALS 17 WINDSHIELD WIPERS 17 OVERHEAD CONSOLE 18 GETTING COMFORTABLE SEATING 19 TILT AND TELESCOPIC STEERING COLUMN 22 POWER EXTERIOR MIRRORS 22 REAR VIEW MIRROR 24 POWER WINDOWS 25 C...

Страница 4: ...ADIO 72 MEDIA 74 PHONE PAIRING A PHONE 75 MAKING A CALL 76 RECEIVING A CALL 77 TEXT MESSAGES 78 APPS SUBARU STARLINK IN VEHICLE APPS 79 MYSUBARU 80 MAPS if equipped MAPS OVERVIEW 82 STARLINK SAFETY AN...

Страница 5: ...SYSTEM OFF 112 CARE AND LIMITATIONS STEREO CAMERA PRECAUTIONS 113 WINDSHIELD GLASS AND DASHBOARD 113 FRONT VIEW LEGACY 114 EYESIGHT DISCLAIMER EYESIGHT DISCLAIMER 115 HOW TO APPENDIX HOW TO OVERVIEW 1...

Страница 6: ...ute for your Owner s Manuals We strongly encourage you to review your Vehicle STARLINK and EyeSight Owner s Manuals to ensure complete understanding As part of routine maintenance and continuous impro...

Страница 7: ...ervice is available anytime during the 3 year 36 000 mile Subaru Limited Warranty whichever comes first See your Subaru Retailer for details and refer to the Roadside Assistance guide in the owner s i...

Страница 8: ...s power to all four wheels improper towing may damage your AWD system The best way to tow your Legacy is with a flatbed truck by your Subaru Retailer or a commercial towing service For more informatio...

Страница 9: ...unk briefly press the button twice The interior lights will illuminate when you press the unlock disarm button if the interior light switch is set to the DOOR position on the overhead console 3 Trunk...

Страница 10: ...g the Car menu Unlocking Using Door Handles Grip the driver s door handle to unlock the driver s door and the fuel filler lid Grip the front passenger s door handle to unlock all doors the fuel filler...

Страница 11: ...Unlocking the Trunk Press the trunk opener button to unlock and open the trunk Two chirps sound and the hazard warning lights flash twice Trunk Opener Button ENTRY AND EXIT 9...

Страница 12: ...1 Power Windows p 25 2 Power Exterior Mirrors p 22 3 Instrument Panel Switches p 14 4 I Switch p 15 5 Audio Controls p 14 6 Light Controls p 16 7 Combination Meter p 12 INSTRUMENT PANEL 10...

Страница 13: ...8 Advanced Adaptive Cruise Control p 15 9 Center Information Display CID p 55 10 Windshield Wipers p 17 11 SUBARU STARLINK Multimedia Touchscreen p 56 12 CVT Select Lever p 35 INSTRUMENT PANEL 11...

Страница 14: ...ON METER 1 Tachometer 2 Combination Meter Display CMD 3 Speedometer 4 Fuel gauge 5 Trip meter and odometer 6 Select lever gear position indicator 7 Engine coolant temperature gauge GAUGES AND WARNING...

Страница 15: ...t warning Door open indicator Brake system warning Yellow lights indicate caution Some examples are Low fuel Engine low oil level warning Tire pressure warning Green and blue lights are for informatio...

Страница 16: ...more information please refer to Keys and Doors and Instruments and Controls in your Owner s Manual AUDIO CONTROLS 1 Source 2 Presets Skip 3 Info Switch 4 Arrow Switches 5 Call and End Mute Switches 6...

Страница 17: ...ion in the Combination Meter Display CMD such as fuel consumption driving time speed and tire pressure among others You can change the information displayed by using the up and down arrows If there ar...

Страница 18: ...release The high beams will stay on as long as you hold the lever The headlight flasher works even with the headlight control switch in the off position 4 High Beams Push the lever forward to change f...

Страница 19: ...rn signal Your Subaru also has a one touch lane changer feature push slightly up and release to signal a right lane change or push slightly down and release to signal a left lane change WINDSHIELD WIP...

Страница 20: ...r more information please refer to page 83 in this Getting Started Guide or Introduction in your SUBARU STARLINK Safety and Security Owner s Manual 3 Automatic Illumination When the interior light swi...

Страница 21: ...lever and make sure the seat is locked into place 2 Seat Height Driver s Seat Pulling up or pushing down on the lever will raise or lower the seat cushion 3 Recline Seatback Pull the lever up to adju...

Страница 22: ...ar Support Press the front side of the switch to increase lower back support Press the rear side of the switch to decrease support If equipped press the upper or lower side of the switch to adjust the...

Страница 23: ...forward You will hear a click when the restraint locks in place Pulling the head restraint as far forward as it will go allows it to return to the fully upright position Seatbelt Adjuster To keep your...

Страница 24: ...ing wheel Push the lever firmly back up to lock the steering wheel in place POWER EXTERIOR MIRRORS The power mirror knob works with the ignition in the ON or ACC position Turn the knob to L left side...

Страница 25: ...d press again to unfold The switch works with the ignition in the ON or ACC positions NOTE Always ensure the mirrors are unfolded before driving If equipped the power folding mirrors can also be set t...

Страница 26: ...select lever out of the R position This setting can also be turned on or off in Door Mirror Setting in the Center Information Display REAR VIEW MIRROR Auto dimming Mirror if equipped The auto dimming...

Страница 27: ...com homelink has a helpful how to video NOTE HomeLink 5 may not be compatible with some older door openers or additional equipment may be required POWER WINDOWS To open or close a window partially pr...

Страница 28: ...f in the fully closed position press briefly hold and then release the center of the moonroof switch to automatically tilt the moonroof up Slide and hold the moonroof switch forward to lay the moonroo...

Страница 29: ...Climate Control On Off Button 2 Climate Control Mode Indicator 3 Customizable Icon 4 Fan Speed Controls Select the Climate Control Mode Indicator to display and adjust the airflow mode Auto mode air...

Страница 30: ...control mode indicator and using the arrows or sliding the temperature control bar You can set separate temperatures for the driver s side and passenger s side 3 Rear Window Defogger Button Press thi...

Страница 31: ...mode will change as follows High Mid Low Off Yellow indicators illuminate indicating the level 8 Ventilated Seat Button Select this button to turn on the driver passenger ventilated seat Each time yo...

Страница 32: ...let selection and air conditioner operation 12 Air Inlet Selection Button Select this button to activate recirculation mode and recirculate the interior air inside the vehicle Recirculation mode is he...

Страница 33: ...select the AUTO button again Remote Engine Start with Climate Control if equipped You can remotely start your Subaru and adjust the temperature using the STARLINK Safety and Security features through...

Страница 34: ...ped There are separate heated seat switches for each side on the rear center console Press the switch to activate the heated seat The heating mode changes to High Low and Off each time you press the s...

Страница 35: ...onsole You can connect a variety of USB equipped devices to the front port such as portable music players or smartphones to enjoy your favorite music or connect to Apple CarPlay or Android Auto The US...

Страница 36: ...to the audio system and accessory power outlets Orange indicator illuminates ON All electrical systems are available Orange indicator illuminates OFF Power off and indicator off STARTING THE VEHICLE...

Страница 37: ...from the D position into the M position to select manual mode The gear position indicator in the Combination Meter Display CMD shows the currently selected gear Arrow shaped indicators show when upsh...

Страница 38: ...dless of the engine speed Delivering maximum driving enjoyment this mode is ideal for driving on twisting roads and for merging or overtaking other vehicles on the freeway with confidence AUTO START S...

Страница 39: ...en completely stopped by depressing the brake pedal with the select lever in the D position the engine will be automatically stopped When you release the brake pedal with the select lever kept in the...

Страница 40: ...switch to the ON position The light will turn off after the engine has started NOTE If the Auto Start Stop warning light does not turn off or is flashing yellow after the engine has started the Auto S...

Страница 41: ...will appear in the Combination Meter To release the parking brake manually depress the brake pedal and push the parking brake switch down with the ignition in the ON position To automatically release...

Страница 42: ...ination Meter Display Once you bring your Subaru to a complete stop by depressing the brake pedal the function operates to keep your Subaru in place While your Subaru is being held by this function th...

Страница 43: ...n will remain active for about 40 seconds or until a front door is opened whichever occurs first With Push button Ignition To stop the engine 1 Stop your Subaru completely 2 Move the select lever to t...

Страница 44: ...on and turn it clockwise until you hear a clicking noise Be certain not to catch the tether under the cap while tightening To close the lid press it until you hear it latch NOTE The Check Engine warni...

Страница 45: ...e seatback to its original position raise the seatback until it locks into place You will no longer be able to see the red marker when the seat is locked To fold the seats from the trunk pull the leve...

Страница 46: ...rer as well as the installation instructions in your Owner s Manual to properly install the LATCH compatible restraint system Use the appropriate seatbelts or anchorages provided in your Subaru Childr...

Страница 47: ...audible beeps and with a Reminder Look in Rear Seat message in the Combination Meter Display CMD You can turn the Rear Seat Reminder off in the Center Information Display CID Passenger Occupant Detect...

Страница 48: ...The maintenance tools and temporary spare tire are stored in the under floor storage compartment Your vehicle is equipped with the following maintenance tools Jack Jack handle Screwdriver Wheel nut wr...

Страница 49: ...HOOD PROP The hood prop is located on the left underside of the hood Release it from the retainer and insert the end into the slot in the engine compartment ENGINE COMPARTMENT 47...

Страница 50: ...ur maintenance needs may vary depending on your driving conditions Please consult with your retailer and refer to the Warranty and Maintenance Booklet for complete information and recommended replacem...

Страница 51: ...Your maintenance needs may vary depending on your driving conditions Please consult with your retailer and refer to the Warranty and Maintenance Booklet for complete information and recommended repla...

Страница 52: ...ncy ENGINE OIL Use 0W 20 synthetic with one of the following specifications API classification SN with the words RESOURCE CONSERVING SN PLUS with the words RESOURCE CONSERVING or SP with the words RES...

Страница 53: ...ttachment and cargo does not exceed the maximum load limit The maximum total load on the roof including crossbars carrying attachments and cargo must not exceed 88 pounds For more information please r...

Страница 54: ...e of each individual tire You can learn more by scanning the QR code to see a video with tips and more information about your Subaru s TPMS The TPMS screen shows individual tire pressure in the Combin...

Страница 55: ...re tire must be used only on a rear wheel If a front wheel tire gets punctured replace the wheel with a rear wheel and install the temporary spare tire in place of the removed rear wheel The default t...

Страница 56: ...t by selecting the Home button 2 Select Settings 3 Select General 4 Find and select Tire Pressure Units 5 Select your desired setting either PSi or kPa then select the X to exit ADDITIONAL SPECIFICATI...

Страница 57: ...w subaru com customer support or contact your Subaru Retailer Refer to page 4 for details on these resources Compatible smartphone and application required For applications to operate latest version o...

Страница 58: ...art of the display where maps phone features Apps and car information is accessed 4 Home Buttons Provide shortcuts to frequently used screens Car Settings icon Allows you to adjust a number of vehicle...

Страница 59: ...just the volume Press the knob again to mute the audio 2 Tune Rotate the knob to change the channels Press and hold to access sound customization settings 3 Car Settings Select to display the Car Sett...

Страница 60: ...position Scrolling lists Scrolling the map screen Drag with two fingers Touch the screen with two fingers and move the displayed screen as desired Changing the displayed angle of the 3D map Swipe Qui...

Страница 61: ...microphone is located in the overhead console You do not need to speak directly into it to activate the voice command features Press the voice recognition switch to start the voice recognition system...

Страница 62: ...et City State 1 Sets a destination to the address Navigate to 1234 Main Street Lincoln Washington Show Map1 Displays the map screen Show Map Tune to Frequency AM FM Switches to AM FM and tunes to spok...

Страница 63: ...of vehicle functions vehicle status and vehicle inclination in the Driving Statistics screen The current setting of various vehicle functions and a brief description of each function can be viewed in...

Страница 64: ...ition and release 3 To delete an icon drag the icon to the area at the bottom of the screen labeled DRAG HERE TO DELETE and release 4 To exit Edit Mode select the Home button ADDING SHORTCUTS You can...

Страница 65: ...2 Select the desired function 3 Select the desired shortcut function Check that the shortcut icon is displayed on the Home screen STARLINK HOME 63...

Страница 66: ...t pairing a phone The profile records and remembers station presets sound preferences phone favorites screen icons and placement To create a driver profile 1 On the Home screen select the Driver Profi...

Страница 67: ...4 Select Driver s Name 5 Type your name in using the keyboard screen select Next and then select Next on the following screen to go to phone pairing 4 DRIVER PROFILE 65...

Страница 68: ...To Appendix or select your phone if it is already paired 7 Select Finish To edit a driver profile 1 On the Home screen select the Driver Profile button 2 Select Edit then select a profile You can the...

Страница 69: ...u want You will receive a pop up screen asking Are you sure you want to activate this profile 3 Select OK VALET MODE The valet mode function prevents others from operating the navigation audio and veh...

Страница 70: ...let Mode Once you have set the passcode valet mode can be quickly and easily activated on the home screen 1 Select the Valet Mode button on the home screen 2 Enter your passcode using the keypad DRIVE...

Страница 71: ...3 Select OK 4 Valet mode is activated securing your navigation audio and vehicle settings DRIVER PROFILE 69...

Страница 72: ...ng Valet Mode Complete the following steps to deactivate valet mode and restore your personal settings 1 Select the Valet Mode button on the home screen 2 Enter your passcode using the keypad DRIVER P...

Страница 73: ...3 Select OK to deactivate valet mode 4 Select OK to initiate a facial scan from the Driver Monitoring system and restore your personal settings DRIVER PROFILE 71...

Страница 74: ...iver which allows it to receive digital broadcasts where available in addition to the analog broadcasts it already receives Digital broadcasts have better sound quality than analog broadcasts as digit...

Страница 75: ...s necessary to continue service For more information or to subscribe visit www siriusxm com Presets You can preset 18 stations Presets can be set for SiriusXM FM or AM stations allowing you to switch...

Страница 76: ...n the player or on the Home Screen select Media then select CD Depending on the CD format the Touchscreen may show the CD album artwork USB iPod The USB connection is below the Center Information Disp...

Страница 77: ...ncoming text messages as well as reply via voice recognition It remembers your driver profile when your phone pairs via Bluetooth Visit www subaru com engineering starlink multimedia html for more inf...

Страница 78: ...mber To make a call from the Touchscreen start by pushing the Home button and then select Phone After the phone screen displays select the method you would like to use to make a call Recents Allows yo...

Страница 79: ...LL To receive a call press the Call switch on the steering wheel or the Accept button on the Touchscreen To reject a call press the End switch on the steering wheel or the Decline button on the Touchs...

Страница 80: ...up with sound and is ready to be retrieved using the Touchscreen Select Play to listen to the message After listening to the message you can also select the Reply button to reply to the sender using...

Страница 81: ...em You can also run supported applications For more information please refer to page 122 For details on the services or the operations visit the Android Auto sites www android com auto or www support...

Страница 82: ...e mobile app is great when you are on the go you can also visit www MySubaru com from your computer to access the same functions and to aid in planning your trip before you leave You can download the...

Страница 83: ...ervice is easy no matter where you are If you are away from your preferred Subaru Retailer for service you can always use Service Appointment Scheduler to locate any of our certified Subaru Retailers...

Страница 84: ...Guide or Navigation System If equipped in your STARLINK Owner s Manual What3words What3words is an innovative addressing system that divides the world into 3 meter about 10 ft squares and assigns each...

Страница 85: ...ay 7 days a week The SOS button is for SOS Emergency Assistance The i button is for Enhanced Roadside Assistance or Concierge if subscribed Press the SOS button for SOS Emergency Assistance Press the...

Страница 86: ...tive at 1 855 753 2495 NOTE Please have your Vehicle Identification Number VIN available as you will need it to complete this step After the enrollment process you will learn more about the features i...

Страница 87: ...Hotspot Set up is quick and easy For more information on a subscription and step by step enrollment instructions please refer to page 136 in this Getting Started Guide or visit https www att com plans...

Страница 88: ...wner s Manual Performing Software Updates Software updates provide enhancements to the system such as new features added security and upgraded functions If you experience any issues or have questions...

Страница 89: ...ther Vocal Image Control Extracts only vocal sound from whole sound and adjusts volume balance off vocals only Sound Restorer This function plays compressed audio with quality near original sound by a...

Страница 90: ...our preference These settings are under the Setting menu and then Navigation Below are some of the common settings you may want to customize SETTING FUNCTION Show Along Route Turn the display for park...

Страница 91: ...ay in your home state and or surrounding states Updating Over the Air To check for available updates over the air first connect to a Wi Fi network see page 134 Map updates can be found by selecting Se...

Страница 92: ...ck setting screen To access the clock setting screen with a single step 1 Select the clock on the status bar at the top of the Center Information Display For more information on clock settings and ful...

Страница 93: ...king together these systems provide enhanced awareness safety and convenience in front to the sides and behind your Subaru Subaru Driver Assist Technologies include EyeSight Driver Assist Technology R...

Страница 94: ...t the cameras windshield and area in front of the cameras are treated with special care Please refer to Care and Limitations on page 113 in this Getting Started Guide for more details FUNCTIONS The Ey...

Страница 95: ...to the braking system to decrease stopping distance This system can be turned on or off in the Center Information Display CID see page 102 Automatic Emergency Steering if equipped The Automatic Emerge...

Страница 96: ...hicle ahead of you accelerates but then suddenly slows down or stops as you begin to accelerate This system can be turned on or off in the Center Information Display CID see page 102 Lane Departure Wa...

Страница 97: ...ressways freeways and interstate highways Using the EyeSight cameras the Lane Departure Prevention Function identifies lane markings when traveling at speeds of approximately 37 mph or greater Operate...

Страница 98: ...n a following distance that corresponds to the speed of the vehicle in front You can turn the Advanced Adaptive Cruise Control on or off using the Adaptive Cruise Control On Off button on the right si...

Страница 99: ...ventional Cruise Control Conventional Cruise Control maintains a constant traveling speed you set but it does not adapt to the other vehicles in front of you To activate Conventional Cruise Control pr...

Страница 100: ...s menu to turn this function on or off STEERING WHEEL CONTROLS Advanced Adaptive Cruise Control 1 Adaptive Cruise Control On Off Press to turn Advanced Adaptive Cruise Control on or off 2 Lane Centeri...

Страница 101: ...mph Press and hold the switch up to increase the target speed in 5 mph increments Press and hold the switch down to decrease the target speed in 5 mph increments Customizing EyeSight Settings The EyeS...

Страница 102: ...d the side that has not left its lane illuminates Flashing alternately Lane Sway Warning is operating Flashing simultaneously Steering wheel operation is not be detected for a certain period of time L...

Страница 103: ...arture Warning and Lane Sway Warning Lane Departure Warning Lane Sway Warning are turned on by selecting All Functions or Warning Buzzer Only Lane Departure Warning Lane Sway Warning are turned off by...

Страница 104: ...are off a yellow Pre Collision Braking OFF indicator illuminates in the Combination Meter Deactivating the Pre Collision Braking system also deactivates Automatic Emergency Steering if equipped When...

Страница 105: ...the Center Information Display improving visibility when making turns with an obstructed view or pulling into a narrow parking spot A guide line is also displayed to provide distance and width referen...

Страница 106: ...Change Assist LCA Lane Change Assist LCA provides an additional level of protection by warning you of rapidly approaching vehicles in the neighboring lanes If LCA detects a vehicle approaching at a hi...

Страница 107: ...cle Detection BSD RCTA to turn the function on or off When these functions are off a yellow BSD RCTA OFF indicator will be displayed in the Combination Meter Deactivating BSD RCTA also deactivates Aut...

Страница 108: ...arp curves in the road and your speed is approximately 20 mph or greater When a preceding oncoming vehicle is detected the forward area is bright your speed decreases to 10 mph or less or the EyeSight...

Страница 109: ...es that a collision with an object is possible the system can automatically apply the brakes to help prevent or minimize the impact Reverse Automatic Braking RAB OFF In some cases it may be helpful to...

Страница 110: ...a helpful alert if a driver becomes distracted or drowsy For added convenience DriverFocus can also recognize up to five drivers and remember their preferences such as seat position climate settings...

Страница 111: ...touch input on the CID screen Combination Meter Display CMD The CMD provides audible signals visual alerts and reminders in the event you become drowsy or distracted DriverFocus status is also display...

Страница 112: ...y becoming a registered driver Preferences such as seat and side mirror memory settings as well as some features in the Center Information Display CID and climate control are uniquely linked to you Re...

Страница 113: ...not automatically recognize a registered driver you can repeat the facial scan by selecting Settings then selecting the Car menu Select Driver Monitoring System then Repeat Facial Scan Deleting a Dri...

Страница 114: ...the Driver Monitoring System off or on and to customize settings You can quickly turn the Driver Monitoring System off or on by selecting the Car Settings icon and then in the Driving Assistance menu...

Страница 115: ...truct the stereo cameras field of vision See Prohibited Area on page 114 Adjust the rearview mirror so it does not obstruct the stereo cameras field of vision Do not install any interior rearview mirr...

Страница 116: ...LEGACY Do not place stickers or objects in the prohibited area in gray FRONT VIEW 114...

Страница 117: ...when the lane markings are visible and system effectiveness depends on many factors Blind Spot Detection Lane Change Assist and Rear Cross Traffic Alert are systems designed to assist the driver by m...

Страница 118: ...0 782 2783 1 800 SUBARU3 SETTING THE CLOCK Clock settings can be adjusted when the ignition is in the ON position You can adjust the clock manually or set the clock to adjust automatically in the cloc...

Страница 119: ...play in the Status Bar 2 Select Time Setting NOTE On this screen you can also adjust the clock format 12H or 24H and for vehicles with navigation adjust the time zone and Daylight Saving Time The reco...

Страница 120: ...4 Adjust the time and date using the Arrow Up and Arrow Down buttons 5 Once you are finished select OK Automatically To set the clock automatically 1 Select the Clock Display in the Status Bar 3 5 HOW...

Страница 121: ...ou can also adjust the clock format 12H or 24H and for vehicles with navigation adjust the time zone and Daylight Saving Time The recommended settings for these are Auto 3 Select Auto or Sync With Pho...

Страница 122: ...devices or page 128 for Apple devices in this Getting Started Guide MEMORY DRIVER S SEAT if equipped You can set the seat and outside mirror position and retrieve them using the buttons on the driver...

Страница 123: ...ure the select lever is in the P position with the parking brake applied and the ignition OFF 2 Adjust your seat and outside mirrors to the desired position 3 While holding the SET button press and ho...

Страница 124: ...n display 2 Select Add in the manage devices pop up Prompts appear on your vehicle touchscreen as you pair your device Complete the actions on your phone and then select the arrow on your vehicle touc...

Страница 125: ...4 Next select Connected Devices Bluetooth 5 Select Pair new device or a list may already be showing of nearby devices to add HOW TO APPENDIX 123...

Страница 126: ...6 Select your vehicle name from the list of available devices 7 Confirm the PIN matches the numbers displayed on your vehicle touch screen display and select Pair on your phone HOW TO APPENDIX 124...

Страница 127: ...ehicle touch screen display 9 Select Yes on the Start Android Auto pop up on your vehicle touchscreen display to connect to Android Auto NOTE If you do not wish to activate Android Auto select No Only...

Страница 128: ...and others Android Auto might not function correctly if one of these apps is outdated or having an issue Apps can be updated in the Play Store app If Android Auto won t launch for the first time foll...

Страница 129: ...nect to Android Auto always use a high quality OEM USB cable Ensure the Android phone is fully up to date Also verify that the Android Auto app along with all other apps that work with Android Auto ar...

Страница 130: ...le touch screen display 2 Select Add in the manage devices pop up Prompts appear on your vehicle touch screen as you pair your device Complete the actions on your phone and then select the arrow on yo...

Страница 131: ...4 Select Bluetooth on your iPhone 5 Select your vehicle from the device list HOW TO APPENDIX 129...

Страница 132: ...ple device PIN is correct and select Pair 7 Select Allow for contacts and favorites to sync from your iPhone and select Yes if the Contact Transfer pop up appears on your vehicle touch screen display...

Страница 133: ...ple CarPlay pop up on your vehicle touch screen display NOTE If you do not wish to activate Apple CarPlay select No Only Bluetooth will be set up You can still activate CarPlay later by selecting the...

Страница 134: ...p up to set your iPhone to be the favorite device that will connect first when your vehicle is started 11 CarPlay will appear on the vehicle touchscreen If not select the Home button and then select t...

Страница 135: ...een If CarPlay does not launch after the above steps try the following 1 Go to the Settings on your iPhone and select Bluetooth 2 Select the blue i next to your vehicle 3 Select Forget This Device 4 R...

Страница 136: ...ng to a Wi Fi Network if equipped 1 On the Home Screen select Settings 2 In the General settings menu select Wi Fi Settings 3 Make sure that Wi Fi is enabled then select Available Wi Fi Networks HOW T...

Страница 137: ...4 Select the desired network When selecting a network with the lock icon a screen will appear for you to enter the password then select OK HOW TO APPENDIX 135...

Страница 138: ...Hotspot Settings to view or update the following settings Wi Fi Network Name SSID SSID Broadcast Network ON OFF Security Type WPA WPA2 Password Connected Devices Maximum of 8 devices Broadcast Freque...

Страница 139: ...f equipped Creating Home Work You can create a home address and work address through the Map screen 1 Select the Map button on the home screen to display the map 2 Select the Menu button HOW TO APPEND...

Страница 140: ...3 Select the Add Home or Add Work button 4 Use the keypad to enter the address Results will be listed below Select the address once it is displayed HOW TO APPENDIX 138...

Страница 141: ...Home or Work icon to save the location as home or work Searching for a Destination Follow these steps to search for a destination 1 Select the Map button on the home screen to display the map HOW TO...

Страница 142: ...ear Me allows you to set the search radius filter Once the filter is set the search will only be performed for items within the chosen option Whole Map Near Me In Town or City Along Route Near Destina...

Страница 143: ...4 Select Go when the destination appears on the map 5 Three route options are provided for your destination Choose your preferred route and Select Go to begin route guidance HOW TO APPENDIX 141...

Страница 144: ...th What3Words Follow these steps to search for a destination 1 First using your phone or computer select your desired location in the What3Words website app which displays the three corresponding word...

Страница 145: ...in the Center Information Display and select the Search button 3 Use the keypad to enter the three words separated by periods associated with your location Results will be listed below Select the loc...

Страница 146: ...4 Select Go when the location appears on the map 5 Three route options are provided for your destination Choose your preferred route and Select Go to begin route guidance HOW TO APPENDIX 144...

Страница 147: ...ute Options You can set the navigation system to avoid certain types of routes 1 On the home screen select Settings then Navigation 2 Select Avoid 3 Select the desired item to avoid HOW TO APPENDIX 14...

Страница 148: ...e route preferences to search for the route that is fastest shortest or most eco friendly 1 On the home screen select Settings 2 Select Navigation 3 Select Route Preference 4 Select your route search...

Страница 149: ...Saving Destination as a Favorite The registered points can be set as a destination To save a location from the Map screen 1 Select the Menu button 2 Select the Favorites button HOW TO APPENDIX 147...

Страница 150: ...3 Select Add 4 Type the address or name of the place you want to save Results begin to appear below as you type Select the address when it appears HOW TO APPENDIX 148...

Страница 151: ...se are the common icons used for the navigation guidance ICON EXPLANATION ICON EXPLANATION Turn left right Go straight ahead at the intersection U turn Exit at the junction Keep left right at the fork...

Страница 152: ...t to zoom in Place two fingers on the screen and move them closer together to zoom out You can also zoom in or out on the map by tapping anywhere on the map and then selecting the or buttons You can e...

Страница 153: ...e road To receive the data service information in the vehicle a subscription to the SiriusXM Traffic Services is required following a free trial Nearest Gas Station When driving on the highway during...

Страница 154: ...omatically For more information please refer to Navigation System if equipped in your STARLINK Owner s Manual To update your maps automatically over Wi Fi follow this process 1 First make sure you are...

Страница 155: ...have been completed turn the ignition switch to the LOCK OFF position and exit the vehicle Close the driver s door and lock the doors Then move at least 10 feet away from the vehicle to prevent the k...

Страница 156: ...stricted during installation and you may need to reset radio station presets and volume settings after the update process To update the software via DCM 1 Updated software will be downloaded automatic...

Страница 157: ...R 12 CREATING A DRIVER PROFILE 64 Retrieving a Driver Profile 67 D DRIVERFOCUS COMPONENTS 108 Camera 108 Center Information Display CID 109 Combination Meter Display CMD 109 DRIVERFOCUS OVERVIEW 108 D...

Страница 158: ...Unlocking the Trunk 9 Unlocking Using Door Handles 8 KEYLESS ENTRY 7 Automatic Door Locking Unlocking 7 L LANE DEPARTURE WARNING AND PRE COLLISION BRAKING SYSTEM OFF 101 Lane Departure Warning OFF 101...

Страница 159: ...the Moonroof 26 Tilting the Moonroof 26 POWER WINDOWS 25 PUSH BUTTON IGNITION SWITCH 34 R RADIO 72 AM FM Radio 72 Presets 73 Satellite Radio 73 REARRANGING ICONS 62 REAR SEAT REMINDER 45 Passenger Oc...

Страница 160: ...MN 22 TIRE PRESSURE MONITORING SYSTEM TPMS 52 TOUCHSCREEN 58 TOWING YOUR ALL WHEEL DRIVE SUBARU 6 TRAILER TOWING CAPACITY 51 TURNING OFF THE VEHICLE 41 Without Push button Ignition 41 With Push button...

Страница 161: ...NOTES 159...

Страница 162: ...NOTES 160...

Страница 163: ......

Страница 164: ...Subaru of America Inc One Subaru Drive Camden NJ 08103 9800 MSA5B2303A Issued July 2022 Printed in USA 07 22 2023 Getting Started Guide Legacy Love It s what makes Subaru Subaru...

Отзывы: