Страница 1: ...nch 1 4 drive extension 10mm socket Power Drill 5 16 Drill Bit Standard pliers Electrical Tape Torque Wrench in lbs IMPORTANT If installing the Security Upgrade system H7110FS200 at the same time as this Keyless Entry system install the Keyless Entry system FIRST Refer to the Security Upgrade Installation manual when instructed to do so on page 5 of this manual This device complies with FCC rules ...
Страница 2: ...0 amp fuses from the module WHITE BLACK and PINK wires Plug the wiring harnesses into the remote keyless entry module Note The supplied wiring harness is pre cut to proper length B Connecting the Keyless Entry Harness 2 Keyless Entry Connector Fig 2 Mating Connector w Wire Loop Locate the keyless entry connector The connector is taped to a vehicle harness that crosses behind the metal knee protect...
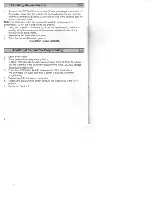
Страница 3: ...rill a hole in the left lower dash trim below the diagnostic connector white arrow Fig 5 Hold the diagnostic connector harness clear of the drill bit Drill the hole from the inside of the panel to prevent burrs or scratches Clear away any burrs or plastic debris from both sides of the hole Insert the button into the hole from behind Secure the button from the front by re attaching the button housi...
Страница 4: ...ess the LOCK button on one of the remote transmitters 2 1 All vehicle doors will lock 2 2 The parking lights will flash once 3 Press the UNLOCK button on one of the remote transmitters 3 1 The driver s door will unlock 3 2 The vehicle courtesy light and DOOR AJAR indicator will turn on 3 3 The parking lights will flash once 4 Press and hold UNLOCK on the same transmitter 4 1 All doors will unlock ...
Страница 5: ...supplied 10mm nut to secure the bracket and module Tighten to 45 60 in lbs Wire Harness Connectors Face Downward Fig 7 H Notes on System Operation Parking lights will flash when the vehicle battery is disconnected and reconnected To stop lights from flashing either Press remote transmitter Unlock button once Turn ignition to the ON position and press programming button for one second mounted on tr...
Страница 6: ...d and clear of any moving vehicle components 3 Replace the left lower dash trim panel 4 Place the Owner s Manual in glovebox Installation is now complete J Additional Transmitter Programming 5 1 Open driver s door 2 Press and hold the programming button In fifteen 15 seconds the door locks will cycle three 3 times to indicate that the system is in the transmitter programming mode DO NOT release th...
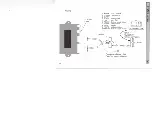
Страница 7: ...6 RD GRN 7 RD WHT 8 WHITE 9 YLW RD 10PK GRN 12V Constant 12V Ignition Parking Lights Ilium Entry Dr Door Unlock All Doors Lock Ground All Doors Unlock Dr Door Unlock Motor Switch Vehicle Keyless Entry Harness Connectors Programming Button See Page 3 for mounting location ...