STK Professional Audio Life 7S Скачать руководство пользователя страница 23

STK Life 7S | User Manual & Set up Guide 

23 


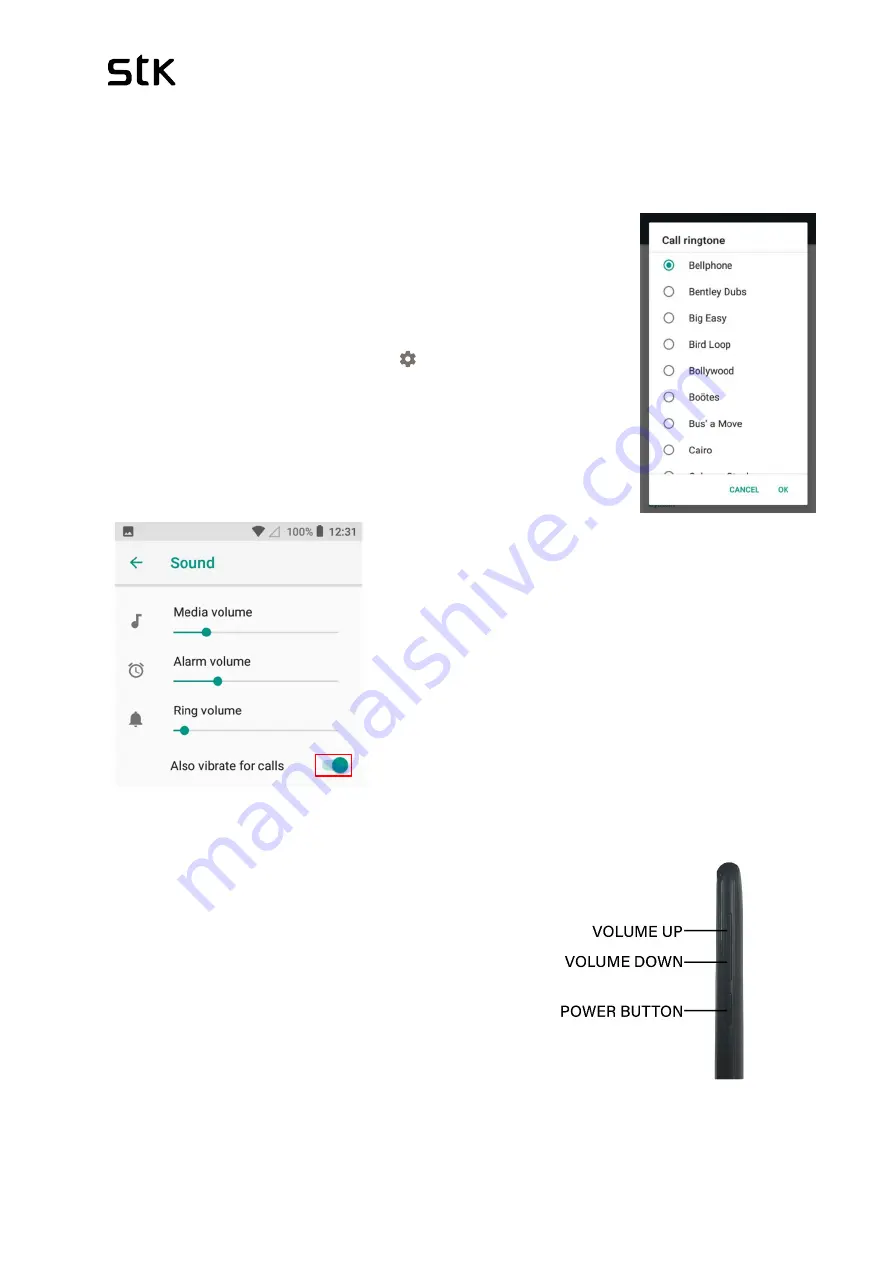
4.2 Audio Profiles and Ringtone 

Learn how to update your various profile settings, including Ringtones, Notification, 
System sounds.  


Changing your ringtone


The options to change your ringtone will only be enabled if you 
have correctly inserted your SIM card into your device. You will 
know if your SIM Card is NOT inserted correctly, if the options 
are greyed out (not selectable). 


Select/press “Settings” with the 

[   ] 

icon. 


Select/press “Sound” > + Add ringtone (at the bottom). 


Select your ringtone from the available, preinstalled list, and it 
should play so you can hear what it sounds like. Press “Ok”.         


Alternatively, if you want to use one of the songs 
on your phone as your ringtone, Press add 
ringtones > select the song > Ok. 

You can also adjust volume of ringtone, 
notifications, music and other media and alarm 
from the Sound settings. Scroll the option up and 
down to adjust the volume as seen on the picture.  

Similarly, you can tap the option on, if your prefer 
your phone to vibrate on calls. 


Adjusting your ringtone volume and other 

system sounds  


Alternatively, you can also press the volume-up or 

down button, located on the top-right side edge of 

your device (with the screen facing you).


You will see a small volume indicator appear that 
moves back or forward as you continue to press 
the volume up or down button (See Screen shot 
below). Select/press the on-screen volume 
indicator to manually adjust your volume. 


Содержание Life 7S

Страница 1: ...ately 13 1 4 How to charge your device 13 1 5 Navigation basics 14 2 Customise your phone and apps 15 2 1 Change your wallpaper 15 2 2 Apps 15 2 3 Google Play 16 2 4 Add an app to a Home screen 16 2 5...

Страница 2: ...Icons 28 6 Contacts 30 7 Photos 31 7 1 Screenshots 31 8 Backup Reset 31 9 Memory storage management 32 9 1 Using your SD memory card storage SD card sold separately 32 10 Power management how to maxim...

Страница 3: ...ion Rate SAR certification information THIS DEVICE MEETS INTERNATIONAL GUIDELINES FOR EXPOSURE TO RADIO WAVES Your mobile is designed not to exceed the limits for exposure to radio waves recommended b...

Страница 4: ...the equipment This equipment has been tested and found to comply with the limits for a Class B digital device pursuant to part 15 of the FCC Rules These limits are designed to provide reasonable prote...

Страница 5: ...iphenyls PBBs not over 0 1 by weight 6 Polybrominated diphenyl ethers PBDEs not over 0 1 by weight Correct disposal Waste Electrical Electronic equipment this marking on the product accessories or lit...

Страница 6: ...ormal operation of medical equipment Follow all hospital regulations and turn it off when you are asked to by posted warnings or medical staff At a Petrol Station Do not use your phone at petrol stati...

Страница 7: ...d do not hang up until help has arrived Note Some mobile phone may not necessarily support all the features described in this manual due to network or radio transmission problems Some networks even do...

Страница 8: ...nto the card slot s See diagram Insert the battery We suggest you switch the phone off when you insert the SIM card 2 Turn on the device press power button as seen on the image 3 When you first turn o...

Страница 9: ...ta You can choose to transfer app music photos and more from any of your old or existing device If you don t want to copy data from your previous device then you can set it up as a new device You can...

Страница 10: ...please use screenshot You can set up the account later if required Note Without setting up a Google account you won t be able to access and download apps from Google Play back up your data to Google a...

Страница 11: ...urity Setting up your passcode For preventing others from using your phone without your permission you can activate the device protection feature Create a screen lock using any of following options a...

Страница 12: ...read the terms and conditions Once you have read privacy policy and Consent Form mark them and press Accept and Continue Your device is now fully set up to use 1 2 How to turn off the phone Press the...

Страница 13: ...of the phone as seen on the port on the image below The device will show you it is charging by turning on the battery indicator on your screen if your phone is off or by showing you a charging symbol...

Страница 14: ...s Icon Description Back Opens the previous screen you were working in Please note once you tap it back up to the Home screen you can t go back any further Home Returns to the Home screen Overview Open...

Страница 15: ...r shortcut to the right edge 2 2 Apps To see all your apps touch or swipe up the icon on your Home screen You can see all your apps including pre installed those that come with your phone and those yo...

Страница 16: ...hase the content To check 1 Open the Play Store app 2 Touch menu at the top left From here you can view the current account or switch to another view your purchased apps check your wish list and more...

Страница 17: ...r to the new position To move between Home screens slide toward the edge of the screen To bump another icon out of the way slide your finger slowly into it Lift your finger 2 6 Remove an app from home...

Страница 18: ...eypad button TIP Caller ID by Google identifies inbound and outbound numbers even for callers that you haven t saved in the Contacts app 3 2 How to answer incoming call Tap and swipe the Green icon up...

Страница 19: ...apps and services including these and many more Google Now for getting the information you need at just the right time Calendar to keep track of your calendar invite Contacts to keep track of your con...

Страница 20: ...text The nearest word highlights with a tab at each end of the selection Drag the tabs to change the selection Delete text Touch the Delete key to delete the characters before the cursor or selected...

Страница 21: ...or Cut Copy and Paste may appear instead on some devices Emoji Use Google Keyboard to choose from a variety of small colourful images used to express emotion known as emoji to add some fun to your mes...

Страница 22: ...your preferences by tapping Settings System Languages input Virtual keyboard Gboard preferences Through this setting you can Number row QWERTY QWERTZ or AZERTY Show Emoji switch key Voice input key S...

Страница 23: ...ress Ok Alternatively if you want to use one of the songs on your phone as your ringtone Press add ringtones select the song Ok You can also adjust volume of ringtone notifications music and other med...

Страница 24: ...tings Display Choose from the following settings Some of these settings may vary by STK Models All can affect battery life Brightness level You can adjust the brightness level by tapping on the Bright...

Страница 25: ...just touch the icon Display brightness Slide the icon left or right to lower or increase the brightness of your screen Wi Fi network Turn Wi Fi on or off or open the Wi Fi settings menu Bluetooth set...

Страница 26: ...l business information including locations contact information and driving directions You can also post public messages about a location and track your friends Please note You must have an active data...

Страница 27: ...ature of TalkBack speech feedback and touch exploration Explore by touch Captions You can turn on captions for your device and specify the language text size and style For some apps you should turn on...

Страница 28: ...he Camera icon indicates capture mode To take a picture If you want to make fine adjustments to focus watch for the focus ring brackets To focus on a different part of the image touch it To zoom in pi...

Страница 29: ...that flash is switched on while taking photos Indicates flash is on auto mote which means camera automatically switches the flash on low light environment Indicates that the flash is switched off Tap...

Страница 30: ...ferent sources they re synced automatically across all the places you need them Through Contacts app you can do following View all contacts You can view all the saved contacts just by tapping contact...

Страница 31: ...wer and Volume down buttons simultaneously The screenshot is automatically saved in Photos app and you ll receive a notification when it s available Touch the notification or open Photos and go to men...

Страница 32: ...e up your system storage When you insert your SD memory card it gives you an option to save to the SD memory card as default but we still recommend the steps below From your home screen or menu select...

Страница 33: ...s are using the most power If you click on each one of these operations e g Screen it will give you friendly hints on how to adjust power use Not all apps or operations will be able to be adjusted to...

Страница 34: ...te Circle icon Select press STK Care application there may be some screens to skip past that tell you about STK care For Live Chat Select press Live chat or Live Help and follow the steps to get in co...

Страница 35: ...your battery is charged over 30 To check if you have the latest version Select press Settings Scroll down and select press About phone Select press About phone Wireless update this will now check if...

Страница 36: ...STK Life 7S User Manual Set up Guide 36...

Страница 37: ...ition Check the SIM card The metal face of the SIM card is polluted Clean the SIM card with a clean cloth Poor received signal quality Signals are obstructed For instance radio waves cannot be effecti...

Страница 38: ...l quality is high The battery cannot be charged The charging voltage does not match the voltage range indicated on the charger Ensure the charging voltage matches the voltage range indicated on the ch...

Отзывы: