INSTALLATIoN
Installation
42
| HSBC 300 cool | HSBC 300 L cool www.stiebel-eltron.com
10. Installation
10.1 Positioning the appliance
f
f
When positioning the appliance, observe minimum clearanc-
es (see chapter "Preparations / Installation site").
f
f
Use the adjustable feet to compensate for any unevenness in
the floor.
10.2 Heating water connection and safety valve
10.2.1 Safety instructions
!
Material losses
The heating system to which the appliance is connected
must be installed by a qualified contractor in accord-
ance with the water installation drawings in the technical
guides.
!
Material losses
When fitting additional shut-off valves, install a further
safety valve in an accessible location on the heat gen-
erator itself or in the flow line in close proximity to the
heat generator.
There must be no shut-off valve between the heat gen-
erator and the safety valve.
Oxygen diffusion
!
Material losses
Avoid open vented heating systems and underfloor
heating systems with plastic pipes that are permeable
to oxygen.
In underfloor heating systems with plastic pipes that are per-
meable to oxygen and in open vented heating systems, oxygen
diffusion may lead to corrosion on the steel components of the
heating system (e.g. on the indirect coil of the DHW cylinder, on
buffer cylinders, steel radiators or steel pipes).
!
Material losses
The products of corrosion (e.g. rusty sludge) can set-
tle in the heating system components, which may re-
sult in a lower output or fault shutdowns due to reduced
cross-sections.
Supply lines
f
f
The maximum permissible line length between the appli-
ance and the heat pump will vary, depending on the version
of the heating system (pressure drop). As a standard value,
assume a maximum line length of 10 m and a pipe diameter
of 22-28 mm.
f
f
Insulate the flow and return lines in accordance with regional
regulations.
f
f
Connect the hydraulic connections with flat gaskets.
Pressure hoses against structure-borne sound transmission:
The appliance and the heat pump are connected to each other
hydraulically via pipes carrying heating water. To reduce the trans-
mission of structure-borne sound on the water side, connect the
appliance to the heat pump with pressure hoses if these are not
already installed in the heat pump.
Pressure differential:
If the available external pressure difference is exceeded, the pres-
sure drop in the heating system could result in a reduced heating
output.
f
f
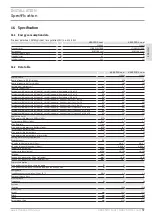
When sizing the pipes, ensure that the available external
pressure differential is not exceeded (see chapter "Specifica-
tion / Data table").
f
f
When calculating the pressure drop, take account of the flow
and return lines and the pressure drop of the heat pump.
The pressure drop must be covered by the available pressure
differential.
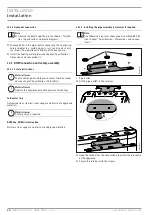
10.2.2 Fitting the pump assembly (accessory) if required
To extend the appliance with a heating circuit with mixer, you can
install pump assembly HSBC 3-HKM (available as an accessory).
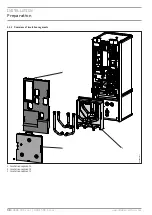
Standard delivery HSBC 3-HKM
D
00000
80
35
7
8
2
4
6
7
1
3
9
5
1 Pipe insulation
2 Connection pipes (*)
3 Temperature sensor
4 Heating circuit pump (*)
5 3-way mixer (*)
6 Insulation mat for 3-way mixer
7 Flat gaskets
8 Servomotor for 3-way mixer (*)
9 Insulation mat for 3-way mixer and heating circuit pump
(*) Pipe assembly


