11-61
2 Screen filter (inside cab)
•
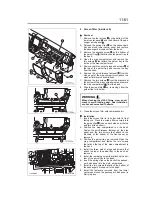
Removal
1. Remove the four screws on the bottom of the
lower center panel and the bottom of the pas-
senger’s kick panel .
2. Release the spring clips on the passenger’s
kick panel and lower center panel, and remove
the passenger’s kick panel from the dash.
3. Remove the exposed screw on the bottom of
the parcel tray that attaches the parcel tray to
the dash.
4. Open the map compartment and remove the
two screws that attach the parcel tray to the
inside of the map compartment.
5. Remove the three sets of plugs and screws at
the top of the parcel tray, and remove the tray
from the dash.
6. Remove the quick-release fastener from the
side panel of the map compartment (above the
washer fluid level check window).
7. Remove the two screws from the brackets at
the bottom of the map compartment and remove
the map compartment from the dash.
8. Slide the screen filter up, removing it from the
guide clips in its holder.
9. Clean the screen filter with compressed air.
•
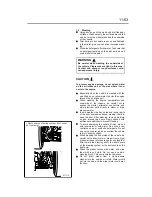
Installation
1. Insert the screen filter in its holder with its front
facing you. Press the screen filter securely into
the guide clips (one on each side near the top
and two at the bottom).
2. Position the map compartment on the dash.
Fasten the quick-release fastener on the side
panel and the two screws that attach to the
brackets at the bottom of the front panel, as
removed.
3. Position the parcel tray, as removed. Open the
map compartment and fasten the two screws
that attach the top of the map compartment to
the dash.
4. Install the three sets of plugs and screws that
attach the top of the parcel tray to the dash, as
removed.
5. Install the remaining screw that attaches the bot-
tom of the parcel tray to the dash.
6. Insert the spring clips on the back of the passen-
ger’s kick panel into the slots, as removed.
7. Install the two screws that attach the bottom of
the passenger’s kick panel to the dash.
8. Install the fasteners removed from the lower
center panel once the passenger’s kick panel is
firmly in place.
WARNING
When cleaning the HVAC filters, wear a dust
mask to avoid inhaling dust. Dust inhalation
can have adverse health effects.
11/22/2005
f610786
Содержание 360
Страница 13: ...2 1 Locations in cab 2 2 Locations outside cab 2 4 2 Warning labels ...
Страница 16: ...2 4 Warning labels Locations outside cab Z12496 ...
Страница 19: ...2 7 Warning labels 30 gallon 113 liter fuel tank Z12494 ...
Страница 20: ...3 1 Doors 3 2 Master door locks 3 4 Entering and exiting the vehicle 3 5 Door window 3 6 3 Vehicle access ...
Страница 27: ...4 1 Seats 4 2 Seat belts 4 4 Steering wheel 4 7 4 Seat and steering wheel adjustments ...
Страница 104: ...10 1 Coolant 10 2 Engine oil 10 2 Fuels 10 2 Cold weather operation 10 3 Installing tire chains 10 4 10 In cold weather ...
Страница 200: ...13 1 Recommended lubricants hydraulic fluids and quantities 13 2 Service specifications 13 4 13 Service data ...
Страница 204: ...14 1 Maintenance schedule 14 2 Lubrication schedule 14 6 14 Maintenance schedule ...
Страница 210: ...15 1 15 Alphabetical index ...


