STEINEL HG ROOF Скачать руководство пользователя страница 1

HG ROOF 

Maintenance 

and Repair

Содержание HG ROOF

Страница 1: ...HG ROOF Maintenance and Repair...

Страница 2: ...are parts Tools Needed Troubleshooting Opening the Robot PCB Power Supply Motor Wheels Guide Block 3 4 5 9 14 21 23 26 28 Switch Potentiometer Start Stop Switch LED Power Cable Fan Heat Tool Heating E...

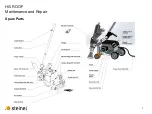
Страница 3: ...HG ROOF Maintenance and Repair 3 Spare Parts...

Страница 4: ...HG ROOF Maintenance and Repair 4 Tools Needed Phillips 2 3 4 5 6 mm Allen wrench Torx TX20 8 mm socket 3 4 5 6 mm Allen wrench Torx TX20 8 mm socket...

Страница 5: ...turned on the green control light should turn on and you should hear the fan It is a no volt release switch If there is power to the switch it will click when pressed If there is no power the switch...

Страница 6: ...sing is grounded and when tested from the plug to the case there should be less than 3 Ohm when used with a cable that is 5m in length If above 3 Ohm then either 1 there is a break on the cord replace...

Страница 7: ...n the toggle switch is in the up position and the speed is above 0 the welder should move forward If the switch is in the down position the tool must be placed in the run position and the welder will...

Страница 8: ...Troubleshooting Reed switch X6 You can check continuity between red and black When there is no magnet it is open When there is a magnet there is continuity You must first remove the wires from the ter...

Страница 9: ...ot 1 Use the 5 mm Allen and remove the two screws at the top of the handlebar 2 Use the 8 mm socket to remove the guide arm 3 Replace the nut so it does not get lost and so that the bearing and axle d...

Страница 10: ...mm hex to remove the heat tool 6 Use the 4 mm Allen to remove the wheel If you only loosen the screw the wheel will stay on and will spin To remove the wheel loosen the screw further until the wheel c...

Страница 11: ...Torx T20 and remove 5 housing screws The screws on the bottom have a lock washer and aid in grounding the device The screws on the sides do not have a lock washer 8 Use 5 mm Allen to remove the axle...

Страница 12: ...ROOF Maintenance and Repair 12 Opening the Robot 10 Check the power connections on the switch Tighten the connection contacts if necessary 11 Check the power connections on the power supply unit 10 1...

Страница 13: ...Repair 13 Opening the Robot 12 Check the grounding wire and plug connection for ground 13 The fan runs on 24v Blue and Red wires 14 The heat tool runs on 240v Use 2 Phillips to tighten loose connecti...

Страница 14: ...r terminals from the power supply using a 2 Phillips 2 Remove the power cable from the terminal block and remove the side with the fan and heat tool 3 Remove the PCB by using the Torx and remove 3 scr...

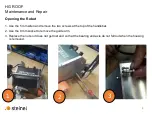
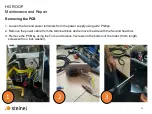
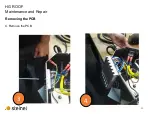
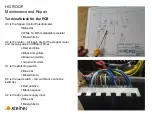
Страница 15: ...HG ROOF Maintenance and Repair 15 Removing the PCB 4 Remove the PCB 3 4...

Страница 16: ...4 is the motor all inputs are for the stepper motor and receive pulses at different times 4 Red and blue 3 Black and yellow 2 Brown and white 1 Green and violet X1 is the start stop switch 2 Blue 24v...

Страница 17: ...speed control potentiometer 1 Remove the wires from the block 2 Check between blue and blue with white stripe It should be 10 kOhm 3 Check between white and blue white and turn the potentiometer You s...

Страница 18: ...HG ROOF Maintenance and Repair 18 X1 Testing the start stop switch 1 Remove the wires from the terminal 2 Switch the switch and check for continuity change 1 2...

Страница 19: ...ower input and 24v supply on the power supply 2 Unplug the power supply input on the PCB and connect the voltage tester Plug in the unit and check voltage between blue and blue white You should have 2...

Страница 20: ...ntenance and Repair 20 Replacing the PCB 1 Remove the wires and label or remove one wire at a time and immediately install in the new PCB because some of the wire colors are the same 2 Reinstall the n...

Страница 21: ...aintenance and Repair 21 Replacing the Power Supply 1 Remove all the wires from the power supply using a 2 Phillips 2 Unplug the switch and ground 3 Remove the housing using Torx TX20 There are 5 scre...

Страница 22: ...HG ROOF Maintenance and Repair 22 Replacing the Power Supply 4 Lift off housing and set to the side 5 Remove Power Supply Remove 3 screws from the L bracket The tool needed is Torx TX10 4 5 Torx TX10...

Страница 23: ...HG ROOF Maintenance and Repair 23 Remove the Motor 1 Cut zip tie 2 Remove 2 screws with 4 mm Allen 3 Remove motor and chain 1 2 3...

Страница 24: ...problems with the motor the PCB more often needs to be replaced but there is a simple test for the motor Place the chain on the sprocket and you can easily turn the motor 2 Short together the blue red...

Страница 25: ...or sprocket and wheel sprocket Insert screws and then press up until the chain is only slightly tight Tighten down screws 2 Reassemble the housing and connect the motor to the terminal block The pictu...

Страница 26: ...le by first heating and then using a 3 mm punch or Allen through the hole in the axle Turn the axle clockwise to remove This is not the normal direction to loosen a screw The reason you must heat the...

Страница 27: ...ockwise It is best to use an old chain and pliers to protect the sprocket and your fingers from heat 3 You can now remove the wheel bearings by tapping the screw with a plastic hammer 4 The rubber can...

Страница 28: ...HG ROOF Maintenance and Repair 28 Replace the Guide Block 1 Heat the two long screws and then remove 2 Use a 4 mm Allen to unscrew 1 2...

Страница 29: ...HG ROOF Maintenance and Repair 29 Replace the Guide Block 3 Remove 2 short 4 mm Allen screws and 1 TX 20 from the front 4 Remove and replace the reed switch 3 4...

Страница 30: ...HG ROOF Maintenance and Repair 30 Replace the Guide Block 5 Replace all screws and add Loctite to the long screws 6 Reassemble the new guide bar and tighten 5 6...

Страница 31: ...HG ROOF Maintenance and Repair 31 Replace the Guide Block 7 The heat tool will eventually be connected to this part 8 Make sure the end of the reed switch is out in front of the housing about 1 8 7 8...

Страница 32: ...epair 32 Switch Replacement 1 Unplug wires 2 Remove the old switch by pressing spring tabs on either side and then removing 3 Insert new switch and press in so that the red button is on the top side a...

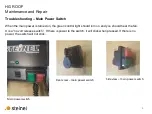
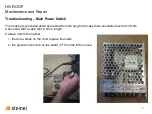
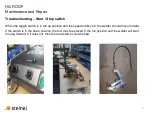
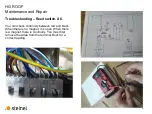
Страница 33: ...HG ROOF Maintenance and Repair 33 Switch Replacement...

Страница 34: ...HG ROOF Maintenance and Repair 34 Replace the Speed Control Potentiometer 1 Use a 1 5 mm Allen to loosen the screw on the bottom of the dial 2 Remove the dial 1 2...

Страница 35: ...HG ROOF Maintenance and Repair 35 Replace the Speed Control Potentiometer 3 Use a 11 mm socket to unscrew the nut from the housing of the potentiometer 3...

Страница 36: ...36 Replace the Speed Control Potentiometer 4 Remove and replace the potentiometer 5 Place the plastic insert by aligning the small slot at the bottom of the potentiometer 6 Reinstall the new potentio...

Страница 37: ...HG ROOF Maintenance and Repair 37 Replace the Start Stop Switch 1 Use a 22 mm wrench to loosen the lock nut 2 Remove the old switch and replace with the new switch 1 2...

Страница 38: ...ROOF Maintenance and Repair 38 Replace the Start Stop Switch 3 Notice that when installing the new switch the blue wire is on the bottom If you do not do this correctly the start stop will be backward...

Страница 39: ...HG ROOF Maintenance and Repair 39 Replace the LED 1 Press springs on both sides and remove 2 Press in new LED 1 2...

Страница 40: ...HG ROOF Maintenance and Repair 40 Replace Power Cable 1 Remove the connectors from the switch 2 Use a 22 mm wrench to loosen the nut 1 2...

Страница 41: ...HG ROOF Maintenance and Repair 41 Replace Power Cable 3 Loosen the compression fitting and remove the cable 3...

Страница 42: ...HG ROOF Maintenance and Repair 42 Replace Power Cable 4 Install new cable and compression fitting if needed 5 Install spade connector and connect to switch 4 5...

Страница 43: ...HG ROOF Maintenance and Repair 43 Replace Fan 1 Cut zip ties 2 Remove 4 2 5 mm Allen screws 1 2...

Страница 44: ...Repair 44 Replace Fan 3 Replace old fan with new fan and reinstall making sure the arrow is pointing down The airflow should move from inside to outside 4 Secure wires close to the power input cord wi...

Страница 45: ...Maintenance and Repair 45 Replace Heat Tool 1 Cut the cable length to 70 cm 2 Strip the outer black insulation to 50 cm and crimp the ends with a 1 mm sleeve 3 Cover with yellow insulation and zip ti...

Страница 46: ...46 Change the Heating Element Important Disconnect tool from power supply 1 Undo welding nozzle clamping screw and remove nozzle 2 Undo screw below the guide carriage 5 mm Allen 3 Pull hot air tool o...

Страница 47: ...Repair 47 Change the Heating Element 4 Remove fastening screws from the left and right of the heat shield Torx T20 5 Remove hot air tool from heat shield 6 Remove 4 screws from outlet nozzle heating e...

Страница 48: ...Repair 48 Change the Heating Element 7 Detach outlet nozzle and fit the new outlet nozzle 8 Firmly screw outlet nozzle back on again 9 Push hot air tool into heat shield and tighten fastening screws o...

Страница 49: ...HG ROOF Maintenance and Repair 49 Change the Heating Element 10 Push hot air tool back into the guide carriage 11 Lightly tighten screw below the guide carriage 12 Reattach the welding nozzle 11 10 12...

Страница 50: ...l care that the nozzle is flat and aligned then tighten the nozzle 14 Align the nozzle with the guide and the pressing wheel by sliding the tool along the guide carriage 15 Adjust the depth of welding...

Страница 51: ...HG ROOF Maintenance and Repair 51 Reassemble the HG ROOF 1 Place the cover back on 2 Tighten cover screws 3 All screws on the bottom cover have a lock washer to aid in grounding 1 3 2...

Страница 52: ...HG ROOF Maintenance and Repair 52 Reassemble the HG ROOF 4 Screws on the back do not have a washer 5 Rewire the PCB 6 Screw down the PCB with 3 screws 4 6 5...

Страница 53: ...HG ROOF Maintenance and Repair 53 Reassemble the HG ROOF 7 Rewire the power supply 8 Connect the switch 9 Connect the line voltage input 8 7 9...

Страница 54: ...Maintenance and Repair 54 Reassemble the HG ROOF 10 Connect the heat tool input 11 Connect the fan 12 Make sure all wires are connected to the power supply Tuck wires and reassemble the side housing 1...

Страница 55: ...e and Repair 55 Reassemble the HG ROOF 13 Check that grounding is less than 3 Ohms 14 Before screwing in the side turn the unit on and test for functionality The LED should turn on 15 Ensure the fan i...

Страница 56: ...the HG ROOF 16 The run switch should make the wheels turn when in the start position When in the stop position if the reed switch is activated the wheels should turn If the switch is open the wheels...

Страница 57: ...tenance and Repair 57 Reassemble the HG ROOF 18 Attach the brace with the axle and housing There is a screw on the side and bottom 19 Attach the wheel to the axle There is one screw on the side of the...

Страница 58: ...HG ROOF Maintenance and Repair 58 Reassemble the HG ROOF 20 Install the back wheels There are two screws 21 The silicon tire can be replaced separately 22 Install the handle with two screws 21 20 22...

Страница 59: ...side arm with one nut and washer Take special care to align the notched hole on the side of the arm to the bolt extending out of the welder 24 Connect the heat tool to the robot by sliding the mounti...

Страница 60: ...mble the HG ROOF 25 Take special care that the nozzle is flat and aligned and then tighten the nozzle 26 Align the nozzle with the guide and the pressing wheel 27 Adjust the depth of welding as necess...

Страница 61: ...ble the HG ROOF 28 The track can be replaced and tightened 29 Reinstall the round belt by stretching it over the two pulley grooves Note Before shipping from the factory all units are tested for 30 mi...

Отзывы: