Series HB 5300
KEEP INSTRUCTIONS FOR FUTURE REFERENCE
Suitable for use with Cruiser Infant Carrier (sold separately)
Страница 1: ...Series HB 5300 KEEP INSTRUCTIONS FOR FUTURE REFERENCE Suitable for use with Cruiser Infant Carrier sold separately...
Страница 2: ...TO REMOVE THE CHILD FROM THE STROLLER BEFORE GOING UP OR DOWN STAIRS OR ESCALATORS DO NOT LIFT THE STROLLER BY THE ARM BAR OR TRAY IF SUPPLIED BECAUSE IT MAY DISENGAGE DO NOT ALLOW CHILDREN TO STAND O...
Страница 3: ...Y ACCESSORIES OTHER THAN THOSE APPROVED FOR USE WITH THIS STROLLER BY BRITAX IT IS UNSAFE TO USE ACCESSORIES NOT APPROVED FOR USE WITH THIS STROLLER THE MAXIMUM WEIGHT OF THE CHILD USING THIS STROLLER...
Страница 4: ...n a comfortable position Minimise lower back bending Bend knees preferable at as large an angle as possible but not at a right angle use a semi squat in preference to a full squat Raise the load with...
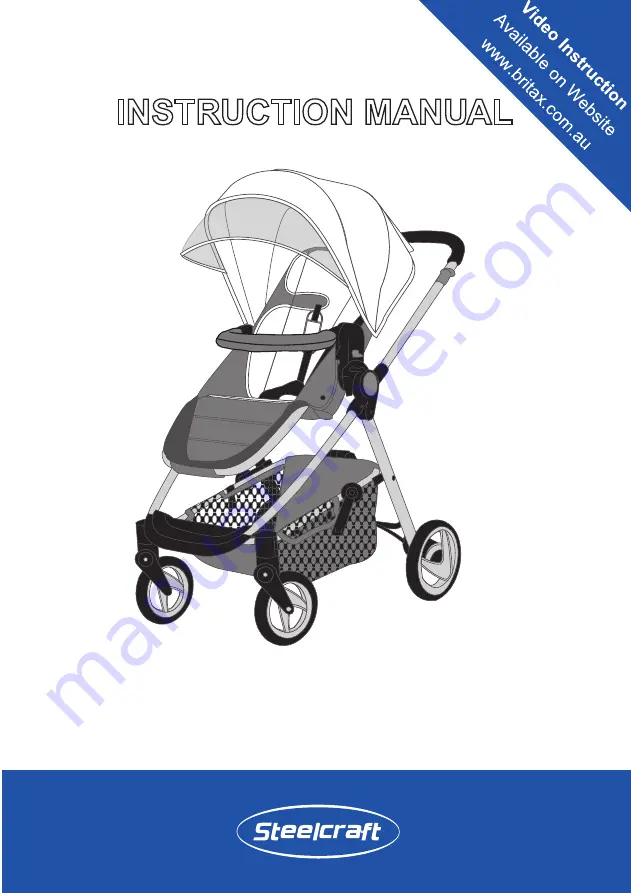
Страница 5: ...e moulding Seat folding button Seat release button Frame lock Sun visor Seat liner Arm bar Leg support adjuster button Seat Adjuster lever Safety Tether strap Basket frame release buttons Brake Front...
Страница 6: ...A 1 x Stroller Frame Basket B 1 x Seat C 1 x Canopy D 1 x Arm bar E 2 x Rear Wheels F 2 x Front Wheels G 1 x Padded seat liner H Shoulder pads E F G H B C D A PARTS LIST 6...
Страница 7: ...DEVICES DURING THIS PROCESS KEEP ALL HANDS AND LIMBS CLEAR OF THESE PARTS AND IN PARTICULAR BE AWARE TO KEEP CHILDREN AWAY FROM ANY DANGER OPEN THE STROLLER SLOWLY AND BE CAREFUL WHERE YOU PLACE YOUR...
Страница 8: ...ward so the frame is unlocked C With each hand holding the handle and rear leg frame continue to open all the way until the handle is locked in position D Now stand the frame upright E While holding t...
Страница 9: ...of the wheel housing and insert the wheel until it locks in Pull on the wheel to confirm it is locked in If not locked in repeat the procedure Then repeat the rear wheel installation for the other sid...
Страница 10: ...your foot press down the RED brake lever to lock the wheels Gently push the stroller forwards and backwards a few times to make sure the brake is engaged B To release the brake lift the brake lever up...
Страница 11: ...the front wheel housing Push in until it locks into place Pull on the front to confirm it is locked in If not locked in repeat the procedure B To remove the front wheels locate the silver tab behind t...
Страница 12: ...he front swivel wheels press down each front wheel lever to the locked position The swivel wheels will lock automatically when the wheels turn to a straight position B To unlock the wheels raise both...
Страница 13: ...procedure 7 TO FIT THE SEAT IN THE FORWARD FACING POSITION A On each side locate the seat mouldings over the frame mouldings as shown B Push down on both sides until you hear the seat lock onto the fr...
Страница 14: ...Release one side at at time Hold the side of the seat press in the seat release button and lift the side up Repeat for the other side and once both sides are released remove the seat from the frame WA...
Страница 15: ...ngs over the frame mouldings as shown B Push down on both sides until you hear the seat lock onto the frame Pull up on each side to confirm they are locked If not locked onto the frame push down again...
Страница 16: ...n each side with the Stroller frame receiver mouldings B Press each side into the frame mouldings until they lock in Pull on each side to confirm engagement Repeat procedure if not locked in C The Arm...
Страница 17: ...ach side of the Stroller frame as shown Push each canopy moulding onto the frame and fix into position B Fit the rear section of the canopy to the top of the seat Attach the hook strips on underside o...
Страница 18: ...GHT IS APPLIED A The leg support has 4 positions To lower the leg support press in and hold both the left and right buttons and adjust to the desired position B To raise the leg support just hold it a...
Страница 19: ...child Buckle tongues separate for added safety To reconnect buckle tongues and to secure the child in the harness please follow the steps below carefully WARNING USE THE HARNESS AT ALL TIMES A Positio...
Страница 20: ...pull the harness strap to adjust to the desired fit The waist strap needs to fit firmly around the child E Tighten or loosen the shoulder straps slide the 3 bar slider up or down to adjust to the desi...
Страница 21: ...sets of harness slots at different heights to accommodate the child To change the shoulder harness height push the shoulder harness tongue out of the current harness slot and through the back of the s...
Страница 22: ...ner A Place the Seat Liner into the Stroller B Place the each shoulder harness straps in the gap on the seat liner C Thread the each waist strap through the button hole D Thread the Crotch Strap and p...
Страница 23: ...e stroller and before you release the brake Only remove your hand from the tether strap loop when the brakes have been applied to the stroller wheels WARNINGS USE THE TETHER STRAP TO STOP THE STROLLER...
Страница 24: ...le or oscillate when walking fast Locking the front swivel wheels will stop this The stroller can be taken up kerbs by either pressing down on the handles and raising the front wheels and mounting the...
Страница 25: ...TO KEEP CHILDREN AWAY FROM ANY DANGER KEEP CHILDREN CLEAR OF THE VEHICLE DURING FOLDING OR UNFOLDING THE VEHICLE REMOVE THE CHILD FROM THE STROLLER BEFORE COMMENCING ANY FOLDING OPERATION FOLD THE STR...
Страница 26: ...asy folding MAKE SURE THE FRONT WHEELS ARE IN SWIVEL WHEEL MODE If wheels are are fixed mode the frame lock cannot engage B Push down on the brake lever to lock the brakes C Fold the canopy and put th...
Страница 27: ...dings and fold the handle all the way forward E With one hand push down and hold the grey seat folding button on the seat moulding Then with your other hand lift the seat adjusting lever all the way u...
Страница 28: ...basket frame release latches Slide the top button to the right and at the same time squeeze the button underneath and lift up The frame will start to fold 4 G Continue to fold the frame together and e...
Страница 29: ...To unfold the stroller hold the stroller handle with one hand and release the frame latch with the other hand B Open the handle with both hands until handle locks into position 20 TO UNFOLD THE STROL...
Страница 30: ...30 C While holding the handle push down the top of the basket until frame locks open D Rotate the top of the seat all the way backwards until it locks Adjust the backrest to the desired position...
Страница 31: ...1 TO LIFT AND CARRY THE STROLLER IMPORTANT NOTES To lift the Stroller grasp the frame approximately halfway along the Stroller so the Stroller is balanced Please refer to page 4 Manual handling techni...
Страница 32: ...EARWARD FACING POSITION FITTED TO THE STROLLER FACING TOWARD THE STROLLER HANDLE SECURE THE CHILD IN THE HARNESS AT ALL TIMES DO NOT LEAVE THE CHILD IN THE INFANT CARRIER FOR EXTENDED PERIODS THE INFA...
Страница 33: ...n either side of the handle rotate the handle backwards The GREEN indicator will now turn to RED D Release the handle latches Then with one hand holding the front of the Infant push the Carrier handle...
Страница 34: ...handle latches in to release the locks The indicator will now be RED B Continue to rotate the handle forward until it returns to the upright position The indicator should now be GREEN C Lift and remo...
Страница 35: ...p prevent this occurring do not fold or store the product if it is damp or wet Always store the product in a well ventilated area When using your stroller at the beach completely clean your stroller a...
Страница 36: ...to alter the specifications color or design without any further notice The Steelcraft trademark is the property of Britax Childcare Pty Ltd Australia The Britax trademark is the property of Britax Ex...