Quick-start guide
FR:
Guide de l’utilisateur - fr.startech.com
DE:
Bedienungsanleitung - de.startech.com
ES:
Guía del usuario - es.startech.com
NL:
Gebruiksaanwijzing - nl.startech.com
PT:
Guia do usuário - pt.startech.com
IT:
Guida per l’uso - it.startech.com
Manual Revision: 01/13/2017
For the latest information, technical specifications, and support for
this product, please visit www.StarTech.com/SM22BU31C3R.
Package contents
• 1 x M.2 SATA enclosure
• 1 x USB-A to Micro-B cable
• 1 x USB-C to Micro-B cable
• 2 x housing assembly screws
• 2 x sets of M.2 mounting hardware
• 1 x screwdriver
• 1 x quick-start guide
Requirements
• One or two M.2 SATA drives
• Phillips screwdriver (not provided)
• 5 mm nut driver or a set of small pliers
This dual-slot enclosure is OS independent and doesn’t require any
additional drivers or software.
To obtain the maximum USB throughput, you must use a system
with a USB 3.1 Gen 2 (10Gbps) port.
Requirements are subject to change. For the latest requirements,
please visit
.
SM22BU31C3R
Dual-Slot M.2 NGFF SATA Enclosure - USB 3.1 (10Gbps) - RAID
*actual product may vary from photos
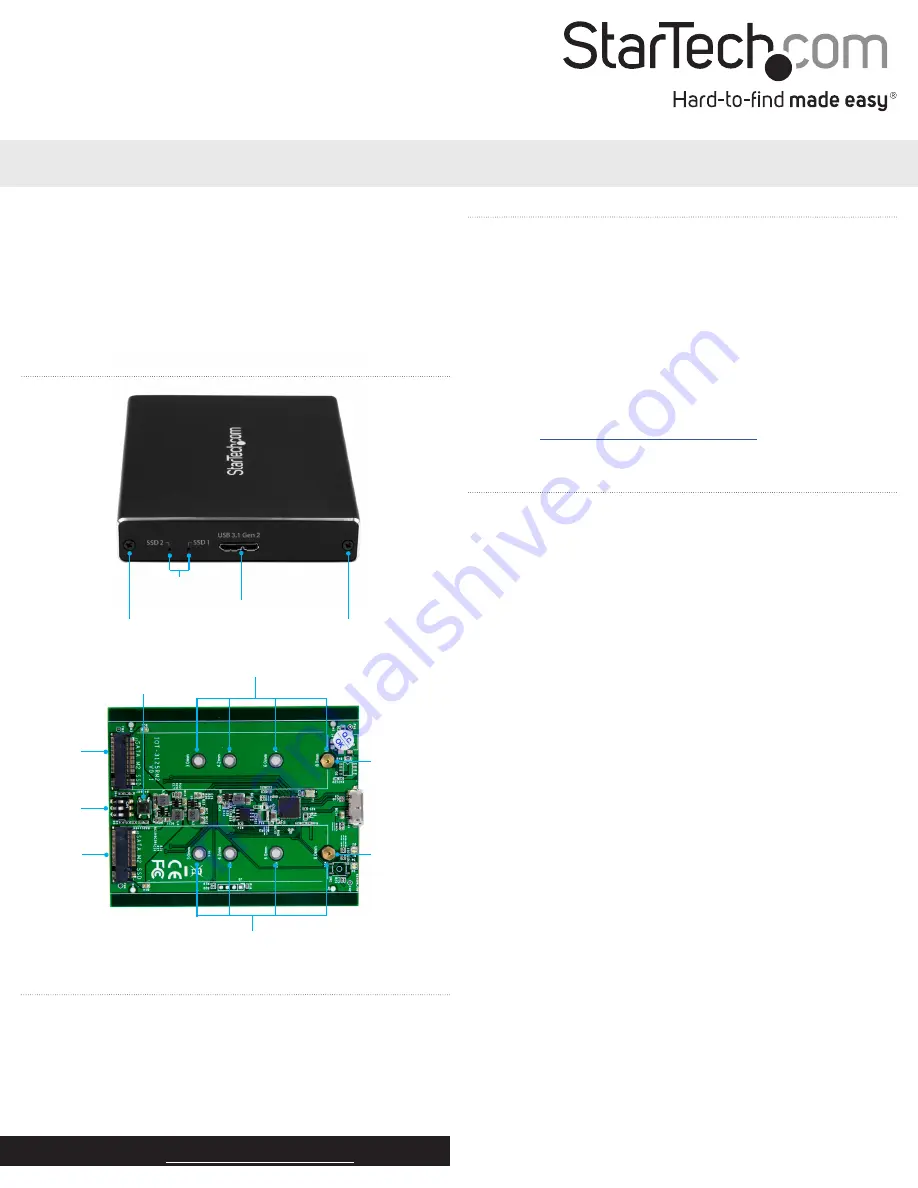
Product diagram
Drive length adjustment holes
RAID set button
Install an M.2 SATA drive
Warning!
Drives should be handled carefully, especially when
they’re transported. If you’re not careful with your drives, you may
lose data as a result. Always handle storage devices with caution.
Make sure that you’re properly grounded by wearing an anti-static
strap when you install any computer component. If an anti-static
strap isn’t available, touch a large grounded metal surface for several
seconds to discharge any built-up static electricity.
Note:
The screwdriver provided with the enclosure is meant to be
used with the M.2 mounting hardware and is too small to be used
with the housing assembly screws.
1. If the cover plate is installed, use a Phillips screwdriver (not
provided) to remove the
housing assembly screws
located on
either side of the
USB 3.1 Micro-B port
on the enclosure.
Note:
The enclosure ships unassembled, so you don’t need to
remove the cover plate the first time that you install a drive.
2. Depending on the length of your drive, you might need to move
the preinstalled mounting screw and standoff. Place your drive
next to the drive tray and note the
drive length adjustment hole
that matches the length of your drive. If the mounting screw
and standoff are already installed in the correct position, use
the provided screwdriver to remove the mounting screw and
proceed to step 5.
3. On the reverse side of the drive tray, use a small set of pliers to
remove the nut holding the mounting screw and standoff in
place.
4. Place the nut and standoff that you removed in the previous step
in the
drive length adjustment hole
that matches the length of
your drive and tighten them.
5. Gently slide the connector on your M.2 SATA drive into the
corresponding
M.2 SATA connectors
on the enclosure. The
connector on your M.2 SATA drive is keyed so that it only fits one
way.
Housing assembly screw
LED indicators
USB 3.1 Micro-B port
Drive length adjustment holes
M.2 mounting
hardware
RAID mode
DIP switches
M.2 SATA
connector
M.2 SATA
connector
M.2 mounting
hardware
Housing assembly screw


