


8
To view manuals, videos, drivers, downloads, technical drawings, and more visit www.startech.com/support
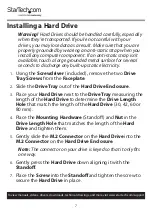
8.
Slide the
Drive Tray
back into the
Hard Drive Enclosure
so
that the
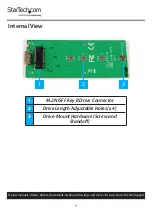
USB 3.1 Micro-B Connector
is facing outward.
9.
Place the
Faceplate
over the
Connector
.
10.
Secure the
Faceplate
in place by inserting two
Drive Tray
Screws
on either side of the
USB 3.1 Micro-B Port
on the
front of the
Hard Drive Enclosure
and use the
Screwdriver
to tighten the
Drive Tray Screws
.
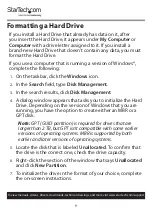
Connecting the Hard Drive Enclosure
Note:
The
Hard Drive Enclosure
does not require an exter-
nal power supply, as it receives enough power through the
USB port on the
Host Computer
.
After you have installed a
Hard Drive
in the
Hard Drive
Enclosure
:
•
Connect the
USB C to Micro B Cable
(included) to the
USB
3.1 Micro-B Port
on the
Hard Drive Enclosure
and to a USB
3.1 port on the
Host Computer
. The
Host Computer’s OS
will automatically install the necessary drives.
Note:
Before you use the
Hard Drive
, you need to format it
according to the requirements of your OS. For more informa-
tion about how to do so, see the
section.