

Quick-Start Guide
To view manuals, FAQs, videos, drivers, downloads, technical drawings, and more, visit www.startech.com/support.
Manual Revision: October 16, 2019 2:11 PM
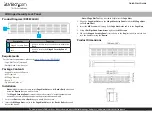
Product Diagram (RKSECLK2U)
Component
Function
1
Hinged Security Panel • Used to restrict access to the device within the
Rack
.
2
Lock
• Used to secure the
Hinged Security Panel
closed.
Requirements
For the latest requirements, please visit
www.startech.com/RKSECLK2U
• Cage Nut Tool x 1(optional)
• Phillips Head Screwdriver x 1
Package Contents
• Hinged Security Lock Panel x 1
• M5 Screws x 4
• M5 Cage Nuts x 4
• Keys x 2
• Quick-Start Guide x 1
Installation
Notes:
Make sure that there are empty
Cage Nut Holes
on the
Rack’s Rails
, above and
below the
Device
that you wish to secure.
The
Hinged Security Panel
is meant to be used to secure 1U height equipment and
will render the rack unit above and below the protected device unusable.
1. Locate the
Device
within a
Rack
that you would like to secure.
2. Insert the
M5 Cage Nuts
(x 4) into the
Cage Nut Holes
on the
Rack’s Rails
above and
below the device.
2U Hinged Security Lock Panel
Note:
A
Cage Nut Tool
can be used to help insert the
Cage Nuts
.
3. Align the
Cage Nut Holes
on the
Hinged Security Panel
, with the
M5 Cage Nuts
on the
Rack’s Rail
.
4. Insert the
M5 Screws
(x 4) through the
Cage Nut Holes
and into the
Cage Nuts
.
5. Using a
Phillips Head Screwdriver
, tighten the
M5 Screws
.
6. When the
Hinged Security Panel
is installed, use the
Key
(included) to unlock and
lock the
Lock
, securing the
Device
.
Product Dimensions
1
2