


21
To view manuals, videos, drivers, downloads, technical drawings, and more visit www.startech.com/support
If you lack the necessary expertise to attach this product to
the wall that you’re using, contact a construction profes-
sional to install the enclosure or to provide specific mounting
instructions for your wall structure.
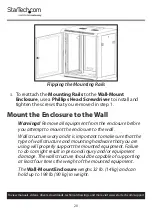
1.
Follow the appropriate steps for the type of wall that you’re
attaching the
Wall-Mount Enclosure
to and attach the
Mounting Plate
to the
Wall
.
2.
Hang the
Wall-Mount Enclosure
onto the
Mounting Plate
.
Caution!
The
Wall-Mount Enclosure
is extremely heavy
and you should not attempt to lift and hang the enclosure
without the assistance of other people.
3.
Secure the
Wall-Mount Enclosure
to the
Mounting Plate
.
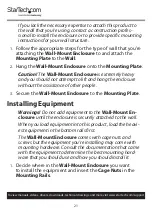
Installing Equipment
Warnings!
Do not add equipment to the
Wall-Mount En-
closure
until the enclosure is securely attached to the wall.
When you load equipment into this product, load the heavi-
est equipment in the bottom rails first.
The
Wall-Mount Enclosure
comes with cage nuts and
screws but the equipment you’re installing may come with
mounting hardware. Consult the documentation that came
with the equipment to determine the best mounting hard-
ware that you should use and how you should install it.
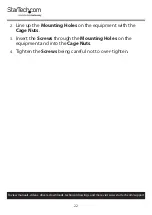
1.
Decide where in the
Wall-Mount Enclosure
you want
to install the equipment and insert the
Cage Nuts
in the
Mounting Rails
.