background image

iTANK i310 Series User Manual

11

4. 

硬體安裝

請參照下列步驟,完成

 i310 

的硬體安裝

 :

1. 

當你打開包裝後,首先請先檢查產品主體以及附件是不是有毀損或是短缺情形,如果發現產品主

體及附件短缺,請立刻與您的供應商聯絡。

2. 

將主機置放於平穩空間上,並確保其通風良好,不會堵塞通風口。

 (

請避免接近水源或是其他容

易造成產品損傷的環境

)

3. 

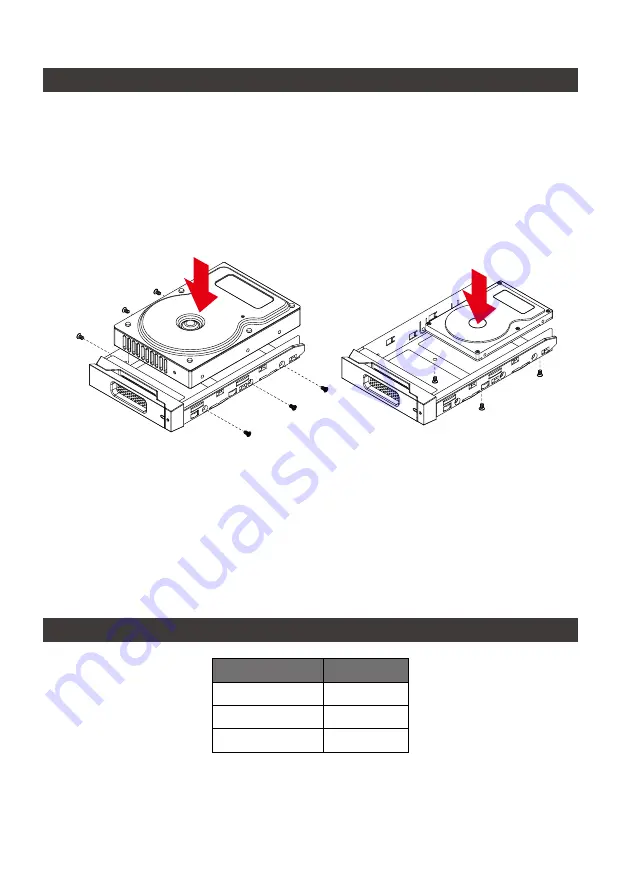
請使用零件包中所附的頂針插入硬碟抽取盒頂針孔,開啟硬碟抽取盒把手便將抽取盒取出。

4. 

安裝

 3.5 

吋硬碟,請使用

 6 

顆零件包內附的大顆螺絲加以固定;安裝

 2.5 

吋硬碟,請使用

 4 

顆零

件包內附的小顆螺絲加以固定。

5. 

硬碟安裝完成後

,

請將抽取盒平移放入主機內

,

並關上把手。

6. 

視電腦

 USB 

埠類型選擇配件中的對應的

 USB 

連接線,連接電腦與

 i310 

 USB 

埠。

7. 

將電源線與電源轉接器連接好

,

並將兩端接頭各自接到

 i310 

及電源插座後啟動

 i310

8. 

此時,您的作業系統將會自動辨識到儲存容量;待辨識成功後,請依據您所需的儲存格式,將系

統依照作業系統的指示完成格式化。待硬盤格式化完成後,便可直接使用

 i310

5. 

燈號說明

狀態

硬碟狀態燈

資料存取

藍燈閃爍

硬碟閒置

藍燈恆亮

電腦休眠

藍燈熄滅


若您使用的是

 USB 3.2 C to A 

連接線,主機端的

 Type-A 

需為

 USB 3.2 Gen2 

規格方可達到最佳存

取效能。

Содержание itank i310

Страница 1: ...iTANK User Manual i310 Series...

Страница 2: ...t Appearance and Packaging Content 1 3 Hardware Requirements and Precautions 2 4 Hardware Installation 3 5 Description of HDD Indicators 3 6 Install The Operation System Into This Device 4 i310 9 1 9...

Страница 3: ...hted by RAIDON TECHNOLOGY INC Operating temperature 0 40 32 104 Storage temperature 20 47 4 116 Operating voltage 100 240V AC i310 User Manual 2 Product Appearance and Packaging Content The following...

Страница 4: ...normally 4 If the i310 needs to be shut down or disconnected please ensure the HDD is safely removed through your operating system before turning off the power 5 We strongly recommend backing up impor...

Страница 5: ...s included in the accessory kit 5 Choose one of the provided cables of your preference to connect the preferred interface connection on the enclosure unit to the computer 6 Depending on the type of co...

Страница 6: ...n your Mac and immediately press and hold Command R Continue holding until you see the Apple logo or a spinning globe Startup is complete when you see the utilities window 3 If you need to erase your...

Страница 7: ...instructions select agree to the software license agreement and then select the disk to start the installation 6 Please allow installation to complete without putting your Mac to sleep or closing its...

Страница 8: ...fter the software is installed press the shortcut icon of the desktop twice to open Hasleo WinToUSB 3 On the left side of the interface select Mirror to USB and click the right folder icon to select t...

Страница 9: ...lect the USB external drive to install 6 Select the version of the disk partition configuration according to your personal hardware speci cations then execute Yes to proceed to the next step 7 Follow...

Страница 10: ...n the USB slot of the computer After rebooting enter the BIOS or UEFI adjusts to the USB external hard disk box as the rst boot sequence and saves the settings and leaves 10 Then start the installatio...

Страница 11: ...ardom com tw STARDOM STARDOM www stardom com tw 0 40 32 104 20 47 4 116 100 240V AC i310 BA31 x1 x1 i310 B31 x1 x1 i310 B31A x1 x1 USB 3 2 C to C x1 USB 3 2 C to C x1 USB3 1 C to A x1 USB3 1 C to A x1...

Страница 12: ...iTANK i310 Series User Manual 10 A B C 3 1 i310 2 i310 3 USB 4 i310 5 i310 i310 STARDOM D USB 3 2 Gen2 Type C 10Gbps E F...

Страница 13: ...iTANK i310 Series User Manual 11 4 i310 1 2 3 4 3 5 6 2 5 4 5 6 USB USB i310 USB 7 i310 i310 8 i310 5 USB 3 2 C to A Type A USB 3 2 Gen2...

Страница 14: ...iTANK i310 Series User Manual 12 6 macOS 1 Wi Fi macOS 10 14 Mojave 2 Mac Command R Apple 3 macOS Mac...

Страница 15: ...iTANK i310 Series User Manual 13 4 macOS macOS 5 6 Mac Mac...

Страница 16: ...iTANK i310 Series User Manual 14 Windows 1 WinToUSB 2 Hasleo WinToUSB 3 USB Windows 10 ISO 4 Windows WinToUSB Windows Windows 10...

Страница 17: ...iTANK i310 Series User Manual 15 5 USB 6 7...

Страница 18: ...iTANK i310 Series User Manual 16 8 Windows 10 9 USB BIOS UEFI USB 10 Windows 10...

Страница 19: ...iTANK i310 Series User Manual 17 http www stardom com tw...

Отзывы: