background image

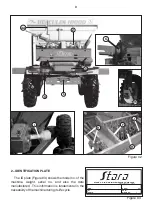
Figure 06

6 -MOUNTING AND ADJUSTMENTS

The  Hércules  10000/Stainless  leaves  the  factory  assembled,  with  the  exception  of  the   

wheel/tire assemblies, the goose-neck and the optional items needed to work with granular or 
powdered products. 

It is important to note in this manual that certain components need special adjustments, be it 

in the application of powdered or granular products.  

6.1 - Hub/wheel axle mounting 

The wheel/tire assemblies come factory ready, thus the only requirement is to align the 

mounting holes with the hub screws and to securely tighten them. 

In case a height extender is being used (item 6.2.2), it will be necessary to dismount the 

H U B / S H A F T  f r o m   t h e   W H E E L  A X L E  
EXTENDER. After re-mounting the hub/shaft, be 
sure  to  mount  with  the  cut  side  downward 
(detailed on   Figure 06). Next, tighten the axle 
extender screws to the height extenders and the 
hub/shaft to the height extender. Finally, tighten 
the HUB screws to the WHEELS.

ATTENTION!

  Securely  tighten  all  wheels 

nuts  and  bolts  before  starting  a  job,  and  re-
tighten after the first work hour. 

6.2 - Optional wheel/axle adjustments-

The Hércules 10000/Stainless facilitates the adjustments for the job, with different width 

dimensions and 3 height adjustments. 


6.2.1 - Wheel/axle width adjustments:

To adjust the wheel axle, place the axle extentions to the desired length and mount the 

clamps on the axle, securely  tighten the bolts. 

There are two options available to adjust the axle width:

1st Option:

 allows for a wheel base adjustment width between 2,100 to 2,700mm. In its 

maximum extended width, do not exceed   5,000 kg of product (figure 07). This still allows for the 
hook-up of the height extender kit, as shown on  figure 09 of page 14.

HUB

AXLE

CUT POINTED

DOWNWARD

WHEEL/TIRE

14

Содержание Hercules 10000

Страница 1: ...DELIVERY DATE IMPORTANT Warranty issues will only be address if this certificate is properly filled out at the time of delivery by technician This certificate must be presented with every warranty cl...

Страница 2: ......

Страница 3: ...ring tension general machine lubrication verify and mount the left right disc on its specified tightening nuts bolts daily side proper working speeds mount and adjust the header cardan u joint general...

Страница 4: ......

Страница 5: ...this warranty which will become non transferable an will terminate automatically in case of the resale of the equipment by the second owner the CLIENTor warranty termination by the CLIENT C The warra...

Страница 6: ......

Страница 7: ...ANUAL AND PARTS CATALOG SEEDER FERTILIZER TRAILER STARA S A Agricultural Machinery and Implements Industry AV STARA 519 N o Me Toque RS Brazil CEP 99470 000 Phone Fax 55 54 3332 2800 e mail stara star...

Страница 8: ......

Страница 9: ...ial 29 9 3 Procedure 29 30 9 4 Verifying the row distribution and overlap 31 9 5 Verifying product flow rates 32 9 6 Adjusting the disc vanes 32 33 9 7 Adjusting the flow rates kg ha using the sample...

Страница 10: ...ralizing Structure H rcules10000 Main Tank Sealing H rcules10000 S S Main Tank Chassis H rcules10000 S S Grating Support Brackets H rcules 10000 S S Brace Package Slide gate Package Assy Measurement S...

Страница 11: ...for Tandem 400 Adjustable Tandem Drive Package Tire 400 Adjustable Tandem Drive Package Tire 12 4x24 Drive Gear Mounting Fixture for Tandem Adjustable Tandem 1 8 2 7 Tire 12 4x24 Drive Axle Adjustable...

Страница 12: ......

Страница 13: ...em which allows height adjustment and various wheel base widths Thus allowing for the job operations to proceed even after the vegetation has sprouted or grown without damaging the harvest Its distrib...

Страница 14: ...inder Conveyor activation U Brace I Conveyor activation drive shaft V Transmission J Conveyor Sealing W Height extender optional K Distribution Discs X Lifting brake Adjustable hitching arm L Distribu...

Страница 15: ...03 shows the model no of the machine weight serial no and also the date manufactured This information is fundamental in the traceability of the machine during its life cycle Figure 03 MOD PESO kg N S...

Страница 16: ...800kg Load capacity and Volume W standard wheels 10 000kg or 5 000 l W wheels using options 5 000kg or 2 500 l Output rate 13kg ha to 6 000kg ha Working speeds 4km h to 18km h Power requirements Minim...

Страница 17: ...preader and the tractor before maneuvering them so as not to trample personnel animals or other objects upon engaging the spreader to the tractor traction bar or the two hydraulic lift points place th...

Страница 18: ...ot to contaminate the rubber components with oil or similar products After using the implement use a high pressure hose to wash it down be sure not to use chemical products which may damage the paint...

Страница 19: ...fill each case with one liter each which makes up the set allowing to release of any air and bathing the whole transmission with oil After harvesting has come to an end it is recommended to clean all...

Страница 20: ...etailed on Figure 06 Next tighten the axle extender screws to the height extenders and the hub shaft to the height extender Finally tighten the HUB screws to the WHEELS ATTENTION Securely tighten all...

Страница 21: ...d the hub shaft assembly is mounted on one of the two adjustement heights In the Standard height w o the use of the height extender figure 09 A the disc height distance from the ground is 800 mm When...

Страница 22: ...is critical that the dimensions of A and B figure 12 be equivalent being that A the distance between the goose neck pivot point and the machine wheel axle B center of the tractor rear wheel axle the d...

Страница 23: ...dure in case of loose or misaligned the conveyor Loose conveyor Tighten the adjustment bolts see Fig 04 page 10 maintain the same number of turns on both sides thus avoiding misalignment issues Convey...

Страница 24: ...it will work properly Maintain the transmission gears with grease so as to facilitate disc replacement IMPORTANT When substituting the disc vanes be very careful for there is a left side set and a rig...

Страница 25: ...or granular products fertilizers and seed The items used exclusively when working with granular products and should be removed when working with limestone are Main Tank Cap Package Optional Incline Se...

Страница 26: ...ng the disc vanes becareful for there is a set for the left disc and another for the right disc They can be easily inverted for they can be mounted on any side but there is only one correct position O...

Страница 27: ...and the adjustments will not obtain satisfactory results for the product is pulled from the opposite side of the vanes INCORRECT Figure 22 In this case the set of the right vanes is mounted on the le...

Страница 28: ...justment is directly affected by the type of application conditions Position 1 for rate up to 150 kg ha Position 2 for rates above 150 kg ha 2 1 The position of the deflector support shown on figure 2...

Страница 29: ...machine is stopped ATTENTION Do not drive in reverse with the conveyor drive wheel engaged in the working position see below The gear box should be adjusted in a way that when the conveyor drive wheel...

Страница 30: ...nveyor drive wheel tire tire 18 x 8 5 8 ATV MAX centered with the machine s tire as shown on figure 28 The drive wheel position is factory set but during maintenance operations or tire replacement of...

Страница 31: ...urize again according to figure 30 1 0 0 springs extended tightening the nut and maintaining a distance of about 75mm for the C measurement as shown on figure 32 NOTE The rubber sheath accordion shape...

Страница 32: ...djustment valve is factory set thus the discs spin at 720 rpm maintain these settings to guarantee the proper system operation The oil pressure filter along with the oil should be changed periodically...

Страница 33: ...ow below 80 l min Contaminated oil Unequal plug pressure Input out hoses inverted Mis matched connections Retighten with caution Apply sealing tape and retighten with caution Retighten with caution Ap...

Страница 34: ...andere fahrgeschwindigkeinten umrechnung siehe streutabelle F r bandgeschwindigkeit II streumengen kg ha vor berechnung durch 2 dividieren 1 K op de gewenste kg ha schuiven 2 I ha aflezen boven hat bi...

Страница 35: ...0 30 35 35 35 35 35 35 35 35 40 40 40 40 40 40 45 45 45 45 45 45 50 50 50 50 50 55 55 55 55 55 60 60 60 60 65 65 65 70 70 70 75 75 80 100 100 100 100 I ha 50 100 300 500 700 900 1100 1300 200 400 600...

Страница 36: ...ary application flow rates of any product using kg ha adjusting the scale band and the required overlap for a uniform application 9 2 Required material Weight scale Tape measure 8 trays with internal...

Страница 37: ...ere is an additional 18m laterally so that the product application is within the center of the tray lines and another to mark for the overlap It is important to initiate the distribution system less t...

Страница 38: ...within the vessels indicate if the row can be increased or reduced according to figure 38 On figure 38 see the sample product in the collection vessel which is interpreted as follows The product in t...

Страница 39: ...d what is the weight to be collected on the trays to equalize the system 1st Adjust the machine and distribute on both rows of trays according to the previous instructions Collect the product of the 8...

Страница 40: ...e opening for the product as it drops onto the conveyor belt it should be full of product or be it before making the collection run 50m distribute the product normally travel with the equipment in ope...

Страница 41: ...roduct Check the floodgate opening for the product as it drops onto the conveyor belt it should be full of product or be it before making the collection run 50m distribute the product normally travel...

Страница 42: ...2 87 1 24 12 46 12 46 14 48 15 51 16 52 1 26 1 01 10 52 10 52 10 53 1 37 15 44 15 44 16 45 17 47 28m 18 47 1 36 15 44 15 44 16 45 17 47 28m 18 47 12 40 14 44 28m 15 44 1 20 12 40 14 44 28m 15 44 2 35...

Страница 43: ...46 10 40 10 40 11 42 12 45 1 01 28m 18 47 14 44 14 44 17 44 18 46 28m 11 53 10 49 11 53 2 55 1 03 28m 16 48 13 42 13 42 15 44 16 47 1 83 1 12 10 40 1 64 1 07 10 40 1 44 1 18 10 52 10 52 10 53 2 9 1 06...

Страница 44: ...rain 14 50 15 51 17 54 ALFALFA 0 85 16 44 21 50 20 52 16 54 BLACK OATS 0 48 17 51 17 51 17 54 HOLLY 0 51 10 41 GREEN PEAS 0 83 15 46 15 46 15 46 18 47 18 47 22 50 BEANS 0 83 22 47 22 47 23 49 MILLET 2...

Страница 45: ...18 00 SERRANA 2 87 1 24 13 50 13 53 17 55 NK 30 00 20 MANAH 2 35 0 80 15 49 16 53 16 54 PK 00 20 30 SERRANA 2 43 1 26 10 46 10 50 NK 30 00 01 MANAH 2 23 1 26 10 49 10 50 11 53 11 54 FOSTAG 567 M4 PK...

Страница 46: ...4 27 30 32 36 WILD TURNIP 14 55 16 55 28m 16 55 MILLET 2 05 0 86 14 53 MILLET 1 73 0 7 11 49 12 50 ALFALFA 16 45 17 47 17 55 GREEN PEAS 17 46 21 50 28m 21 50 SUNFLOWERS 11 50 11 50 13 55 CANOLA 23 54...

Отзывы: