background image

- 2 -

2. 

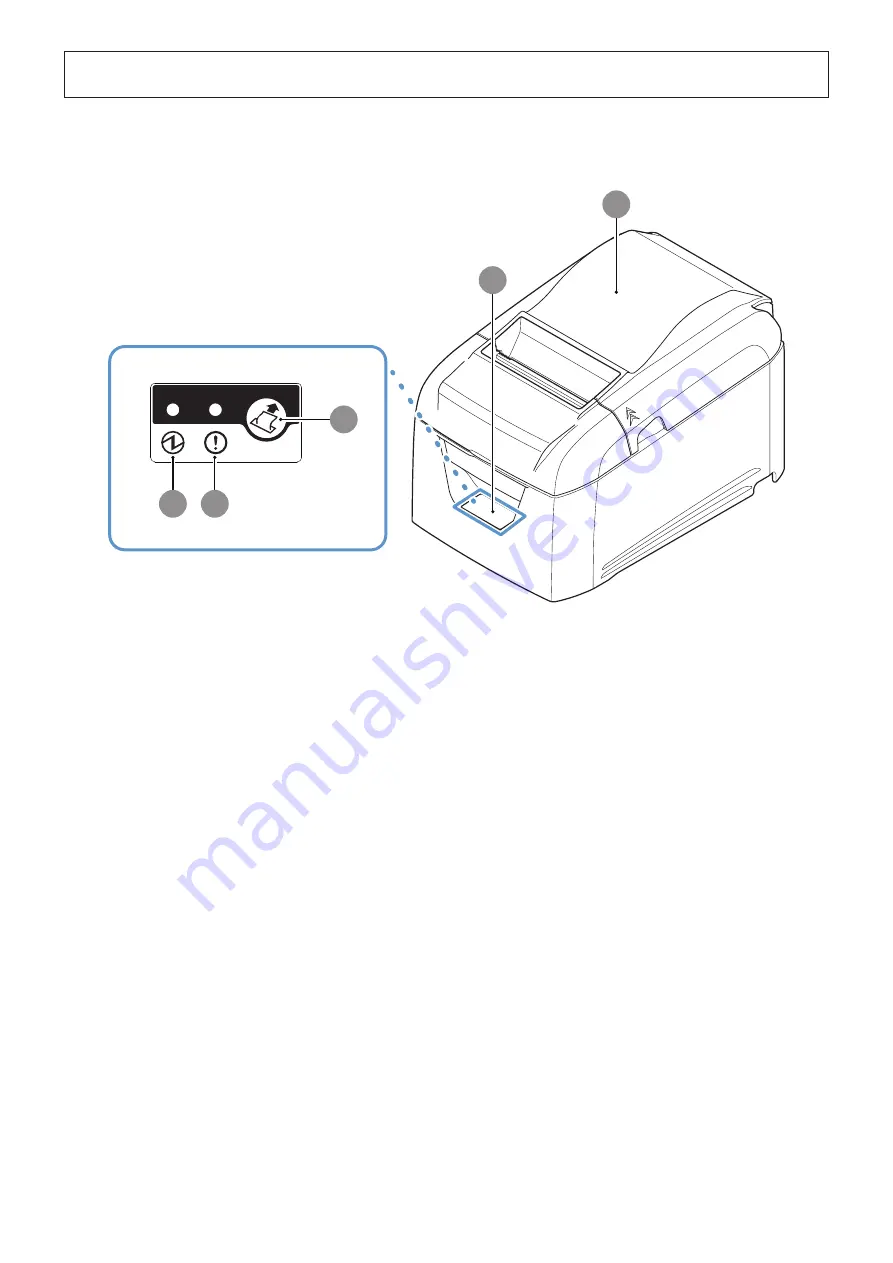
 Parts Identification and Nomenclature

1

Rear cover

Open to replace paper.

Do not open while printing.

2

Control panel

Features lamps that indicate printer status and a button for operating 

the printer.

3

FEED button

When the printer is online, pressing this button feeds the paper roll.

4

POWER lamp (green)

Lights when the printer is online.

This lamp also indicates errors, in combination with other lamps.

5

ERROR lamp (red)

Lights when the cover is open.

This lamp also indicates errors, in combination with other lamps.

1

5

4

2

3

Содержание TSP043 Series

Страница 1: ...Hardware Manual THERMAL PRINTER TSP043 Series...

Страница 2: ...the FCC Rules These limits are designed to provide reasonable protection against harmful interference when the equipment is operated in a commercial environment This equipment generates uses and can...

Страница 3: ...te deve intraprendere le misure adeguate per risolvere il problema Dansk Danish ADVARSEL I et hjemligt milj kunne dette produkt for rsage radio forstyrrelse Bliver det tilf ldet p kr ves brugeren muli...

Страница 4: ...AC Adapter 9 3 4 Turning the Power On 10 3 5 Connecting to a Peripheral Device 10 3 6 Loading a Paper Roll 11 3 7 Changing the Paper Width 13 3 8 Setup Precautions 14 4 LED Display 16 4 1 Error Indic...

Страница 5: ...that the surrounding area is clean dry and free of dust 7 Make sure that the printer is connected to a reliable power outlet It should not be on the same electric circuit as copiers refrigerators or...

Страница 6: ...us and a button for operating the printer 3 FEED button When the printer is online pressing this button feeds the paper roll 4 POWER lamp green Lights when the printer is online This lamp also indicat...

Страница 7: ...t Connects to a host PC through a USB cable 9 Power inlet Connects to an optional AC adapter 0 Peripheral drive connector Connects to peripheral devices such as cash drawers Do not connect this to a t...

Страница 8: ...Connect the parallel cable to the parallel port on your PC 3 1 3 RS 232C Cable Connect the RS 232C cable to the RS 232C port on your PC 3 1 4 Ethernet Cable 1 Connect the Ethernet cable to the Etherne...

Страница 9: ...he dealer that you bought the product from if you are unsure about what cable to use Before connecting or disconnecting an interface cable be sure to disconnect theAC adapter s power cord from the out...

Страница 10: ...le to the connector on the RS 232C interface board and tighten the left and right screws 3 2 2 Parallel Cable To connect a parallel cable follow the procedure given below 1 Make sure that the AC adapt...

Страница 11: ...re If the printer is turned on when an Ethernet cable is not connected to it the POWER and ERROR lamps are simultaneously turned on and off at 4 second intervals to indicate the disconnection Be sure...

Страница 12: ...ault all settings are set to ON 1 Follow the steps below to reset network settings using the dip switches 1 Check that the power switch is set to OFF and that dip switch 1 2 is set to OFF 2 Set the po...

Страница 13: ...hat is 24 VDC 10 and 2 1 A or more Select a power supply with current capacity that is appropriate for the actual printing ratio Use a power supply that supports with SELV output Take into considerati...

Страница 14: ...lug Follow the procedure given below 1 Make sure that the AC adapter s power cord is not connected to the outlet 2 Connect the modular jack plug to the peripheral drive connector on the rear panel of...

Страница 15: ...get your fingers caught when opening or closing the printer s rear cover 3 After the rear cover is closed the printer performs initial operations from paper feeding to paper cutting Do not open the r...

Страница 16: ...m Take up paper roll width 80 0 5 mm 58 0 5 mm Core inner and outer diameters Inner diameter 12 1 mm external diameter 18 1 mm Printed surface Outer edge of roll You cannot use inner wrapped paper rol...

Страница 17: ...oll guide 2 As shown in the figure insert the paper roll guide in the groove 3 Secure the paper roll guide in place by pushing the section marked as A in the figure Note 1 Do not change the paper widt...

Страница 18: ...the tear bar There is a cutter or tear bar inside the paper outlet slot Never put your hand in the slot regardless of whether or not the printer is in operation You must open the printer cover to repl...

Страница 19: ...heating element Doing so may make it dirty which will decrease the printing quality Static electricity can damage the driver IC and other components of the thermal print head Avoid touching it directl...

Страница 20: ...erable errors Turn the printer off check the recovery conditions and then turn the printer back on If the same error occurs after you turn the printer back on the printer needs to be repaired Error de...

Страница 21: ...Do not pull on the paper with the rear cover closed Doing so may cause damage to or deformation of parts such as the thermal head and the rubber roller 4 Load the paper roll straight and gently close...

Страница 22: ...e jammed paper Note When removing jammed paper be careful not to damage the printer In particular the thermal head is easily damaged so do not touch it 4 Turn the knob in front of the cutter in the di...

Страница 23: ...ft cloth wipe off the dirt from the rubber roller Clean the entire rubber roller by rotating it 6 3 Paper Holder Clean the paper holder of debris dust paper particles etc that may have accumulated Not...

Страница 24: ...http www starmicronics com support...

Отзывы: