


ASSEMBLY INSTRUCTIONS
8
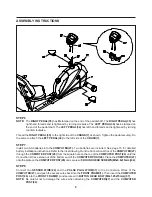
STEP 3
Attach the
HANDRAIL(6)
to the
REAR FRAME(3)
with
CARRIAGE BOLTS(M8x1.25x45mm)(55), ARC
WASHERS(M8)(75), LOCK WASHERS(M8)(77),
and
ACORN NUTS(M8x1.25)(71).
Plug the
PULSE
SENSOR WIRE(40)
into the Socket of the
PULSE EXTENSION WIRE(38)
located on the
REAR FRAME(3).
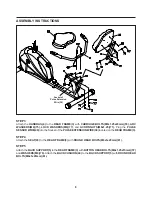
STEP 4
Attach the
SEAT(43)
to the
REAR FRAME(3)
with
ROUND HEAD BOLTS(M6x1x20mm)(61).
STEP 5
Attach the
BACK SUPPORT(5)
to the
REAR FRAME(3)
with
BUTTON HEAD BOLTS(M8x1.25x15mm)(57)
and
WASHERS(M8)(76).
Attach the
BACK CUSHION(44)
to the
BACK SUPPORT(5)
with
ROUND HEAD
BOLTS(M6x1x20mm)(61).
Socket of
Pulse Extension
Wire(38)
Содержание 15-4825
Страница 18: ...PRODUCT PARTS DRAWING 18 FRONT BACK...
Страница 22: ...22 NOTES...