background image


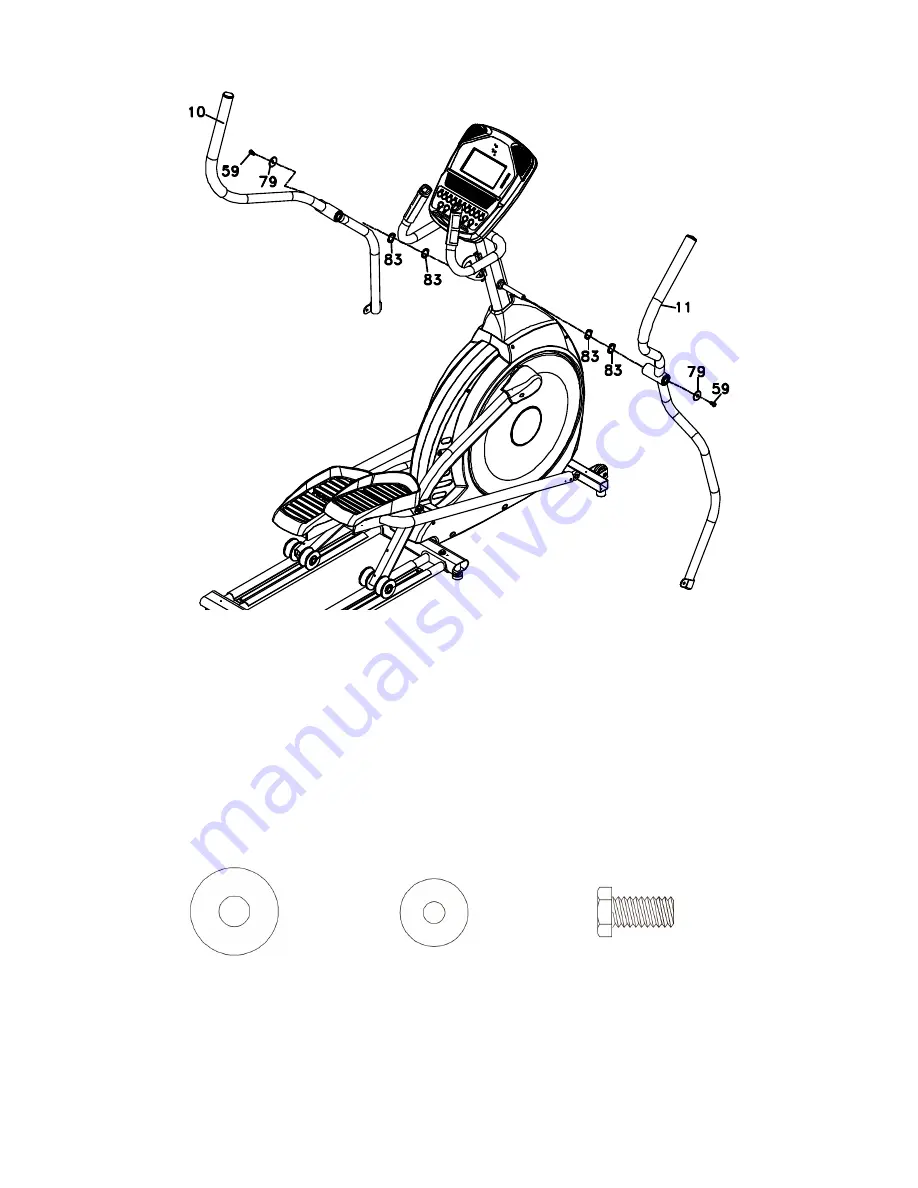
SWING ARM ASSEMBLY 

1. 

Slide two Wave Washers (83) onto both the Left and Right Console Mast axle. 

2. 

Slide the Swing Arms (L) and (R), (10ƒ& 11) onto the appropriate side of the axle. Note:   


Make sure the arms are attached as shown in the illustration. 

3. 

Place a Flat Washer (79) onto each Hex Head Bolt (59) and fasten in the end of the left   


and right axle. Tighten with the wrench (106). 


HARDWARE 


#79.5/16" × 23mm 
Flat Washer (2 pcs) 

#59. 5/16" × 15mm 
Hex Head Bolt (2 pcs) 

#83. 17mm   
Wave Washer (4 pcs) 
 

2


Содержание SPT0034- XE195

Страница 1: ...SPT0034 PLEASE CAREFULLY READ THIS ENTIRE MANUAL BEFORE OPERATING YOUR NEW ELLIPTICAL OWNER S MANUAL XE195 ELLIPTICAL...

Страница 2: ...3 Important Electrical Instructions 4 Important Operation Instructions 4 Assembly Instructions 5 Features 10 Console Operation 11 Programmable Features 14 General Maintenance 18 Exploded View Diagram...

Страница 3: ...administrator for all Spirit warranty and service needs Their responsibility is to provide you with the technical knowledge and service personnel to make your experience more informed and any difficul...

Страница 4: ...roperly call your dealer Keep the cord away from heated surfaces Do not operate where aerosol spray products are being used or where oxygen is being administered Sparks from the motor may ignite a hig...

Страница 5: ...TIONS NEVER operate this elliptical without reading and completely understanding the results of any operational change you request from the computer Understand that changes in resistance do not occur...

Страница 6: ...e at the bottom of the box lift the box over the unit and unpack 2 Carefully remove all parts from carton and inspect for any damage or missing parts If damaged parts are found or parts are missing co...

Страница 7: ...6 onto the Hex Head Bolt 60 and hand tighten through the left side of the console mast Place a Curved Washer 84 onto each Hex Head Bolt 103 and thread both into the front of the console mast tube Fast...

Страница 8: ...onto the appropriate side of the axle Note Make sure the arms are attached as shown in the illustration 3 Place a Flat Washer 79 onto each Hex Head Bolt 59 and fasten in the end of the left and right...

Страница 9: ...ecting Arm ends should be inside of the Swing Arm L and R 10 11 brackets Slide a Hex Head Bolt 104 through each Swing Arm L and R 10 11 bracket and each Connecting Arm end 2 Slide a Flat Washer 80 ont...

Страница 10: ...ad Screws 105 Tighten all four screws with the Phillips Head Screw Driver 108 Then attach the Front Stabilizer Cover 49 with two Phillips Head Screws 105 Tighten with the Phillips Head Screw Driver 10...

Страница 11: ...on the outer part of the foot and throws off the natural alignment of the joints The solution was to add a 2 degree inward angle to the footpads This might sound simple but what it achieves is not Pe...

Страница 12: ...on the console will perform an internal self test During this time all the lights will turn on When the lights go off the Message Center will show the software version i e VER 1 0 The distance window...

Страница 13: ...g BASIC INFORMATION The Message Center will initially be displaying the Program name When in scan mode during a program Speed will be displayed for four seconds then move on and display Watts indicati...

Страница 14: ...xercise equipment whether it is in a gym or at home are not accurate and tend to vary widely They are meant only as a guide to monitor your progress from workout to workout The only way to measure you...

Страница 15: ...ess Enter to continue 5 Now you are finished editing the settings and can begin your workout by pressing the Start key You can also go back and modify your settings by pressing the Enter key NOTE At a...

Страница 16: ...Cardio This program presents a quick progression up to near maximum resistance level default or user input level It has slight fluctuations up and down to allow your heart rate to elevate and then rec...

Страница 17: ...o back and modify your settings by pressing the Stop key to go back one screen 7 If you want to increase or decrease the resistance at any time during the program press the Level Up or Down keys on th...

Страница 18: ...f Effort 6 Minimal 7 Very very light 8 Very very light 9 Very light 10 Very light 11 Fairly light 12 Comfortable 13 Somewhat hard 14 Somewhat hard 15 Hard 16 Hard 17 Very hard 18 Very hard 19 Very ver...

Страница 19: ...ance diagnostic software The software will allow you to change the console settings from English to Metric and turn off the beeping of the speaker when a key is pressed for example To enter the Mainte...

Страница 20: ...18 EXPLODED VIEW DIAGRAM...

Страница 21: ...3 23 Axle for Pedal 2 24 Retaining Bracket Aluminum Track 4 25 Drive Belt 1 26 Drive Pulley 1 27 Flywheel 1 28 Magnet 1 29 7 7 25L_Woodruff Key 2 30 Console Assembly 1 30 1 Console Top Cover 1 30 2 C...

Страница 22: ...over 2 53 32 1 8T _Button Head Plug 2 54 Front Handle Bar Cover L 1 54 1 Rear Handle Bar Cover L 1 55 Front Handle Bar Cover R 1 55 1 Rear Handle Bar Cover R 1 56 32 2 5T_Round Cap 2 57 Connecting Arm...

Страница 23: ...m_Phillips Head Screw 2 99 17 23 5 1T_Flat Washer 1 100 5 19m m_Tapping Screw 4 102 30 19m m_Console Mast Bushing 2 103 3 8 3 4m m_Hex Head Bolt 2 104 5 16 1 1 4 _Hex Head Bolt 2 105 M5 15m m_Phillips...

Страница 24: ...22 Dwg Part description Qty 151 M8 6 3T_Nut 4 152 Axle Stopper 1 153 M5 5m m_Slotted Set Screws 2 154 Adaptor Power Cord 1...

Страница 25: ...to our Service 07 3272 7010 For efficient processing of your enquiry please have relevant date of purchase retailer name you purchased the item from and the brand on the product This warranty does no...

Страница 26: ...implied by law Our goods come with guarantees that cannot be excluded under the Australian Consumer Law You are entitled to a replacement or refund for a major failure and for compensation for any ot...

Страница 27: ...a consumer guarantee under the Australian Consumer Law 3 The product was damaged through abnormal use no refund or repair can be offered The sending of replacements spare parts or the cost of repair c...

Отзывы: