

Contenido de la caja:
SPc5
Countertop Terminal
Quick Reference Guide
E N G L I S H
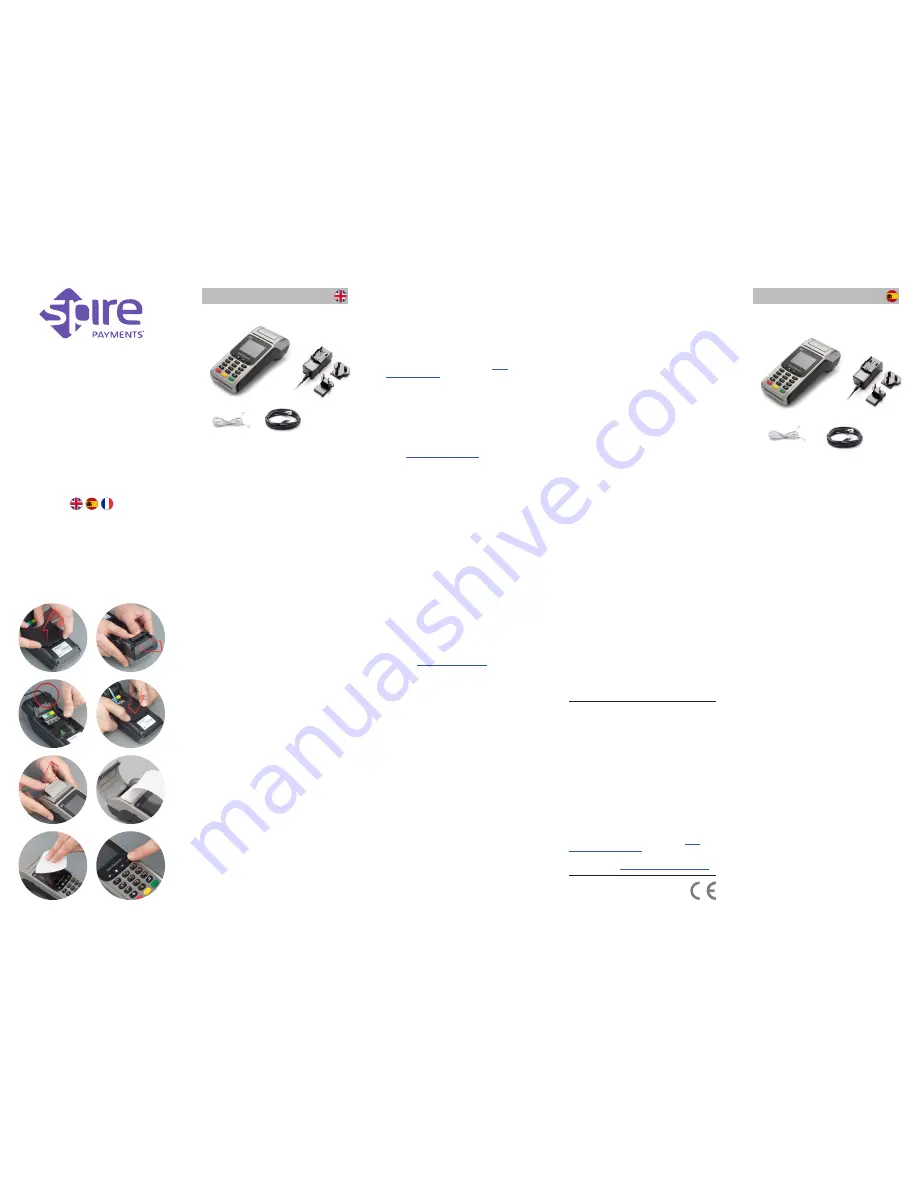
What you have received:
Terminal and
paper roll
Plug top
power supply
(region specific)
Phone cable
(optional)
Network cable
(optional)
Terminal y
rollo de papel
Fuente de
alimentación
Cable telefónico
(opcional)
Cable de datos
(opcional)
Step 1. Terminal connections
• Place the terminal face down on a flat surface,
push the two tabs upwards and remove the rear
cover.
(fig. 1)
• Remove the cable tidy.
(fig. 2)
• Thread the black power supply cable to the right
of the cable tidy recess and insert the plug into the
rear of the terminal.
(fig. 3)
• Thread the telephone cable through the cable
tidy recess and insert the plug into the socket
identified with the blue LINE label.
• Alternatively if you are connecting the terminal to
an Internet connection point, thread the network
cable to the left of the cable tidy recess and insert
the plug into the socket identified with LAN.
• Refit the cable tidy and rear cover until you hear a
‘click’.
(fig. 4)
• A merchant copy of the receipt will be printed. Tear
off and retain for your records.
• Confirm display prompts to print the customer
receipt. (If contactless transaction, only a merchant
copy will print.)
• Once printing is complete, tear off receipt and pass
to customer.
Step 5. Other transaction types
Please refer to the User Manual or visit
www.
spirepayments.com
for further information on
performing all transaction types and reading card
data by Swipe, Keyed and Contactless. Alternatively
contact your technical help desk for assistance.
Step 6. End of day/shift change
procedures
It is essential to perform specific processes at the
end of a working day, and possibly between shifts
for internal records.
Please refer to the User Manual
or visit
www.spirepayments.com
for further details.
Alternatively contact your technical help desk for
assistance.
PABX/Prefix digit(s)
If the phone line you intend to use needs a PABX/
prefix digit(s) in order to dial out, your terminal will
need to be configured for this. Please read the User
Manual provided by your bank or payment service
provider for more information or call the helpdesk
for assistance.
DHCP (relevant if you are using a
network connection)
Your terminal will be pre-configured for use on
standard networks featuring DHCP (automatic
allocation of IP address). In the unlikely event that
• Ensure the contactless card has been placed at a
distance of 0 to 4 cm from the terminal display.
• Ensure the magnetic stripe card has swiped in the
correct orientation.
• Test with another card of the same type.
Caution and Safety Instructions
• Do not attempt to disassemble, service or repair
any part.
• Do not use if damaged or the terminal shows signs
of tampering.
• Only use the supplied power adapter with an
electrical outlet of the correct rating.
• To avoid the potential hazard of electrical shock
do not use in wet environments or during an
electrical storm.
• Do not use in proximity of potentially flammable
gases or substances.
• Ensure cables used do not cause a trip hazard or
risk the device being dropped on to a hard surface.
• Do not expose to excessive heat or cold. Only
operate between 0 °C and 40 °C.
• Before cleaning, disconnect from the electrical
outlet. Use only a dry or dampened soft cloth.
• Do not immerse, use liquids, sprays or aerosol
cleaners. Clean all spillages quickly.
• Dispose any part in an environmentally sound
manner and in accordance with local laws.
• Spire Payments will not be held liable for any
damage resulting from user operation that does
not comply with the guidance stated.
Frequency bands and power
Maximum radio-frequency power transmitted in
the frequency bands in which this radio equipment
• Connect the telephone cable to the telephone
socket, and the network cable (if required) to your
Internet connection point.
Step 2. Paper roll installation
• With the terminal facing up, gently pull upwards
on the lever located in the middle of the printer
door.
(fig. 5)
• Discard any packing material from the paper roll.
• Fit the roll as shown in the diagram.
The correct
orientation of the paper is critical.
(fig. 6)
• Pull 10 cm of paper until it protrudes from the top
of the terminal.
• Ensure the printer roller is installed.
• Close the printer door until a ‘click’ is heard.
• Remove the excess paper by pulling down and
tearing along the serrated edge.
(fig. 7)
Step 3. Turning on the terminal
• Connect power supply to a nearby electrical outlet.
• Hold down the power button (located on the right
of the menu buttons) until the display illuminates
and the terminal beeps.
(fig. 8)
• Remove the protective film from the display if
present.
Step 4. Sale transaction
• Enter the transaction amount into the terminal
when prompted.
• Insert the customer’s Chip Card into the card slot
in the terminal with chip facing upwards.
• Pass the terminal to the customer for PIN entry.
• The terminal will automatically contact the
acquirer and approve/decline the transaction.
your network does not have this feature, please call
the helpdesk for assistance.
Troubleshooting
In the unlikely event you experience issues with
this product, please follow the relevant procedure
detailed below. If this does not resolve the issue,
please visit
www.spirepayments.com
or your solution
provider for further assistance.
No display on terminal
• Check terminal is switched on.
• Check connection between terminal, power supply
and mains supply.
Poor printing performance
• Check the printer door is closed fully.
• Ensure an approved paper roll is installed correctly.
• Ensure the printer roller is placed correctly. If it has
been accidentally removed, please put it back to
its original position.
Communication problems
• Ensure the communication cable is connected
correctly.
• If your terminal is connected via the telephone
line, use a telephone to ensure there is a dial tone
on the telephone line.
• Reset the terminal by powering off and on.
• If your terminal is connected via an Internet
connection, ensure the Internet connection is
operational.
• If connecting to a broadband phone line, ensure the
terminal is connected to the link through a DSL filter.
Cannot read cards
• Ensure the Chip Card has been inserted in the
correct orientation.
Paso 1. Conexionado del terminal
• Coloque el terminal boca abajo sobre una
superficie plana, pulse las dos pestañas hacia
arriba y extraiga la tapa posterior.
(fig. 1)
• Deslice y extraiga la cubierta protectora de cables.
(fig. 2)
• Encamine el cable de alimentación por el canal
situado en la parte derecha de la cubierta
protectora de cables e inserte el conector en la
parte trasera del terminal.
(fig. 3)
• Coloque y conecte el cable telefónico en el
conector identificado en color azul como “LINE.”
• Si se va a conectar el terminal a un punto de
acceso a Internet, encamine el cable de red por el
E S PA Ñ O L
fig. 4
fig. 3
fig. 2
fig. 1
fig. 5
fig. 6
fig. 7
fig. 8
operates is below the limit values specified in the
corresponding Harmonized Standards.
The frequency bands and power limits applicable
to this radio equipment are: GSM900: 35 dBm,
GSM1800: 32 dBm, Wi-Fi 2.4G: 20 dBm, NFC
13.56 MHz: 60 dBuA/m at 10 m.
©2015–2017 Spire Payments Holdings S.à.r.l.
All rights reserved.
All information is subject to
change without notice and Spire Payments does not
warrant the information’s accuracy or correctness.
Spire Payments and the Spire Payments logo are
trademarks, service marks or registered trademarks
or service marks of Spire Payments Holdings S.à.r.l. All
other trademarks are the property of their respective
owners. Any Spire Payments software described in this
document is subject to a Software License Agreement.
Please refer to the Software License Agreement for
information regarding the terms of use.
EU Compliance Statement •
Hereby, Spire Payments
Holdings S.à.r.l. declares that the radio equipment
type SPc5 is in compliance with Directive 2014/53/EU
and Directive 2011/65/EU.
The full text of the EU declaration of conformity is
available at the following internet address
www.
spirepayments.com/library
.
PCI PTS •
The PCI Notice and Installation Guidance is
available online at
www.spirepayments.com/library
.
Spire Payments Holdings S.à.r.l.
70 route d’Esch
L-1470 Luxembourg
canal situado en la parte izquierda de la cubierta
pasa cables e inserte el cable en el conector
identificado como LAN.
• Inserte en la guía la cubierta pasa cables, y coloque
la tapa posterior en su sitio hasta escuchar un
‘clic’.
(fig. 4)
• Conecte el cable telefónico a la roseta telefónica
y, si es necesario, el cable de datos al punto de
acceso a Internet.
Paso 2. Instalación del rollo de papel
• Con el terminal boca arriba, tire suavemente de la
palanca situada en la parte central de la tapa de la
impresora.
(fig. 5)
• Retire el material de embalaje del rollo de papel.
• Coloque el rollo como se muestra en el dibujo.
Es
muy importante que el papel esté correctamente
orientado.
(fig. 6)
• Tire del papel hasta que sobresalga unos 10 cm
por la parte superior del terminal.
• Antes de cerrar la tapa de la impresora,
asegúrese de que el rodillo de la impresora está
correctamente instalado.
• Cierre la tapa de la impresora hasta que oiga un
‘clic’.
• Retire el papel sobrante tirando de él hacia abajo y
ayudándose del borde dentado.
(fig. 7)
Paso 3. Encendido del Terminal
• Conecte la fuente de alimentación a la red
eléctrica.
• Pulse la tecla de encendido (situada a la derecha
de las teclas de menú) hasta que se encienda la
pantalla.
(fig. 8)
• Retire la película protectora de la pantalla, si
todavía está adherida.


