GSM INTRUSION ALARM SYSTEM
INSTRUCTION MANUAL
GSM - PSTN - SMS - TOUCH
GSM Wireless Security Alarm System
Страница 1: ...GSM INTRUSION ALARM SYSTEM INSTRUCTION MANUAL GSM PSTN SMS TOUCH GSM Wireless Security Alarm System ...
Страница 2: ...Printed in Shenzhen RE GSM August 2013 SECURE YOUR HOME AND BUSINESS ...
Страница 3: ...Alarm memo entry delay exit delay Hybrid alarm 30 wireless zones 4 hardwired zones Advanced zone attribute user friendly zone names Temperature display and relay signal output Support wireless LCD LED keypad and wireless siren Support user code and installer code 100 alarm log SMS alert when system Arm Disarmed sensor s low battery AC power failure phone line disconnect Reset factory design Built ...
Страница 4: ...ing Alarm current 120mA Backup Battery 3 7V 800mA Standby time Around 24 hours Charging time 8 hours GSM frequency 850 900 1800 1900MHz GSM Transmission power 2W Receiving and emitting frequency 433MHz 868MHz optional Wireless transmission distance 100 m Open space Working condition Temperature 10ºC 50ºC Humidity 5 80 4 ...
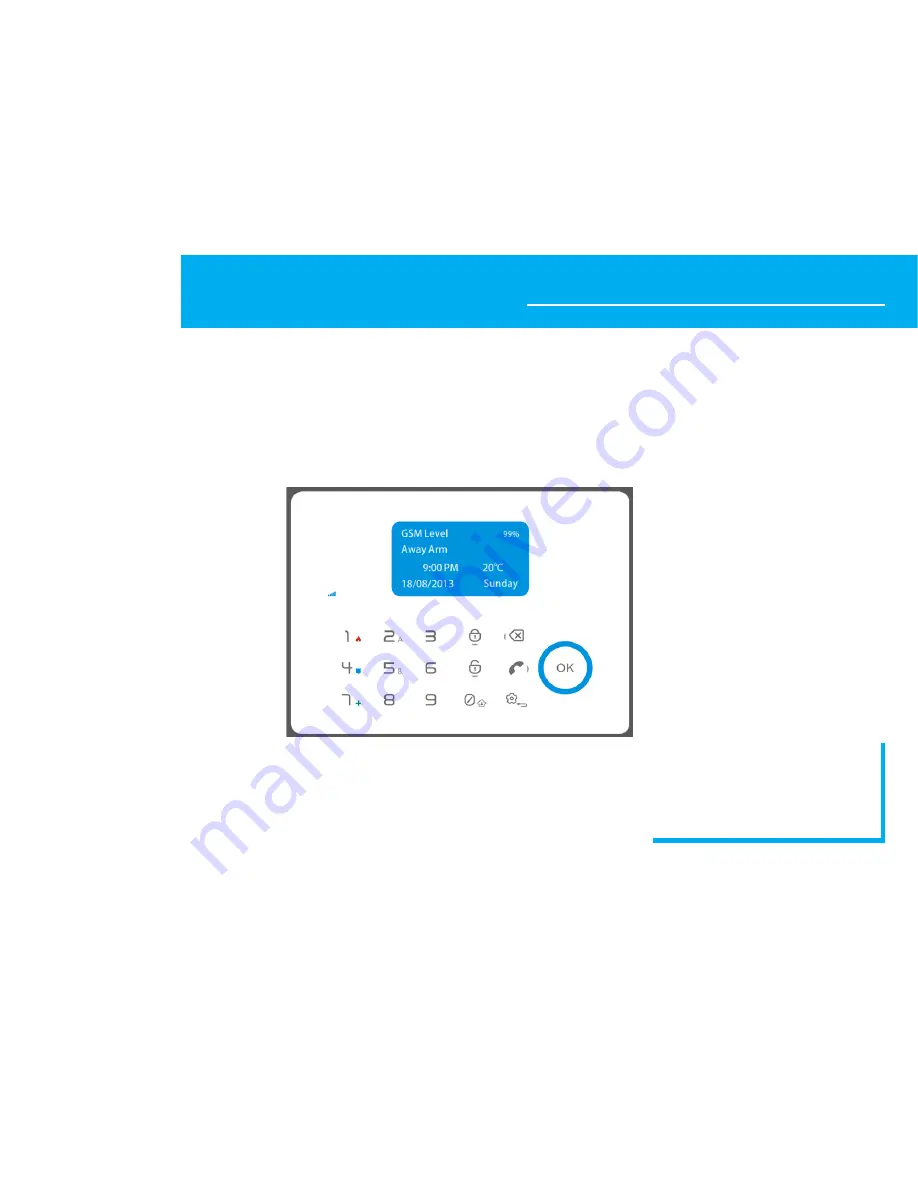
Страница 5: ... e r t y u i o a s d f q LCD Display w GSM Signal LED e Fire Alarm r Burglary t Medical Help y SpeedDial Button u Home Stay Arm i Down Disarm o SET Exit a Up Away Arm s Left Delete Log d Right Phone Call f Confirm Save 5 ...
Страница 6: ...Back panel View 12V 31 32 33 34 BELL No Com Anti Tamper Switch Installation Bracket Speaker Wired Connection DC 12V input jack ON OFF Telephone line SIM Card Slot Reset 6 ...
Страница 7: ... to alarm system after pick up input xxxx you will hear di sound press 2 to active the Stay Arm Disarm In keypad touch then input xxxx OK Remotely via SMS send SMS content xxxx0 Remotely via phone make phone call to alarm system after pick up input xxxx you will hear di sound press 3 to disarm Notice xxxx is the current user code default user code is 1111 and default admin installer code is 1234 T...
Страница 8: ...can touch to check these log when system is not in setup status OK OK Make Phone Call When alarm system in disarm status you can make phone call via alarm panel Touch then input the phone number touch to make phone call The function enables alarm system can be used as a portable cell phone Pick up Phone Call If there is a phone call to alarm system the confirm circle s LED will light up and you ca...
Страница 9: ...e XX hours XX minute XX second Do same procedure for date Touch and select the week touch OK to confirm all settings X Alarm Receiving Phone Number This alarm system can totally preset up to 5 personal emergency phone numbers for alarm receiving Time Setting Phone No Setting SMS Setting Record Phone Groups 1 Alarm Call 28901540 Touch to select the Alarm Call or Alarm SMS then touch you can input t...
Страница 10: ...ne number enter new mobile phone number Touch OK to save the phone number it will navigate to event report selection Touch to select enabled or disable the event report AC power recover means when external electricity is recover the alarm system will send SMS Arm Disarm SMS means when alarm system is Armed or Disarmed the system will send SMS PSTN Off means when fixed phone line is cut or with tro...
Страница 11: ...elay Alarm Delay Siren Setting Tone Setting Arm Delay 10 Seconds Alarm Delay Entry Delay The alarm delay or entry delay can allow user to set alarm delay zones before system set alarm off This allow user enter into specific detection area to disarm the system without triggering alarm Arm Delay Alarm Delay Siren Setting Tone Setting Alarm Delay 10 Seconds Touch to delete exist data and input new se...
Страница 12: ...en On Touch to delete the zone number and input new zone number from 00 34 Touch OK to save Touch to delete the siren time and input new siren time 00 means disable Default value is 01 Touch to choose On to enable built in siren and touch OK to save X X Tone Setting Tone setting means the alarm system will make beep sound when detects system event such as telephone line cut Arm Disarm Temperature ...
Страница 13: ...bute Upload PSTN Call in Tone 9 GSM Call in Tone 3 Program Delete Use this function to program delete wireless sensors and accessories remote keyfob wireless LED LCD keypad The wireless zone number is from 00 30 Zone 00 is for programming wireless remote keyfob or keypads Touch to delete exist data It accpets ring time between1 9 Touch OK to save X Call in Setting Program Delete Zone Attribute Upl...
Страница 14: ...omize the system which can be more suitable for specific installation Ensuring the zones with correct attribute therefore sensors can work properly Call in Setting Program Delete Zone Attribute Upload Zone No 01 Activate 0 Defence Line 00Help Alarm Delay Off Zone Chime Off Smart Sensor Off Touch to delete the zone number and input new zone number from 00 30 Touch OK navigate to next menu Touch OK ...
Страница 15: ...ans interior protection which is belong to motion zone The sensors in this zone will be activated when system is in Away Arm mode but will be de activated when system in Home Arm Stay Arm mode Zone Number Zone Type Sensor Type Sensors 00 N A Wireless Remote Keyfob Maximum 10 pcs 01 10 Emergency Zone Wireless Sensors Panic Smoke Gas Leak 11 20 Perimeter Zone Door sensor IR beam 21 30 Motion Zone PI...
Страница 16: ...tus to central monitoring station Call in Setting Program Delete Zone Attribute Upload Center Phone No 911 User Code 0001 Upload Status Off Touch to delete exist number and input new alarm monitoring centre number Touch OK to save then navigate to next level menu touch to delete default user code and input your user code touch OK to save then navigate to next level menu touch to choose disable or ...
Страница 17: ...an modify the admin code The admin code with authorization for programming the system The default admin code is 1234 Password Setting Pin Setting Reset Time Arm Disarm Pin Setting Reset Navigate to this menu user can reset the alarm system The system will reset to factory status If user have done wrong programming can not be solved then you can use reset function It will erase all the user s progr...
Страница 18: ...auto arm disarm setting Notice The time format should be 12 00 hours then minutes Wrong time input can not be saved X Temperature Control This system is built in temperature sensor for monitoring onsite temperature You can set the upper limit and lower limit to make temperature alert NC dry contract output The temperature range can be from 00 70 If you enabled SMS notification then it will send th...
Страница 19: ...r can touch A or B for making speed dial phone call The phone number can be the person that needs to be notified in case of an emergency a carer Mum or Dad Temp Control Speed Dial A Phone No 1008610086 B Phone No 10011001 Notice After finish the setting you can touch to exit setting status The system will automactially exit setting status when without any operation on keypad 19 ...
Страница 20: ...SMS notification The system will send SMS with below content 0001 Alarm System 11 Zone Door Sensor Alarming 20 Inquiry System s Status The system allow user to inquiry the system s status send User code C text message to alarm system alarm will reply text message inform you whether it s Armed or Disarmed SMS Content XXXXC ...
Страница 21: ... will be Away Armed Press 2 on the phone to Stay Arm It will hang up immediately system will be Stay Armed Press 3 on the phone to Disarm It will hang up immediately system will be Disarmed Press 4 on the phone to listen onsite voice It will hang up after 20 seconds delay Press 5 on the phone to listen voice memo Press 6 on the phone to talk back fixed phone number doesn t support this function Pr...
Страница 22: ... remote keyfob program keyfobs in sequence into zone 00 Call in Setting Program Delete Zone Attribute Upload Zone No 00 Program Delete Touch to choose Program then touch OK to confirm the LCD will display Programming Now press the button for two times the LCD will display Success then touch OK to save Touch to choose Delete then touch OK to confirm the LCD will display Success then touch OK to sav...
Страница 23: ... maximum 1cm the sensor will send alarm signal to alarm system Program Delete Go to Program Delete for programming wireless remote keyfob program keyfob in sequence into zone 11 20 Touch to choose Program then touch OK to confirm the LCD will display Programming Now separate door sensor for two times the LCD will display Success then touch OK to save Touch to choose Delete then touch OK to confirm...
Страница 24: ...er and the magnet with double sided tape or the screw Avoid placing the detector in areas with large metallic structures or electrical installations such as boiler area or counters Technical Information Working voltage 1 5V LR6 Static current 30 μA Alarm current 40mA Emitting frequency 433MHz 868MHz optional Transmission distance 100 m Open space Lifespan of battery 12 months Notice The door senso...
Страница 25: ...el lens 2 Alarm LED Indicator 3 Swivel Bracket Program Delete Go to Program Delete for programming wireless remote keyfob program keyfob in sequence into zone 21 30 Touch to choose Program then touch OK to confirm the LCD will display Programming Now triggering PIR sensor for two times the LCD will display Success then touch OK to save Touch to choose Delete then touch OK to confirm the LCD will d...
Страница 26: ...s Wall mounted on corridor to detect movement Technical Information Working voltage 2x1 5V LR6 Static current 50 μA Alarm current 9 5mA Detection angle 110 Detection distance 12 m Emitting frequency 433MHz 868MHz optional Transmission distance 100 m Open space Lifespan of battery 12 months Notice The PIR sensor in the package may differ from manual The specification will change when use different ...
Страница 27: ...Leak Alarm E112 Combustion 07 Tamper Alarm E137 Tamper 08 Heat Alarm E158 High temp 09 Perimeter Zone E131 Perimeter 10 Door E134 Entry Exit 11 Front Door E134 Entry Exit 12 Back Door E134 Entry Exit 13 Side Door E134 Entry Exit 14 Window E131 Perimeter 15 Glass Break E131 Perimeter 16 Vibration E130 Burglary 17 Motion Zone E132 Interior 18 Garage E130 Burglary 19 Motion E132 Interior Zone Name CI...
Страница 28: ...ection Notice Hardwired zone number from 31 34 All hardwired zones are disabled de activated If you want to use the hardwired zones you need go to Zone attribute to enable them EOL resistor must be connected to hardwired sensor for zone protection it can make hardwired sensors work properly A1 means wired zone V1 means DC power either from alarm panel or separate power supply Appendix 28 ...
Страница 29: ...ors in too cold too hot or dusty places to prevent it from curtailing the service lives of electric parts and preventing the plastic shell from distorting Do not put the alarm panel and any wireless sensors in low and too exposed places to prevent children from touching them or the thieves from finding them Reglar testing is necessary for finding and resolving probles in time Regulary check the ba...
Страница 30: ...System Note ...