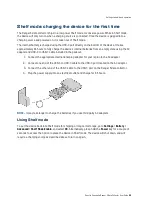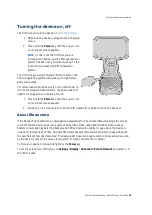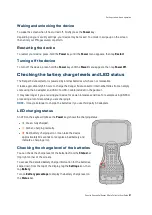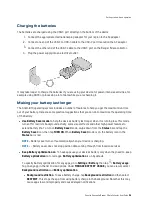
background image

Display settings: adjusting the backlight

The Ranger 5 data collector is equipped with a high brightness outdoor readable display. You can easily 
increase the brightness of the display to increase the readability of the device in bright sunlight 
conditions, or turn down the brightness to help conserve battery power when working indoors or in dull 
conditions. You can also set the device to automatically adjust the backlight power depending on the 
ambient light conditions.

Configuring Adaptive brightness

Adaptive brightness is on by default. It uses the ambient light sensor on the device's screen (see 

Parts of 

the Ranger 5 data collector, page 25

) to adjust your screen brightness depending on the amount of light 

around you.
To adjust the backlight settings, and turn Adaptive brightness off / on:

 1. 

Open the 

Settings

 app 

.

 2. 

Tap 

Display

.

 3. 

Tap the setting that you want to change.

Manually adjusting the backlight brightness

 1. 

Swipe down from the 

Status Bar

 at the top edge of the screen to view the 

Quick Settings

 bar.

 2. 

Slide the backlight slider 

 left or right to adjust the brightness.

NOTE – 

You can manually adjust your brightness level while Adaptive brightness is on.

TIP – 

You can also access the backlight slider by pressing 

Fn + 7

.

Display settings: screen auto-rotation

The Ranger 5 data collector is equipped with orientation sensors that can detect if your device is in 
portrait or landscape orientation. The operating system can automatically adjust the display to match 
your device orientation, or you can lock the orientation.
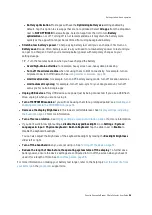
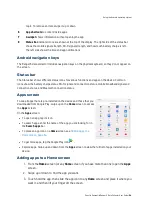
Swipe down from the top of the screen to display the 

Quick Settings

 bar. 


l

If auto-rotate is turned off, the auto-rotate icon 

 is not visible; 

Portrait

 or 

Landscape

 will be 

displayed instead. Tap to turn on auto-rotate 

.


l

If auto-rotate is turned on, the auto-rotate icon 

 is visible. You can:


l

Tap 

to toggle auto-rotate Off.


l

Lock the orientation. Orientate the device to 

Portrait

 or 

Landscape

, then tap 

 to turn off 

auto-rotate and lock the device in the selected orientation.

Spectra Geospatial Ranger 5 Data Collector User Guide |

42

Getting started: basic operation

Содержание 121900

Страница 1: ...Version 1 00 Revision A June 2021 Spectra Geospatial Ranger 5 Data Collector Powered by Android TM 10 USER GUIDE...

Страница 2: ...indows are either registered trademarks or trademarks of Microsoft Corporation in the United States and or other countries The Bluetooth word mark and logos are owned by the Bluetooth SIG Inc and any...

Страница 3: ...the equipment Recycling information You should dispose of the device and accessories properly according to local laws and regulations Because the device contains electronic components it must be dispo...

Страница 4: ...ial environment Canada IC ID 5817A EM7455 5817A 121900 This digital apparatus does not exceed the Class B limits for radio noise emissions from digital apparatus as set out in the radio interference r...

Страница 5: ...on minimiser les contacts humains lors du fonctionnement normal Ce p riph rique a t valu et d montr conforme aux limites SAR Specific Absorption Rate Taux d absorption sp cifique d IC lorsqu il est i...

Страница 6: ...y replaced by an incorrect type Dispose of used batteries according to the instructions b Make sure the temperature for the adapter while charging is within 0 25 C 32 77 F Limited Warranty Terms and C...

Страница 7: ...RE IN LIEU OF ALL OBLIGATIONS OR LIABILITIES ON THE PART OF TRIMBLE ARISING OUT OF OR IN CONNECTION WITH ANY PRODUCT BECAUSE SOME STATES AND JURISDICTIONS DO NOT ALLOW LIMITATIONS ON DURATION OR THE E...

Страница 8: ...er 5 data collector 25 Setting up the device 26 Inserting a MicroSIM card optional 26 Tethering the stylus 28 Installing a screen protector 28 Attaching the pole bracket optional 31 Attaching the hand...

Страница 9: ...y keys modes and settings 48 Keyboard status LEDs 49 Using the Android operating system 51 Using Accounts 51 Add a Google or other account 52 Remove a Google or other account 52 The Android interface...

Страница 10: ...OWER modules 71 Installing EMPOWER module drivers and software apps 71 Configuring and controlling a module with the Trimble EMPOWER Hub application 72 Using the cameras 73 Taking photos and videos 73...

Страница 11: ...are safe for disposal in the normal municipal waste stream These batteries contain recyclable materials and are accepted for recycling Dispose of used batteries in accordance with local regulations W...

Страница 12: ...the voltage in your location Ensure the adapter has prongs compatible with your outlets l The AC power supply is designed for indoor use only Avoid using the AC power supply in wet areas l Unplug the...

Страница 13: ...n of six inches be maintained between a handheld wireless phone and a pacemaker to avoid potential interference with the pacemaker These recommendations are consistent with the independent research by...

Страница 14: ...5 data collector in direct sunlight for a long time unnecessarily Ultraviolet light and excessive heat from sun loading heat can damage the display l Use proper touchscreen tools Use either fingers or...

Страница 15: ...res between 0 C to 40 C 32 F to 104 F Use only the manufacturer designated charging accessories to recharge the batteries Other environmental conditions The batteries are sealed from water and dust an...

Страница 16: ...OWER module bay Battery Power Batteries l Internal Li Ion batteries l 4530 mAh 7 2V 32 6 Wh nominal capacity Battery Life l RTS workflow 16 hours GNSS workflow 18 hours usage l Depends on display sett...

Страница 17: ...rowse for 3rd party tools that enable you to view sensor output Display Ambient light sensor Environmental Certifications Conflict Minerals China RoHS 2 0 EU RoHS 2 0 EU REACH Safety Certifications US...

Страница 18: ...eral Minimum Integrity and Loose Cargo Test l High altitude low pressure l Operation 9 144 m 30 000 ft at 5 C 41 F l Storage 12 192 m 40 000 ft at 30 C 22 F l Rapid Decompression 2 438 m 8 000 ft to 1...

Страница 19: ...le Access version 2021 and later Trimble Siteworks Positioning System version 1 40 and later Spectra Geospatial Origin Trimble 3Log ScaleWiz Trimble Unity Remote Monitoring and Work Management Softwar...

Страница 20: ...u have used other Spectra Geospatial handheld field computers data collectors or survey controllers before Spectra Geospatial recommends that you spend some time reading this guide to learn about the...

Страница 21: ...ck of the device see Inserting a MicroSIM card optional page 26 for instructions on removing the compartment cover Configuration options The Ranger 5 data collector is powered by the Android 10 operat...

Страница 22: ...Alcohol prep pad l grey lint free cleaning cloth l blue lint dust removal sticker 45W AC USB C PD power supply with regional plug adapters EU UK SAA l Input 100 240VAC 50 60Hz 1 3A l Output 45W 5V 3A...

Страница 23: ...rmation page 11 A wide range of replacement and optional accessories are available to purchase for the Ranger 5 data collector including l AC power supply with regional plugs and USB C port l USB C to...

Страница 24: ...ceiver Module l Trimble EM110 1D 2D Barcode Imager Module l Trimble EM111 1D 2D Barcode Imager UHF 902 928 MHz RFID NA l Trimble EM111 1D 2D Barcode Imager UHF 865 6 867 6 MHz RFID EU l Trimble EM112...

Страница 25: ...ional keys 17 Pole mount latches x2 6 CAPS lock LED 18 Handstrap connector points x4 7 Battery charging LED 19 Gore Vent DO NOT COVER 8 Power key 20 Camera camera flash 9 Shift LED 21 Trimble EMPOWER...

Страница 26: ...m you will need a data plan and microSIM card from your local cellular service provider to use cellular data If you are unsure check with your mobile operator See Working with mobile broadband page 62...

Страница 27: ...card door using a coin or the tool located on the stylus tether as shown do not remove the door completely 4 Slide the microSIM card into the slot in the orientation shown on the microSIM door 5 Clos...

Страница 28: ...e stylus dock shown top left in the image below to store it when not in use Installing a screen protector The Ranger 5 data collector is fitted with a mechanically strengthened glass touchscreen which...

Страница 29: ...Polish and dry the screen with the lint free cleaning cloth supplied 4 Remove any dust specs with the supplied dust sticker Spectra Geospatial Ranger 5 Data Collector User Guide 29 Setting up the devi...

Страница 30: ...on the screen If you make a mistake and the glass looks off center you can gently lift the screen protector up and realign it Then once the protector is on the screen give it a soft press in the cente...

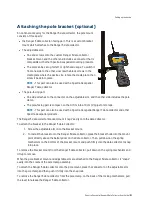
Страница 31: ...spatial Ranger 7 data collector and other Spectra Geospatial products The Ranger 5 data collector bracket mount snaps easily onto the data collector To attach the bracket to the Ranger 5 data collecto...

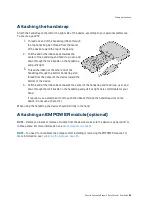
Страница 32: ...ull the end of the ribbon back towards the center of the handstrap and feed it up over and down through the lock buckle on the handstrap and pull it as tight as is comfortable for your hand If require...

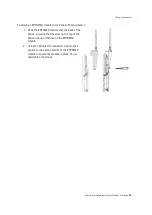
Страница 33: ...that the slots on the top of the device line up with those on the EMPOWER module 2 Using the Phillips 1 screwdriver tighten the 2 captive screws at the bottom of the EMPOWER module to secure the modu...

Страница 34: ...the onscreen keypad Using a USB or Bluetooth mouse This section covers some explains some basic features to get you started using your Ranger 5 data collector When you start your device for the first...

Страница 35: ...our region to the AC adapter 2 Connect one end of the USB C to USB C cable to the USB C port located on the AC adaptor 3 Connect the other end of the USB C cable to the USB C port on the Ranger 5 data...

Страница 36: ...n appears 2 Swipe up on the touchscreen to enter a PIN password or pattern if one has been set About Sleep state If the Ranger 5 data collector is unplugged and stationary for one minute default setti...

Страница 37: ...he packout It may take longer if you are using your device for power intensive activities for example using GNSS or processing a lot of data while you are charging it NOTE It may take longer to charge...

Страница 38: ...cts background activity some visual effects and other high power features to extend battery life To turn on Battery Saver mode swipe down from the Status bar and tap the Battery Saver icon then tap TU...

Страница 39: ...for certain Google apps l Unplug USB devices Many USB devices use power just by being connected If you use a USB flash drive unplug it when you are not using it l Turn off EMPOWER modules if you will...

Страница 40: ...p the Advanced dropdown 3 Select Touch Panel Mode and choose between Finger Stylus or Glove Mode When using the device in the rain Spectra Geospatial recommends that you use Finger mode with a screen...

Страница 41: ...using when you first touch it to scroll a page or a list up or down Scrolls vertically or horizontally Swipe a Home screen left or right to see your other Home screens Drag your finger or the stylus a...

Страница 42: ...Status Bar at the top edge of the screen to view the Quick Settings bar 2 Slide the backlight slider left or right to adjust the brightness NOTE You can manually adjust your brightness level while Ada...

Страница 43: ...n it on 3 When you tap in a text field on the screen the onscreen keypad will appear You can still use the physical keyboard while the virtual keyboard setting is on Using a USB or Bluetooth mouse You...

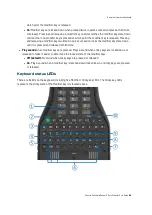
Страница 44: ...board and describes the special non standard functionality of the keyboard and the associated utilities About the keyboard controller firmware Main keyboard keys Configuring built in keyboard settings...

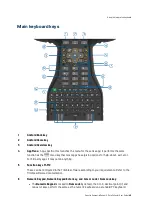
Страница 45: ...t do anything 5 Function keys F1 F12 These can be configured in the Trimble software according to your requirements Refer to the Trimble software documentation 6 Numeric Keypad Numeric Keypad Enter ke...

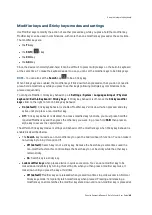
Страница 46: ...f See Modifier keys and Sticky keys modes and settings page 48 for more information The modifier keys are keys that modify the action taken when other keys are pressed while the modifier key is held d...

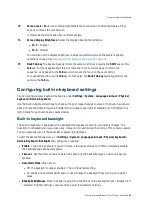
Страница 47: ...Use the Android toggle to Enable Turn On slide to the right or Disable Turn Off slide to the left Details for each setting are covered below Built in keyboard backlight The built in keyboard is equip...

Страница 48: ...you press a non modifier key l Off Sticky key behavior is disabled To access modified key functions you must press hold the required Modifier key and then press the other key you want E g press hold S...

Страница 49: ...and released a third time l Play sounds when modifier keys are pressed Plays a sound when sticky keys are locked down or released to make it easier to determine the locked state of the modifier keys l...

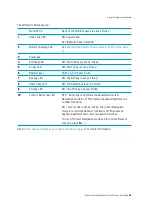
Страница 50: ...ON the Search key is set as sticky 9 Ctrl key LED ON the Ctrl key is set as sticky 10 Cursor Num Lock LED OFF Num Lock is on this is the default and Cursor Navigation mode is off The numeric keyboard...

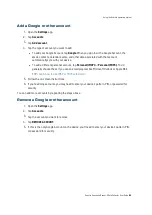
Страница 51: ...for a Google Account or use one that you already have You already have a Google Account if you use an email address to sign in to any Google product for example Gmail YouTube Google Play AdWords Googl...

Страница 52: ...an email program like Microsoft Outlook or Apple Mail TIP Learn how to use IMAP or POP3 with Gmail 5 Follow the on screen instructions 6 If you re adding accounts you may need to enter your device s p...

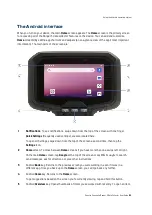
Страница 53: ...n a second time then tap the Settings icon 2 Home screen To move between Home screens if you have more than one swipe left or right On the main Home screen tap Google at the top of the screen or say O...

Страница 54: ...tooth connection status Apps screen To see all apps that are pre installed on the device and those that you downloaded from Google Play swipe up on the Home screen to access the Apps screen On the App...

Страница 55: ...Using the pre installed Google apps and other apps The Ranger 5 data collector comes with a range of useful pre installed software The following describes some important bundled applications and summa...

Страница 56: ...missions for files and folders view your content on the go while offline receive notifications about important activity on your files and use the device camera to scan paper documents YouTube Music is...

Страница 57: ...se to view and open recent files including images videos audio and downloads stored on the device or in Google Drive Camera The Camera app lets you take regular photos or video using the rear facing c...

Страница 58: ...tps www trimble com empowermodules Music is a utility for managing songs albums artists and playlists stored on the device Videos is a utility for videos stored on the device Settings Getting more app...

Страница 59: ...rn on Wi Fi on your Ranger 5 data collector and connect to a wireless network Working with Wi Fi networks Connect to a Wi Fi wireless network and browse the Internet download apps send email messages...

Страница 60: ...so it no longer appears in your list of networks 1 From the Apps screen open the Settings app 2 Tap Network Internet 3 Tap Wi Fi 4 At the top of the Wi Fi screen make sure the On Off switch is On 5 Ta...

Страница 61: ...bar Quick Settings on the Home screen You can quickly turn Wi Fi on or off or switch networks from the Status bar Quick Settings on a Home screen On a Home screen swipe down from the Status bar at the...

Страница 62: ...2 Tap Network Internet then tap Mobile network 3 Adjust the settings as required l Mobile data Access data using mobile network l Roaming Let your device transmit data over other carriers networks whe...

Страница 63: ...ector including Bluetooth Wi Fi Cellular as well as any wireless radios connected to the Ranger 5 data collector such as EMPOWER modules To turn Airplane mode on or off 1 Swipe down from the top edge...

Страница 64: ...the data collector s integrated GNSS receiver For advanced GNSS setups use a survey grade receiver or the EM100 GNSS receiver module refer to the Trimble EMPOWER module user documentation for more inf...

Страница 65: ...may have bad calibration data on the device In most cases this will be resolved after performing one to four calibrations to clear out bad data and correctly calibrate the device If the compass still...

Страница 66: ...The Ranger 5 data collector has a USB type C port for connecting USB devices such as a flash drive scanner printer keyboard or mouse The Ranger 5 data collector has built in support for mass storage d...

Страница 67: ...screw USB Type C locking plug type as specified by the Universal Serial Bus Type C Locking Connector Specification Revision 1 0 March 9 2016 The below figures are extracted from the above specificati...

Страница 68: ...nnected to a device To save battery turn off Bluetooth when you are not using it Bluetooth is off in Airplane mode Pairing and connecting a Bluetooth device with the Ranger 5 data collector Before you...

Страница 69: ...can connect a 3rd party USB C to RS 232 adapter To connect an RS 232 device plug the device cable into the RS 232 adapter port and plug the USB C plug on the adapter into the USB C port on the Ranger...

Страница 70: ...Ranger 5 data collector 4 Use a USB type C data transfer cable to connect the Ranger 5 data collector to the MacOS device 5 Swipe down from the top of the Ranger 5 data collector screen to see your no...

Страница 71: ...ch a module see Attaching an EMPOWER module optional page 32 When you attach a module make sure that the EMPOWER Hub and other supporting software is updated See Installing EMPOWER module drivers and...

Страница 72: ...e EMPOWER Hub comes pre installed on the Ranger 5 data collector and can be used to monitor module status and manage modules attached to your device including l View module status information l Enable...

Страница 73: ...ering the camera and flash windows Remove the film with a fingernail or the plastic stylus tip before first use to ensure proper focus and exposure of your photos and videos Taking photos and videos B...

Страница 74: ...Take a Photo l Start capturing a Panorama l Start shooting a Video 5 To see the photos you ve saved tap the thumbnail image in the corner of the screen Changing camera settings To change how photos o...

Страница 75: ...aved to the Photos and Gallery apps on theRanger 5 data collector open these apps from the Apps screen There are several ways to look through your photos and videos l Camera app From within the Camera...

Страница 76: ...comprehensive online support how to guides troubleshooting articles and related downloads for the Android 10 operating system go to the online Android support pages for the Android 10 operating system...

Страница 77: ...ates are labeled Update If an update is available tap the app Update If multiple updates are available tap Update all Close apps that you are not using Normally you don t need to close apps Android au...

Страница 78: ...are doesn t recognize my EMPOWER module l Check module contacts and attachment It is possible the contacts between the module and the device are dirty or that the module is not attached correctly Ensu...

Страница 79: ...te the compass especially if you have removed or installed an EMPOWER module See Calibrating the compass page 65 for more information Power and battery issues Battery will not charge l The battery is...

Страница 80: ...to the CPU Any unsaved files and settings will be lost To force your device to restart 1 Press hold the Power key until the Power Off and Restart options appear on the screen 2 Tap Restart to restart...

Страница 81: ...d updates page 76 l See Check for app updates page 77 Software downloads and updates The latest versions of software including drivers firmware updates and software utilities are available on Google P...

Отзывы: