background image


2.


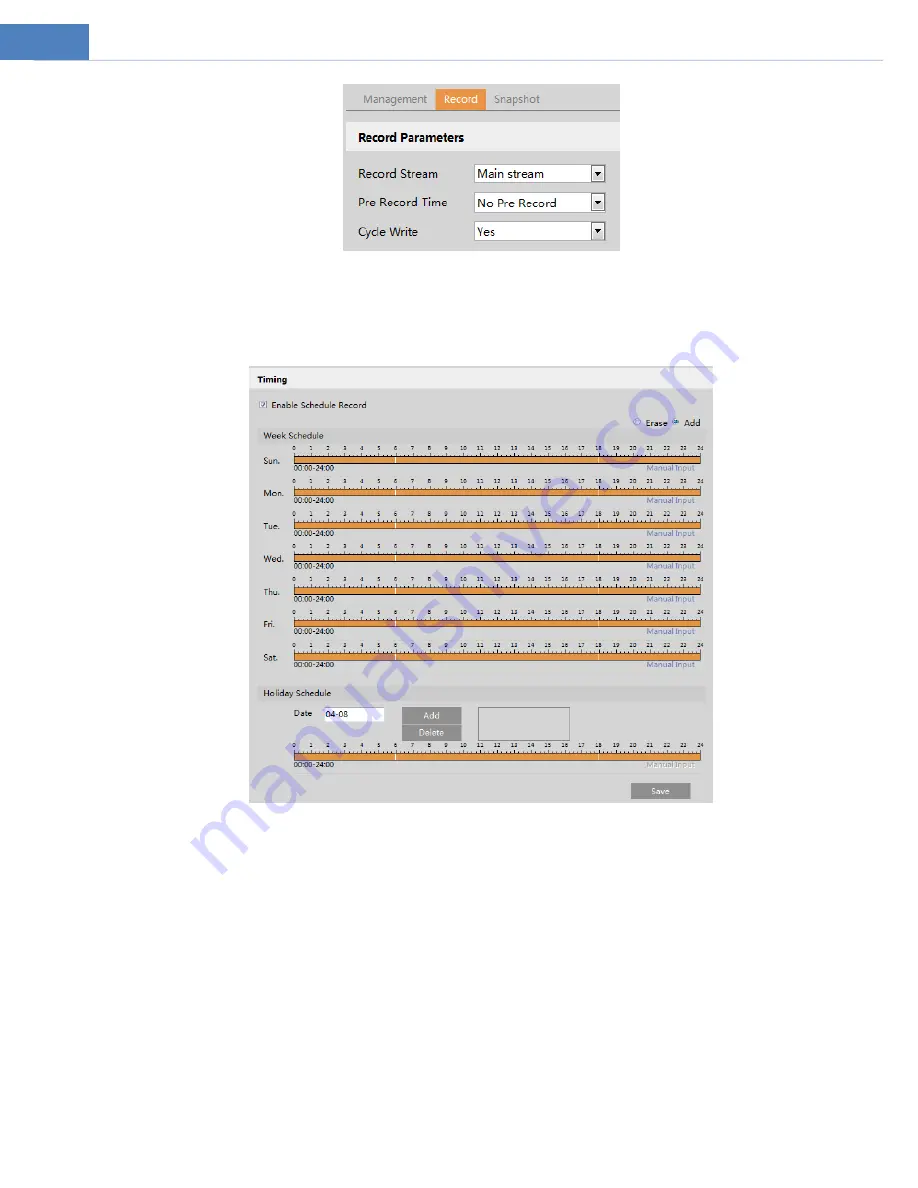
Set record stream, pre-record time and cycle writing. 

Pre Record Time

: Set the time to record before the actual recording begins. 

 
3. 

Set schedule recording. C

heck “Enable Schedule Record” and set the sch

edule. 


Weekly schedule 

Set the alarm time from Monday to Sunday for a single week. Each day is divided in one hour increments. Green means 
scheduled. Blank means unscheduled. 

“Add”: Add the schedule for a special day.

 Drag the mouse to set the time on the timeline. 

“Erase”: Delete 

the schedule. Drag the mouse to erase the time on the timeline. 

Manual Input: Click it for a specific day to enter specific start and end times. This adds more granularities (minutes). 
 

Day schedule 

Set the alarm time for alarm a special day, such as a holiday. 

Note: Holiday schedule takes priority over weekly schedule. 
 

z


Snapshot Settings 

Go to System

Æ

Storage

Æ

Snapshot to go to the interface as shown below.   


Содержание O8VB1

Страница 1: ...User Manual 8MP IP Camera O8VB1 O8VD1 O8VT1 Please read this instruction carefully before operating the unit and keep it for further reference ...

Страница 2: ...n and Daily Maintenance Please shut down the device and then unplug the power cable before you begin any maintenance work Do not touch the CMOS sensor optic component You can use a blower to clean the dust on the lens surface Always use the dry soft cloth to clean the device If there is too much dust use a cloth dampened with a small quantity of neutral detergent Finally use the dry cloth to clean...

Страница 3: ...hese limits are designed to provide reasonable protection against harmful interference This equipment generates uses and can radiate radio frequency energy and if not installed and used in accordance with the instruction manual may cause harmful interference to radio communication However there is no guarantee that interference will not occur in a particular installation If this equipment does cau...

Страница 4: ...Other Alarms 14 4 3 3 Alarm Server 15 4 4 Analytics Configuration 15 4 4 1 Abnormality 16 4 4 2 Line Crossing 16 4 4 3 Intrusion 17 4 5 Network Configuration 18 4 5 1 TCP IP 18 4 5 2 Port 19 4 5 3 Server Configuration 20 4 5 4 DDNS 20 4 5 5 802 1x 21 4 5 6 RTSP 21 4 5 7 UPNP 22 4 5 8 Email 22 4 5 9 HTTPS 23 4 5 10 QoS 24 4 6 Security Configuration 24 4 6 1 User Admin 24 4 6 2 Online User 25 4 6 3 ...

Страница 5: ...5 2 2 SD Card Video Search 31 Appendix 34 Appendix 1 Troubleshooting 34 Appendix 2 Specifications 35 ...

Страница 6: ... further reference Should you require any technical assistance please contact Speco Technologies Technical Support at 1 800 645 5516 Main Features z Built in PoE Power over Ethernet z Integrated IR LEDs for clear vision in low light z IP67 rated for outdoor installations z Remote viewing support via web browser mobile APP and CMS VMS Applications ...

Страница 7: ...ave a DHCP server built in Install IP Scanner from the CD and run it after installation IP Scanner is the tool for discovering the IP cameras on the local network In the device list the IP address model number and MAC address of each device will be listed Select the applicable device and double click to open up the web viewer You can also manually enter the IP address in the address bar of the web...

Страница 8: ... only Abnormal clarity indicator Start stop live view Scene change indicator Enable disable audio Line crossing indicator Snapshot Intrusion indicator Zoom in for motorized models Motion alarm indicator Zoom out for motorized models z All indicator icons above will flash in live view interface only when the corresponding events are enabled z In full screen mode to exit double click on the mouse or...

Страница 9: ...5 Icon Description Icon Description Zoom Zoom Focus Focus One key focus used when image is out of focus after manual adjustment ...

Страница 10: ...System Configuration 4 1 1 System Information In the System Information interface the system information of the device is listed 4 1 2 Date and Time To set the time and date go to SystemÆDate and Time Please refer to the following interface Select the applicable time zone and enable disable DST as needed Click the Date and Time tab to set the time and date ...

Страница 11: ...age to go to the interface as shown below z SD Card Management When the card is used for the first time click the Format button to format the SD card All data on the card will be cleared by clicking this button Click the Eject button to stop writing data to the SD card Then the SD card can be ejected safely Snapshot Quota Set the capacity proportion of captured pictures on the SD card Video Quota ...

Страница 12: ...ns scheduled Blank means unscheduled Add Add the schedule for a special day Drag the mouse to set the time on the timeline Erase Delete the schedule Drag the mouse to erase the time on the timeline Manual Input Click it for a specific day to enter specific start and end times This adds more granularities minutes Day schedule Set the alarm time for alarm a special day such as a holiday Note Holiday...

Страница 13: ...and then set the snapshot interval and schedule The setup steps of schedule are the same as the schedule recording See Schedule Recording 4 2 Video Configuration Video Configuration includes Image Settings Video Audio Setup OSD Privacy Mask and Region of Interest 4 2 1 Image Configuration In the Image Settings interface as shown below various settings can be adjusted such as brightness contrast hu...

Страница 14: ...to the scene so that the object of the image in the darkest area will be seen clearly Antiflicker z Off disables the anti flicker function This is used mostly in outdoor installations z 50Hz reduces flicker in 50Hz lighting conditions z 60Hz reduces flicker in 60Hz lighting conditions White Balance Adjust the color temperature according to the environment automatically Frequency 50Hz and 60Hz can ...

Страница 15: ...age quality the more bitrate will be required I Frame interval It determines how many frames are allowed between a group of pictures When a new scene begins in a video until that scene ends the entire group of frames or pictures can be considered as a group of pictures If there is not much movement in the scene setting the value higher than the frame rate is fine potentially resulting in less band...

Страница 16: ... Go to ImageÆVideo Mask interface as shown below A maximum of 4 zones can be set up To set up video mask 1 Enable video mask 2 Click the Draw Area button and then drag the mouse to draw the video mask area 3 Click the Save button to save the settings 4 Return to the live to verify that the area have been drawn as shown as blocked out in the image To clear the video mask Click the Clear button to d...

Страница 17: ...ty for the identified area 1 Check Enable and then click the Draw Area button 2 Drag the mouse to set the ROI area 3 Set the level 4 Click the Save button to save the settings 4 2 6 Zoom Focus This function is only available for the model with motorized zoom lens Within this section zoom and focus can be controlled If the image is out of focus after a manual adjustment one key focus can be used to...

Страница 18: ...e addresses Trigger FTP If Trigger FTP and Attach Picture are checked the captured pictures will be sent into FTP server address Please refer to FTP configuration chapter for more details 2 Set motion detection area and sensitivity Click the Area and Sensitivity tab to go to the interface as shown below Move the Sensitivity scroll bar to set the sensitivity Higher sensitivity value means that moti...

Страница 19: ... the camera will transfer the alarm event to the alarm server If an alarm server is not needed there is no need to configure this section 4 4 Analytics Configuration This series of IP cameras supports certain smart functions such as line crossing detection region intrusion detection etc These events can be triggered as alarm events For more accuracy here are some recommendations for installation z...

Страница 20: ...nsitivity tab to go to the interface as shown below Drag the slider to set the sensitivity value or directly enter the sensitivity value in the textbox Click Save button to save the settings The sensitivity value of Video Blur Detection The higher the value is the more sensitive the system responds to the blurriness of the image The requirements of camera and surrounding area 1 Auto focusing funct...

Страница 21: ...raw button to stop drawing Click the Clear button to delete the lines Click the Save button to save the settings 5 Set the schedule of the line crossing alarm The setup steps of schedule are the same as the schedule recording See Schedule Recording Configuration of camera and surrounding area 1 Auto focusing function should not be enabled for line crossing detection 2 Avoid the scenes with many tr...

Страница 22: ...tection The setup steps of the schedule are the same as schedule recording setup See Schedule Recording Configuration requirements of camera and surrounding area 1 Auto focusing function should not be enabled for intrusion detection 2 Avoid the scenes with many trees or the scenes with various light changes like many flashing headlights The ambient brightness of the scenes shouldn t be too low 3 C...

Страница 23: ...used to connect internet the camera will get a dynamic WAN IP address This IP address will change frequently To be notified the IP change notification function can be used Click IP Change Notification Config to go to the interface as shown below Trigger Email when the IP address of the device is changed the new IP address will be sent to the email address that has been set up Trigger FTP when the ...

Страница 24: ...tem 1 Check Enable 2 Check the IP address and port of the transfer media server in the VMS Then enable the auto report in the VMS when adding a new device Next enter the remaining information of the device in the VMS After that the system will automatically allot a device ID Please check it in the VMS 3 Enter the above mentioned server address server port and device ID in the corresponding boxes C...

Страница 25: ...e authentication of the switch it can be accessed via the local network Protocol type and EAPOL version Please use the default settings User name and password The user name and password must be the same with the user name and password applied for and registered in the authentication server 4 5 6 RTSP Go to NetworkÆRTSP Select Enable to enable the RTSP function Port Access port of the streaming med...

Страница 26: ...IP address is changed please set the Email here first Go to Network ÆEmail Sender Address sender s e mail address User name and password sender s user name and password Server Address The SMTP IP address or host name Select the secure connection type at the Secure Connection pull down list according to what s required SMTP Port The SMTP port Send Interval S The time interval of sending email For e...

Страница 27: ...tificate Then the following interface will be displayed If there is a signed certificate click Browse to select it and then click Install to install it Click Create a private certificate to enter the following creation interface Click the Create button to create a private certificate Enter the country only two letters available domain camera s IP address domain validity date password province stat...

Страница 28: ... the larger the number is the higher the priority is 4 6 Security Configuration 4 6 1 User Admin Go to SecurityÆUser Admin interface as shown below Add user 1 Click Add to pop up the following textbox 2 Enter user name in User Name textbox 3 Enter letters or numbers in Password and Confirm Password textbox 4 Choose the user type Administrator has all permissions Normal user can only view the live ...

Страница 29: ...and added again with the new access level Delete user 1 Select the user to be deleted in the user configuration list box 2 Click the Delete button to delete the user Note The default administrator account cannot be deleted 4 6 2 Online User Go to SecurityÆOnline User to view the user who is viewing the live video An administrator user can kick out all the other users including other administrators...

Страница 30: ... reboots 4 7 Maintenance Configuration 4 7 1 Backup and Restore Go to MaintenanceÆBackup Restore z Import Export Settings Configuration settings of the camera can be exported form a camera into another camera 1 Click Browse to select the save path for import or export information on the PC 2 Click the Import Setting or Export Setting button z Default Settings Click the Load Default button to resto...

Страница 31: ...the Browse button to select the save path of the upgrade file 2 Click the Upgrade button to start upgrading the firmware 3 The device will restart automatically Caution Do not close the browser or disconnect the camera from the network during the upgrade 4 7 4 Operation Log To query and export log 1 Go to MaintenanceÆOperation Log 2 Select the main type sub type start and end time 3 Click Search t...

Страница 32: ... as shown below Images that are saved on the PC or SD card can be found here z Local Image Search 1 Choose Picture Local 2 Set time Select date and choose the start and end time 3 Click to search the images 4 Double click a file name in the list to view the captured photos as shown above ...

Страница 33: ... time Select date and choose the start and end time 3 Choose the alarm events at the bottom of the interface 4 Click to search the images 5 Double click a file name in the list to view the captured photos Click to return to the previous interface The descriptions of the buttons are shown as follows ...

Страница 34: ...ze of the image Zoom in Click this button to digitally zoom in Zoom out Click this button to digitally zoom out Slide show play Click this button to start the slide show mode Stop Click this button to stop the slide show Play speed Play speed of the slide show 5 2 Video Search 5 2 1 Local Video Search Click Search to go to the interface as shown below Videos were recorded locally to the PC can be ...

Страница 35: ...disable audio drag the slider to adjust the volume after enabling audio only some models support this function 5 2 2 SD Card Video Search Click Search to go to the interface as shown below Videos that were recorded on the SD card can be played in this interface 1 Choose Record SD Card 2 Set search time Select the date and choose the start and end time 3 Click to search the images ...

Страница 36: ...n be shown in 24H 12H 2H 1H format by clicking the corresponding buttons Video clip and downloading 1 Search the video files according to the above mentioned steps 2 Select the start time by clicking on the time table 3 Click to set the start time and then this button turns blue 4 Select the end time by clicking on the time table Then click to set the end time 5 Click to download the video file in...

Страница 37: ...33 Click Set up to set the storage directory of the video files Click Open to play the video Click Clear List to clear the downloading list Click Close to close the downloading window ...

Страница 38: ... IE browser may be set up to block ActiveX Follow the steps below 1 Open IE browser and then click ToolsÆInternet Options 2 Select SecurityÆCustom Level 3 Enable all the options under ActiveX controls and plug ins 4 Click OK to finish setup No sound can be heard 1 Audio input device is not connected Please connect and try again 2 Audio function is not enabled at the corresponding channel Please en...

Страница 39: ... FCC Rules Operation is subject to the following two conditions 1 This device may not cause harmful interference and 2 This device must accept any interference received including interference that may cause undesired operation FCC Responsible Party Speco Technologies 200 New Highway Amityville NY11701www specotech com ...

Отзывы: