N8NRT Smart Manage
ment
Terminal
Quick Start Guide
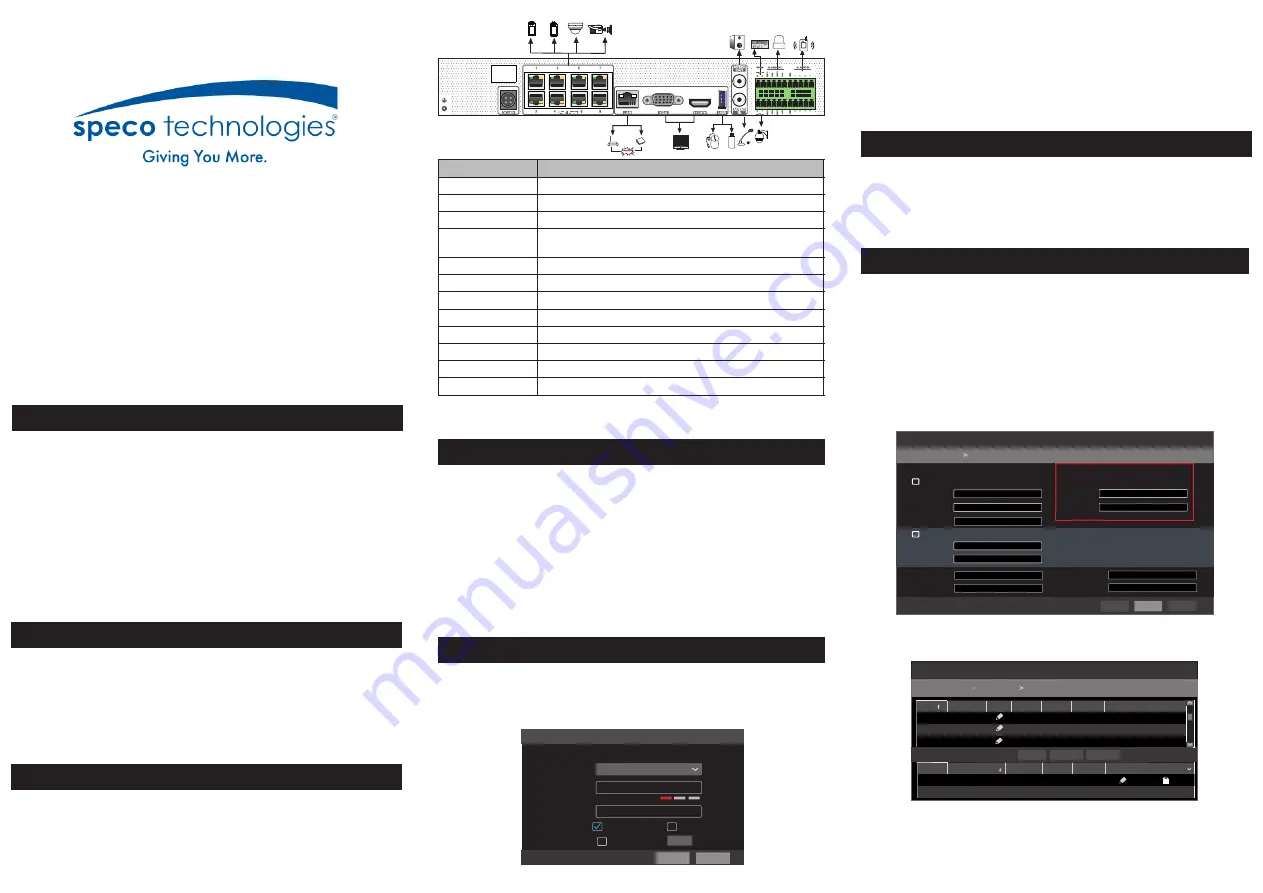
The interfaces of the rear panel are for reference only.
3
. Rear Panel Instruction
4
Startup
&
Shutdown
►Startup
①
Connect the monitor and the power.
②
The device will boot and the power indicator will display blue.
③
A wizard window will pop up.
5
. Login
Please check the device and the accessories after getting the device. If there
are any damages, shortages or defects, please contact your dealer immediately.
●
Please read this instruction carefully before using the product and keep
it for further reference.
●
All the examples and pictures used here are for reference only.
●
The contents of this manual are subject to change without notice.
●
This device should be operated only from the type of power source indicated
on the marking label. The voltage of the power must be verified before using
the same.
You must configure the wizard if you start the NVR for the first time. Choose
the language and read the privacy statement. Then set the data, time and zone
as needed. After that, set the login password.
The default username is
admin
. Set your own password when you use the wizard
for the first time. Enable pattern lock and click “Edit” to set the pattern lock. Then
set security questions and answers. It is important for you to remember these
answers, or you will not be able to reset your password. Click “Next” to continue.
Username
Admin Password Setup
New Password
Confirm Password
Pattern Lock
admin
Wizard
Display Password
Enable
Log In Automatically
Next
Previous
Edit
6
. Disk Settings
You can view the disk number, disk capacity of the NVR and serial number,
Read/Write status of the disk. Click “Format” to format the disk. Click
“Next” to continue.
7
. Network Configuration & Add Devices
①
Enter IP address, subnet mask, gateway, etc. If using DHCP, please enable
DHCP in both the NVR and the router.
②
Enter HTTP port (the default value is 80) and server port (the default port is
6036).
③
The
internal ethernet port is the port which connects all the PoE ports with
the NVR system. The PoE ports are available if the internal ethernet port is
online; if it is offline, all the PoE ports will be unavailable.
④
Add Camera. Click “Next” to go to the following interface.
Wizard
Obtain an IP address automatically
Internal
Ethernet Port ( Online )
Address
Address
192 . 168 . 1 . 2
.
.
.
255
255
255
0
192 . 168 . 1 . 1
Subnet Mask
Gateway
Subnet Mask
Ethernet Port 1 ( Online )
Obtain DNS
automatically
HTTP Port
RTSP Port
HTTPS Port
Sever Port
. . .
. . .
Preferred
DNS
Alternate
DNS
80
443
Network Settings
80
80
80
No.
Address
Edit
Port
Protocol
1
2
3
192.168.1.20
192.168.1.38
192.168.2.45
XXX
XXX
XXX
Wizard
Network Settings
Add Camera
No.
Address
IP Camera Name
Protocol
1
10.151.151.103
[POE1] IPC
Add All
Refresh
Remain
Bandwidth
:
77
/
80
Mb
Facial Panel
Name
Description
Connectors for alarm input devices, like sensors
Relay
output
;
connectors for
external
alarm output devices
Connector for PTZ device
.
Y
is
TX
+,
Z
is
TX
-
a
Connector for
a
keyboard
.
A
is
TX
+,
B
is
TX
-
ALARM
OUT
GND & ALARM
IN
P/Z
K/B
Audio
input
Audio
output
Connect
to
high
definition
display
device
Connect
to
monitor
Ethernet
port
8 PoE network
ports; connect to PoE IP cameras/panels
Connector for power input
Connectors for USB devices (like USB mouse, USB storage
device for backup or upgrade, etc. )
AUDIO
OUT
AUDIO
IN
VGA
PoE Ports
HDMI
LAN
USB
DC48V
►Shutdown
Click “Start” and select “Shutdown” icon. This will bring a shutdown window.
The device will shut down by clicking “OK” button. Then disconnect the power.
2
.
Packing Check
1
.
Notes
10 . 151 . 151 . 1
.
.
.
255
255
255
0
Next
Previous
Cancel
6036
554
5.0.2.0
5.0.1.0
5.0.2.0
Version
Add
+
_
_
_
+
+
Model
XXX
XXX
XXX
Delete
Edit
Status
Online
Delete All
Click “Refresh” to refresh the list of online IP cameras/panels which are in the
same local network with the device. Click + to add the searched cameras/panels.
Click “Add All” to add all the devices in the list.


