background image


1

BASIC SYSTEM SET-UP


Follow these 4 steps to complete basic system set-up. 


1

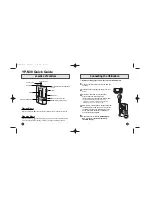
  Set-Up and Connect AM Antenna, Connect and Extend FM Antenna 


2

    Connect the Main Unit to Power 


This system is designed to operate on 230V 50Hz AC house current. Connecting this system to any other power 

supply could result in damage to the unit which is not covered by your warranty. 


NOTE: 

This is a safety feature to reduce the possibility of electric shock. You should have your outdated outlets changed by a 

qualified, licensed electrician. Do not file the wide blade on the plug, or use an adapter to make the plug it into your outlet. This 

defeats the safety feature and could expose you to electric shock. 


AM

AM Antenna Jack 

FM ANTENNA 

FM ANTENNA 

AC outlet 

Содержание DISC4400

Страница 1: ...other power supply could result in damage to the unit which is not covered by your warranty NOTE This is a safety feature to reduce the possibility of electric shock You should have your outdated out...

Страница 2: ...correct and polarities as shown below 4 Power on the Main Unit Press the STANDBY button The main display briefly shows HELLO Please refer to page 39 for setting the clock For setup of Bluetooth conne...

Страница 3: ...oth The cloth should be thick enough to protect your product 2 Using a cross head screwdriver not supplied unscrew the three screws that secure the stand to the unit 3 Firmly pull the stand from the b...

Страница 4: ...N 5 LCD DISPLAY 6 BUTTON 7 CD DOOR 8 BUTTON 9 VOLUME BUTTON 10 TIMER BUTTON 11 MEMORY CLOCK BUTTON 12 LINE IN JACK 13 HEADPHONE JACK 14 BUTTON 15 PAIRING BUTTON 16 SD CARD JACK 17 BUTTON 18 USB PORT 1...

Страница 5: ...TTON 4 BAND BUTTON 5 SKIP BUTTON 6 PAIRING BUTTON 7 PLAY MODE BUTTON 8 FOLDER UP DN BUTTON 9 EQ BUTTON 10 1 9 NUMERIC 11 SLEEP BUTTON 12 STANDBY BUTTON 13 MUTE BUTTON 14 TIMER BUTTON 15 BUTTON 16 SKIP...

Страница 6: ...of the main unit or by the buttons on the remote control handset If a specific function can only be operated by the remote handset or by the front panel controls this will be clearly indicated in the...

Страница 7: ...The appropriate EQ indicator briefly appears on the display to confirm your selection and your selection is shown at the bottom of the display The system remembers the EQ setting when the power is sw...

Страница 8: ...tick Memory Stick Duo with adapter only xD Picture Card Discs with non standard shapes e g heart square star cannot be played in this unit Attempting to do so may damage the unit IMPORTANT This player...

Страница 9: ...file system MP3 file name requires MP3 or mp3 as an extension Chinese characters cannot be displayed although files featuring them can be played VBR Variable Bit Rate files can be played but playing...

Страница 10: ...e device by gently pulling it out of the socket Inserting and Removing USB Flash Card Devices Insert the card into the slot by gently pressing into position until it locks in place Cards can only be i...

Страница 11: ...ith the printed label facing out Press the OPEN CLOSE button to close the CD door The display will show lashing READING as the player reads the table of contents on the disc After reading the disc the...

Страница 12: ...flashes in the display but the disc continues spinning Press the PLAY PAUSE button once more to cancel Pause mode and resume playback at the same point The elapsed time stops flashing Skip Track and H...

Страница 13: ...ss the REPEAT button until the ALL indicators disappear from the display Repeat mode can also be canceled by opening the CD tray switching to the TUNER or USB mode or pressing the button to return the...

Страница 14: ...low 1 Load the disc in the player and wait until the player has read the Table of Contents of the disc 2 Press the MEMORY CLOCK button The MEMORY indicator Track 01 and Program Memory PR 01 will appea...

Страница 15: ...he programmed sequence again press the MEMORY CLOCK button then the PLAY PAUSE button To cancel the programmed sequence from the memory press the BAND button at programming mode Programmed Repeat Play...

Страница 16: ...shing READING indicator for a minute or more before playback begins This is normal and not an indication of any problem with your player For example if we insert an MP3 WMA CD containing 09 Directorie...

Страница 17: ...DE button once The indicator appears and the selected track will be repeated continuously To repeat all the tracks in a single Directory or Album Begin playback as usual Press the PLAY MODE button twi...

Страница 18: ...our computer containing MP3 WMA audio files the software you use to create the disc will normally allow you to input the name of the artist the name of the album and the titles of the individual songs...

Страница 19: ...first track we want to program is Track and Album 05 1 Press the MEMORY CLOCK button The display shows Album 01 The MEMORY indicator Track 01 and Program Memory PR 01 will appear in the display indica...

Страница 20: ...r MMC flash memory card containing MP3 WMA audio files into the card slot by gently pressing into position until it locks in place Cards can only be inserted one way The player will read the informati...

Страница 21: ...lash containing MP3 WMA audio files into the USB port by gently pressing into position until it locks in place USB devices can only be inserted one way The player will read the information on the USB...

Страница 22: ...receive audio from many Bluetooth capable devices including mobile phones personal computers and PDAs within a range of about 30 feet DISC 4400 supports the following Bluetooth profiles and functiona...

Страница 23: ...sh to pair with it Double beep Mobile phone has connected to DISC 4400 using Bluetooth hands free or headset profile Double beep Capable device has connected to DISC 4400 using Bluetooth stereo profil...

Страница 24: ...en space Generally Bluetooth devices can communicate with each other clearly within a regular sized room or office Operation between different rooms will depend on the construction of the room It is i...

Страница 25: ...it and the mobile phone where they are no more than 3 feet apart Press and hold the PAIRING button on the main unit or remote control for 5 seconds PAIRING flashes on the display Set the mobile phone...

Страница 26: ...ize the DISC 4400 main unit by its Bluetooth name DISC 4400 Please refer to the phone user manual for details Select the DISC 4400 for pairing When prompted for a passkey enter 0000 Select the newly p...

Страница 27: ...s on the display Set the connecting device to search for Bluetooth devices and follow the instructions on the device s screen Please refer to the device user manual for details You will recognize the...

Страница 28: ...ice user manual for this information Place the DISC 4400 main unit and the device you which to connect where they are no more than 3 feet apart Press and hold the PAIRING ANSWER button on the main uni...

Страница 29: ...f the microphone you may talk at a normal volume and your voice should be clear to the party you are calling If you move beyond 6 feet you will need to raise your voice in order to be heard clearly Us...

Страница 30: ...e normal way To transfer sound from the speaker to your mobile handset during a call press and hold PAIRING for 2 seconds Display shows TRANSFER To transfer back press and hold PAIRING again Display s...

Страница 31: ...igh quality stereo music over Bluetooth and control music playback from the remote control Getting Started Ensure your mobile phone is A2DP capable and connected to the system Refer to page 31 for det...

Страница 32: ...nd hold the BAND key for 5 seconds until the display shows DISCONNECT ALL If after 5 seconds the display does not show any message there are no active connections to terminate Please remember to de ac...

Страница 33: ...so have to vary the direction of this antenna until you find the position that provides the best reception MW AM Insert the socket of loop aerial into the AM antenna socket on the unit Adjust the posi...

Страница 34: ...emote control to select the preset memory location Example 3 4 Press the MEMORY CLOCK button again the 3 stops flashing confirming that the station has been stored in preset channel location 3 5 Tune...

Страница 35: ...to flash Press the or buttons to adjust the minute Press the MEMORY CLOCK button to confirm Clock setting only available in STANDBY mode Setting the Wake Timer This system includes a timer to allow y...

Страница 36: ...asleep to between 15 and 90 minutes of music and then shuts the power off automatically To operate the sleep timer Turn the system on and operate as usual Press the SLEEP button on the remote control...

Страница 37: ...ne in jack 1 Switch the function to AUX the display will show AUX 2 Connect the external audio source through 3 5mm Line In jack located on the front of panel CARE AND MAINTENANCE Compact Disc Care To...

Страница 38: ...in pairing mode Press and hold PAIRING button for 5 seconds until PAIRING lashes on the display Another mobile phone is already connected Press and hold the BAND button for 5 seconds to terminate any...

Страница 39: ...ations Hard to hear broadcasts because of noise Antennas connections are incorrect or loose The AM loop antenna is too close to the system or not positioned properly Move further away and or change po...

Отзывы: