background image

Ot
he
rs

GB 

62

Replacing the Lamp

Replacing the Lamp

The lamp used for the light source has a certain life. 
When the lamp dims, the color balance of the picture 
becomes strange, or “Please replace the LAMP.” 
appears on the screen, the lamp is exhausted. Replace 
the lamp with a new one (not supplied).

Use LMP-H180 Projector Lamp as the replacement lamp.

When replacing the lamp after using the 
projector

Turn off the projector, then unplug the power cord. 
Wait for at least an hour for the lamp to cool.

Caution

The lamp becomes a high temperature after turning off the 
projector with the 

[

/

1

 (on/standby) switch. If you touch the lamp, 

you may scald your finger. When you replace the lamp, wait for 
at least an hour for the lamp to cool. When removing the lamp 
unit, make sure it remains horizontal, then pull straight up. Do not 
tilt the lamp unit. If you pull out the lamp unit while tilted and if 
the lamp breaks, the pieces may scatter, causing injury.

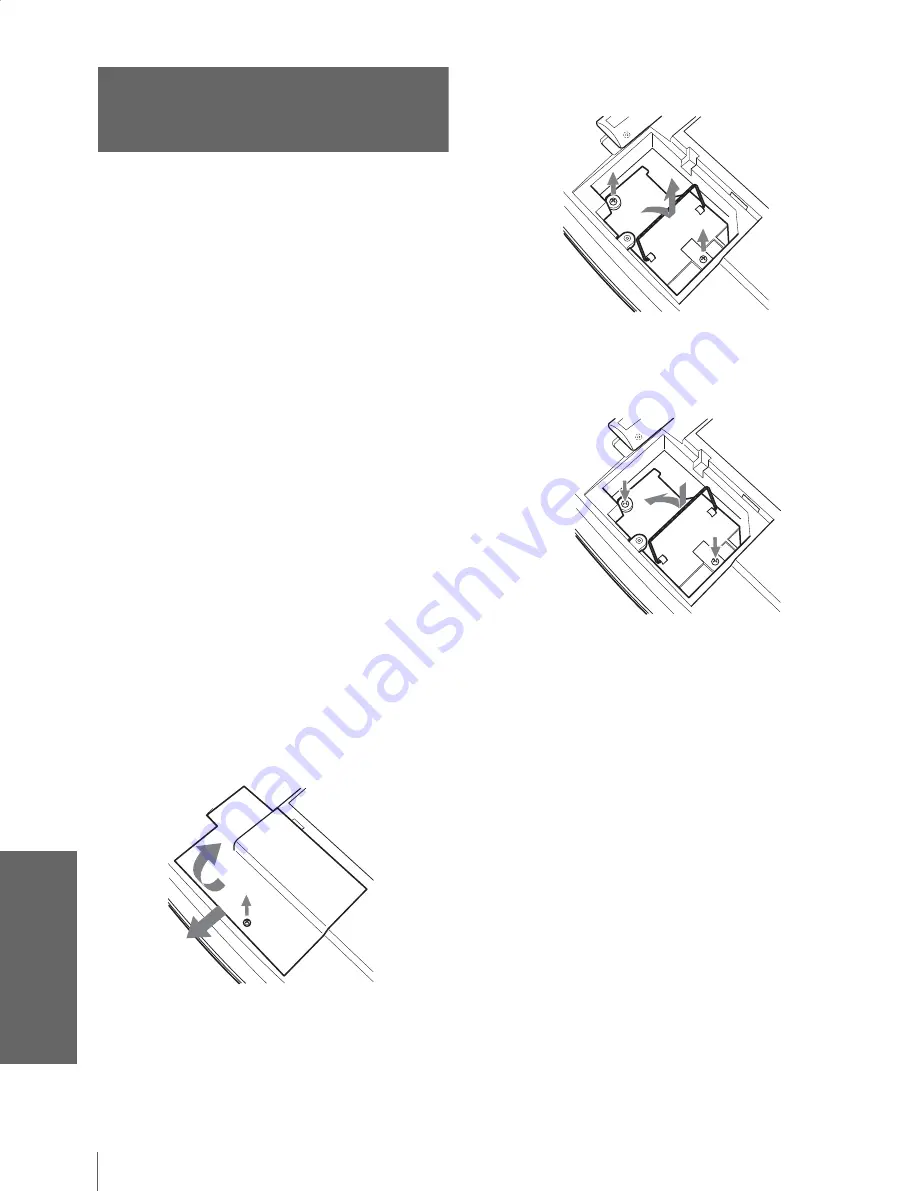
1 Place a protective sheet (cloth) beneath 

the projector. Turn the projector over so 
you can see its underside.

Note

Be sure that the projector is stable after turning it over.

2 Press the adjuster adjustment button to 

raise the adjuster.

3 Open the lamp cover by loosening a screw 

with the Philips screwdriver.

4 Loosen the two screws on the lamp unit 

with the Philips screwdriver. Pull out the 

lamp unit by the handle, taking care not to 
touch the adjuster.

5 Insert the new lamp all the way in until it is 

securely in place, taking care not to touch 
the adjuster. Tighten the two screws.  Fold 
down the handle.

6 Close the lamp cover and tighten the 

screws.

7 Press the adjuster adjustment button to 

replace the adjuster.

8 Turn the projector back over.

9 Connect the power cord and set the 

projector to standby mode.

10 Press the following buttons on the remote 

control in the following order for less than 
five seconds each: RESET, 

<

,

, ENTER.

Notes

• Do not put your hands into the lamp replacement spot, or not 

fall any liquid or object into it to avoid electrical shock or fire.

• Be sure to use the LMP-H180  Projector Lamp for replacement. 

If you use lamps other than LMP-H180, the projector may 
cause a malfunction.

• Be sure to turn off the projector and unplug the power cord 

before replacing the lamp.

1

2

3

Содержание VPLHS20 - Cineza Digital Home Entertainment LCD Projector

Страница 1: ...________________________ GB Mode d emploi _________________________________________ FR Manual de instrucciones _________________________________ ES 4 099 551 12 1 Video Projector 2003 Sony Corporation VPL HS20 Video Projector VPL HS20 ...

Страница 2: ...vision reception which can be determined by turning the equipment off and on the user is encouraged to try to correct the interference by one or more of the following measures Reorient or relocate the receiving antenna Increase the separation between the equipment and receiver Connect the equipment into an outlet on a circuit different from that to which the receiver is connected Consult the deale...

Страница 3: ...gnal from the Computer 36 Using a Memory Stick About a Memory Stick 37 Preparing for Viewing the Picture Files Stored in a Memory Stick 40 Inserting a Memory Stick 40 Displaying the Desired Pictures in Digital Camera Mode 41 Viewing the Pictures 44 Viewing the Pictures in Sequence Slide Show 44 Displaying a Picture on the Full Screen Full Screen 45 Playing Movie Pictures 46 Selecting the Folder Co...

Страница 4: ...GB 4 Specifications 64 Location of Controls 74 Front 74 Rear 75 Bottom 76 Remote Control 77 Index 76 ...

Страница 5: ...even if the unit itself has been turned off Do not look into the lens while the lamp is on Do not place your hand or objects near the ventilation holes The air coming out is hot On preventing internal heat build up After you turn off the power with the I 1 on standby switch do not disconnect the unit from the wall outlet while the cooling fan is still running Caution The projector is equipped with...

Страница 6: ... 1 AC power cord 1 Operating Instructions this manual 1 Inserting the batteries into the remote control This section describes how to install the projector and screen how to connect the equipment from which you want to project the picture etc Insert the batteries E side first as shown in the illustration Inserting them forcibly or with the polarities reversed may cause a short circuit and may gene...

Страница 7: ...e entertainment with this projector in various situations Enjoying home theater Enjoying video games on a large screen Watching sports etc with your company Viewing images recorded by a digital camera and stored in the Memory Stick on a large screen Before Setting Up the Projector Do not place the projector in the following situations which may cause malfunction or damage to the projector Poorly v...

Страница 8: ...iling to set this mode when using the projector at high altitudes could have adverse effects such as reducing the reliability of certain components Using the Optional Conversion Lens You can install the following two types of lenses optional on the projector For projection distances when installing the Conversion Lens see page 67 VPLL CT10 Long Focused Conversion Lens VPLL CW10 Short Focused Conve...

Страница 9: ...s If you use the screw supplied with the Lens the Lens may fall from the projector and may cause injury Notes on installation of the optional Conversion Lens The Lens scratches easily so when handling it always place it gently on a stable and level surface in a horizontal position Be sure not to bump the Lens on the surface of the lens of the projector Avoid touching the Lens surface To remove the...

Страница 10: ...nly set V Keystone in the INSTALL SETTING menu to Manual and adjust the level to 0 When projecting using both Side Shot and V Keystone adjustments 1 page 21 Position the projector with the lens end within the area in the illustration by using the values a to f in the table below as a guide Unit m feet Tip The tables show the distances when projecting the 15 kHz RGB component progressive component ...

Страница 11: ...reen Unit mm inches Screen size inches 40 60 80 100 120 a 1 5 4 9 2 3 7 5 3 1 10 2 3 9 12 8 4 6 15 1 b 1 8 5 9 2 8 9 2 3 7 12 1 4 7 15 4 5 6 18 4 Screen size inches 150 180 200 250 300 a 5 8 19 0 7 0 23 0 7 8 25 6 9 7 31 8 11 7 38 4 b 7 0 23 0 8 4 27 6 9 4 30 8 11 7 38 4 14 1 46 3 Screen size inches 40 60 80 100 120 Minimum 1 8 72 1 2 2 8 109 7 8 3 7 147 3 8 4 7 184 3 4 5 6 222 1 8 Maximun 2 2 87 ...

Страница 12: ...ing the PSS 610 adjustable with 243 268 293 343 368 393 mm SS inches 40 60 80 100 a Minimum 1840 72 1 2 2790 109 7 8 3740 147 3 8 4690 184 3 4 Maximum 2230 87 7 8 3370 132 3 4 4510 177 5 8 5650 222 1 2 x b 305 b 12 b 457 b 18 b 609 b 24 b 762 b 30 b When using the PSS 610 adjustable with 243 268 293 343 368 393 mm SS inches 120 150 180 200 a Minimum 5640 222 1 8 7070 278 1 2 8490 334 3 8 9440 371 ...

Страница 13: ...able itself Refer to the operating instructions of the connected equipment When you connect your projector to PJ MULTI or DVI connector select the input signal with the Input A Signal Sel or DVI Signal Sel setting in the SET SETTING menu 1 page 34 Note Before you change the DVI Signal Sel setting disconnect the DVI cable and turn off the digital tuner etc HDMI HDMI logo and High Definition Multime...

Страница 14: ...f the DVD player digital tuner To connect the projector to a DVD player digital tuner which is not equipped with S video output use the video cable instead of the S video cable To connect the projector to a DVD player digital tuner equipped with a D connector use a commercially available conversion cable Connecting to a DVD Player Digital Tuner PB CB PR CR Y S Video Video S VIDEO VIDEO DVI HDMI Y ...

Страница 15: ...oy better picture quality by connecting a DVD player digital tuner equipped with HDMI output to the HDMI input of the projector S VIDEO VIDEO DVI HDMI Y PB CB PR CR PJ MULTI Rear of the projector AV amplifier Active speakers Digital tuner etc with the DVI output to DVI output DVI cable not supplied Video signal flow S VIDEO VIDEO DVI HDMI Y PB CB PR CR PJ MULTI HDMI cable not supplied Video signal...

Страница 16: ...cted has no S VIDEO S video connector connect the cable to VIDEO video output You can enjoy better sound quality by connecting the projector to an AV amplifier using the supplied signal interface cable Connecting to Video Equipment Connecting to an AV Amplifier S VIDEO VIDEO DVI HDMI Y PB CB PR CR PJ MULTI S video or video cable VMC 810S not supplied Video signal flow Rear of the projector to S vi...

Страница 17: ... Even if you connect the signal interface cable to the audio output on the computer there is no sound output from the projector To connect to the DVI connector Connecting to a Computer S VIDEO VIDEO DVI HDMI Y PB CB PR CR PJ MULTI Signal interface cable SIC HS30 not supplied Video signal flow Rear of the projector to monitor output Computer Active speakers with SONY logo upside S VIDEO VIDEO DVI H...

Страница 18: ...interface unit Note Audio from the Interface Unit IFU HS1 is output only when a TV is connected Connecting to Vavious Equipment using the Optional Interface Unit S VIDEO VIDEO DVI HDMI Y PB CB PR CR PJ MULTI Video signal flow VCR etc Audio amplifier Active speakers Audio signal flow DVD player etc PJ muti cable supplied to IFU HS1 Interface unit IFU HS1 not supplied Rear of the projector TV with S...

Страница 19: ...y switch to turn on the projector The ON STANDBY indicator lights in green 3 Turn on the equipment connected to the projector Refer to the operating instructions of the connected equipment 4 Press INPUT to project the picture on the screen Each time you press the button the input indication changes 1 page 26 INPUT LIGHT STANDARD CINEMA DYNAMIC USER 2 PICTURE MODE USER 3 USER 1 MS SLIDE MENU APA LE...

Страница 20: ...ected on the screen If you want to make adjustments using the current input signal set Test Pattern in the INSTALL SETTING menu to Off 1 page 35 When projecting using Side Shot adjustment only When projecting using Side Shot adjustment only you can adjust to correct horizontal trapezoidal distortion using the Side Shot function to the maximum 1 Set V Keystone in the INSTALL SETTING menu to Manual ...

Страница 21: ...me 5 Adjust to correct horizontal trapezoidal distortion using the SIDE SHOT or Press SIDE SHOT or so that the upper side of the picture becomes parallel to the bottom side If the right side is longer than the left side press SIDE SHOT If the left side is longer than the right side press SIDE SHOT To fine adjust the distortion press M or m Note Even when projecting using Side Shot four sides of a ...

Страница 22: ... the SIDE SHOT or Press SIDE SHOT or so that the upper side of the picture becomes parallel to the bottom side If the right side is longer than the left side press SIDE SHOT If the left side is longer than the right side press SIDE SHOT To fine adjust the distortion press M or m Note Even when projecting using Side Shot four sides of a picture may sometimes not be parallel to the sides of a screen...

Страница 23: ...de of the picture fit those of the bottom side of the screen using the adjuster and the ZOOM or 8 Press the FOCUS buttons or to adjust the focus again Step 4 Selecting the Menu Language You can select one of thirteen languages for displaying the menu and other on screen displays The factory default setting is English Tip You can operate the menu using the M m arrow buttons on the side panel of the...

Страница 24: ...elected is shown as a yellow button 4 Press M or m to select the MENU SETTING menu and press or ENTER The selected menu appears 5 Press M or m to select Language and press or ENTER 6 Press M or m to select a language and press ENTER The menu changes to the selected language To clear the menu Press MENU MENU Picture Mode Standard Adjust Picture Volume 30 PICTURE SETTING Input A ENTER Input A or ENT...

Страница 25: ... to operate the projector to view the picture from the equipment connected to the projector It also describes how to select the wide screen mode or the quality of the picture to suit your taste INPUT LIGHT STANDARD CINEMA DYNAMIC USER 2 PICTURE MODE USER 3 USER 1 MS SLIDE MENU APA LENS VOLUME SIDE SHOT RESET WIDE MODE ENTER 2 4 ...

Страница 26: ... and turn off the digital tuner etc 5 Press ZOOM to adjust the size of the picture ON STANDBY Lights in red ON STANDBY Lights in green NTSC 3 58 Video 1 INPUT To view the picture from Press INPUT to display Video equipment connected to VIDEO INPUT on the projector Video 1 Video equipment connected to S VIDEO INPUT on the projector S Video 1 RGB component equipment connected to PJ MULTI INPUT via t...

Страница 27: ...he 1 switch 3 Unplug the AC power cord from the wall outlet after the fan stops running and the ON STANDBY indicator lights in red You can turn off the projector by holding the 1 on standby switch for about one second instead of performing the above steps SelectingtheWide Screen Mode You can enjoy various wide screen mode according to the video signal received You can also select it using the menu...

Страница 28: ...pping is done on a squeezed 16 9 picture It is displayed in the center of the screen Normal Through One to one mapping is done on a 4 3 normal aspect ratio picture It is displayed in the center of the screen Notes You can adjust the vertical position of the picture with V Position in the INPUT SETTING menu only when Zoom or Subtitle is selected You can adjust the position of the subtitles with Tit...

Страница 29: ...INEMA Select for soft film like picture in dark environment USER 1 2 and 3 You can adjust the quality of the picture to suit your taste and store the settings into the selected memory of the projector Press one of the USER 1 2 and 3 buttons then adjust the picture by using the menus The settings are stored and you can view the picture with the adjusted picture quality by pressing the button 1 page...

Страница 30: ...ems Input signal indicator Shows the selected input channel is displayed when no signal is input You can hide this indicator using Status in the MENU SETTING menu Input signal setting indicator For Input A Shows Computer Component or Video GBR For Digital Shows Computer or Video GBR For Video S Video input Shows Auto or the Color System setting in the SET SETTING menu This section describes how to...

Страница 31: ...riginal screen using depending on the selected item To clear the menu Press MENU To reset items that have been adjusted Select the item you want to reset then press RESET Complete appears on the screen and the setting is reset to its factory preset value Items that can be reset are Contrast Brightness Color Hue and Sharpness in Adjust Picture of the PICTURE SETTING menu Dot Phase H Size and Shift ...

Страница 32: ...ment Dynamic Select for enhanced picture contrast and sharpness Standard Recommended for normal viewing condition Also select to reduce roughness when viewing the picture with Dynamic Cinema Select for soft film like picture User 1 2 and 3 You can adjust the quality of the picture to suit your taste and store the settings Once the settings are stored you can view the picture with the adjusted pict...

Страница 33: ...g the APA button H Size Adjusts the horizontal size of the picture from a computer The higher the setting the wider the picture The lower the setting the narrower the picture Shift As the setting for H horizontal increases the picture moves to the right and as the setting decreases the picture moves to the left Use or to adjust the horizontal position As the setting for V vertical increases the pi...

Страница 34: ...lects the signal input from the equipment by selecting Input A with the INPUT button Computer Inputs the signal from a computer Component Inputs the component or progressive component signal from a DVD player digital tuner etc Video GBR Inputs the signal from a TV game or HDTV broadcast DVI Signal Sel Selects the signal input from the equipment by selecting Digital with the INPUT button Computer I...

Страница 35: ...the trapezoidal distortion perfectly depending on the room temperature or the screen angle Side Shot Corrects the horizontal trapezoidal distortion of the picture Set the level to 0 when you adjust the picture using V Keystone only Note Even when projecting using Side Shot four sides of a picture may sometimes not be parallel to the sides of a screen frame Image Flip Flips the picture on the scree...

Страница 36: ...still picture from the computer 2 Press the APA Auto Pixel Alignment button When the picture is adjusted properly complete appears on the screen Notes When Smart APA is set to On the APA function is automatically activated Press the APA button when the image appears on the whole display area of the computer If there are black edges around the image the APA function will not function properly and t...

Страница 37: ...ucts Memory Stick Stores any type of data except copyright protected data that requires the MagicGate copyright protection technology Memory Stick compatible with MagicGate high speed data transfer Equipped with the Magic Gate copyright protection and compatible with high speed data transfer This Memory Stick can be used with all Memory Stick compliant products The projector is not compatible with...

Страница 38: ...mory Stick Duo with your projector attach it to the Memory Stick Duo adaptor before inserting it into your projector If you insert a Memory Stick Duo without the Memory Stick Duo adaptor you may be unable to remove the Memory Stick Duo Be sure to attach Memory Stick Duo to the adaptor with the correct orientation Be sure to insert the Memory Stick Duo adaptor with the correct orientation Otherwise...

Страница 39: ...tion switch Data may be damaged if You remove the Memory Stick or turn off the unit while it is reading or writing data You use the Memory Stick in a location subject to the effects of static electricity or electric noise We recommend that you make a backup copy of important data that you record on the Memory Stick Notes Do not attach anything other than the supplied label to the Memory Stick labe...

Страница 40: ...ion MagicGate Memory Stick and are trademarks of Sony Corporation Memory Stick ROM and are trademarks of Sony Corporation Preparing for Viewing the Picture Files Stored in a Memory Stick Inserting a Memory Stick Insert the Memory Stick into the Memory Stick slot on the front of the projector Be sure to insert the Memory Stick in the correct direction To remove the Memory Stick When the access indi...

Страница 41: ...ing the slide show Protecting an important picture file Rotating a picture file still picture only Registering the startup picture file still picture only Deleting a picture file Picture setting menu Menu of a still picture To display the picture setting menu press ENTER when a picture is displayed on the full screen You can perform the following operations using the menu displayed on the picture ...

Страница 42: ...ide Show Option Select Folder Filter Still Size 1024x768 No 123 1234 Date 2003 JUL 15 12 34PM File 100MSDCF SJP0001 JPG Digi Camera Mode Full Screen Slide Show Protect Rotate Startup Delete Close Appears when startup is set Appears when a file is protected Index menu Date File name and file format Resolution Order total number of picture files Memory Stick Home Slide Show Option Select Folder Filt...

Страница 43: ...ze 320x240 No 1 1234 Date 2003 JUL 15 12 34PM File SJP0001 MPG Prev Full Screen Menu Return NEXT Information On Audio Select Protect Delete Close L R Picture setting menu of a movie file Resolution Date File name and file format Movie icon Appears when a file is protected Order totalnumber of picture files ...

Страница 44: ... The time is about right Repeat set to execute the slide show repeatedly or one time only 3 Press M or m to select the setting item and press ENTER 4 Press M or m to set the selected item and press ENTER INPUT LIGHT STANDARD CINEMA DYNAMIC USER 2 PICTURE MODE USER 3 USER 1 MS SLIDE MENU APA LENS VOLUME SIDE SHOT RESET WIDE MODE ENTER MS SLIDE button 2 5 Memory Stick Home Slide Show Option Select F...

Страница 45: ...s changed to MS and the slide show starts promptly To start a slide show from the selected index picture You can run a slide show by selecting a thumbnail in the index screen 1 Press M m or to select the picture file from which you want to start the slide show and press ENTER 2 Press M or m to select Slide Show in the index menu of a still picture file movie file and press ENTER Displaying a Pictu...

Страница 46: ...rded with the Sony MPEG MOVIE etc 1 Display the Memory Stick Home 1 page 41 2 Press M m or to select a movie picture you want to display and press ENTER The index menu of a movie file appears Tip When you select a movie picture in the index screen Rotate and Startup are not available Size 1024x768 No 1 1234 Date 2003 JUL 15 12 34PM File 100MSDCF SJP0001 JPG 2003 JUL 15 12 34PM INPUT LIGHT STANDARD...

Страница 47: ...y skip when you watch them Usable MPEG1 movies are MPEG MOVIE AD EX HQ HQX CV MPEG1 of VAIO Giga pocket equivalent to a video CD To stop playback Press m to select x To play a movie on the full screen Press M or m to select Full Screen in the Movie Player and press ENTER The picture is enlarged to fill the screen and playback starts When you press M m or ENTER during playback the Movie Player is r...

Страница 48: ...individual still or movie picture files and other folders You must select folders when you are displaying a picture file stored in a Memory Stick To turn off the Digital Camera Mode 1 Display the Memory Stick Home 2 Press M or m to select Select Folder and press ENTER 3 Press M or m to select Digi Camera Mode and press ENTER 4 Press m to select Off and press ENTER The folder list appears Memory St...

Страница 49: ...he picture setting menu of a still picture file appears 3 Follow steps 3 and 4 in Rotating a Still Picture Notes You cannot rotate a picture which is protected 1 page 50 To rotate it release the protection on that picture When the write protect tab on the Memory Stick is set to LOCK you cannot rotate the pictures stored in that Memory Stick INPUT LIGHT STANDARD CINEMA DYNAMIC USER 2 PICTURE MODE U...

Страница 50: ... for all the pictures in the selected folder To protect the full screen still picture 1 Display the desired still picture on the full screen 1 page 45 2 Press ENTER The still picture setting menu appears 3 Follow steps 3 and 4 in Protecting an Important Picture Protecting a movie picture in the Movie Player 1 Perform steps 1 to 3 in Playing Movie Pictures 1 page 46 to display the Movie Player on t...

Страница 51: ... prefer Registering a Still Picture as the Startup Picture When you want to use a picture stored in your Memory Stick as the startup picture register the picture in the Memory Stick Tip You cannot register a movie file as the startup picture 1 Display the Memory Stick Home 1 page 41 2 Press M m or to select the picture you want to use as the startup picture and press ENTER Size 320x240 No 1 1234 D...

Страница 52: ... the Startup Picture To cancel the registration of the startup picture 1 Display the index screen by selecting a thumbnail select Startup and press ENTER 2 Press M or m to select Cancel and press ENTER Setting the Startup Picture 1 Display the Memory Stick Home 1 page 41 2 Press M or m to select Option and press ENTER 3 Press M or m to select Setup and press or ENTER Startup is selected Memory Sti...

Страница 53: ...u can register one startup picture per one Memory Stick Deleting a Picture You can delete unnecessary picture from the Memory Stick 1 Display the Memory Stick Home 1 page 41 2 Press M m or to select the picture you want to delete from the Memory Stick and press ENTER The index menu appears Memory Stick Home Slide Show Option Select Folder Filter Still Size No Date File Digi Camera Mode File Setup ...

Страница 54: ... screen still picture 1 Display a picture you want to delete on the full screen 1 page 45 2 Press ENTER to display the still picture setting menu 3 Press M or m to select Delete and press ENTER 4 Press M or m to select the desired item and press ENTER When Selected file deleted OK is displayed select Yes then press ENTER To delete a movie picture in the Movie Player 1 Perform steps 1 to 4 in Playi...

Страница 55: ...re names Name order to sort from Z of the picture names Date order to sort from the earliest date of recording Date order to sort from the latest date of recording Note For a picture processed on a computer the displayed date may be the date when the data is updated instead of the recorded date INPUT LIGHT STANDARD CINEMA DYNAMIC USER 2 PICTURE MODE USER 3 USER 1 MS SLIDE MENU APA LENS VOLUME SIDE...

Страница 56: ...y movie pictures only Off to display all pictures 4 Press M or m to select the item you want to set and press ENTER When Filter is selected the selected setting Still or Movie is indicated on the Memory Stick Home INPUT LIGHT STANDARD CINEMA DYNAMIC USER 2 PICTURE MODE USER 3 USER 1 MS SLIDE MENU APA LENS RESET WIDE MODE ENTER 2 4 Memory Stick Home Slide Show Option Select Folder Filter Still Size...

Страница 57: ...option setting menu appears 3 Press M or m to select Memory Stick The information on the Memory Stick in use is displayed To return to the Memory Stick Home Press M or m to select Close INPUT LIGHT STANDARD CINEMA DYNAMIC USER 2 PICTURE MODE USER 3 USER 1 MS SLIDE MENU APA LENS RESET WIDE MODE ENTER 2 3 Memory Stick Home Slide Show Option Select Folder Filter Still Size No Date File Digi Camera Mo...

Страница 58: ...e Memory Stick Home before initializing the Memory Stick Select Close in step 4 The Memory Stick Home is restored Notes When the Memory Stick is initialized the protected picture is also cleared When the Memory Stick with the write protect tab set to LOCK is initialized the message Memory Stick locked is displayed While initializing the Memory Stick you cannot use the buttons for operation in the ...

Страница 59: ...ding to the input signal 1 page 34 Color balance is incorrect c Adjust the picture in the Adjust Picture of the PICTURE SETTING menu 1 page 32 c Set Color System in the SET SETTING menu to match the color system being input 1 page 34 The picture is too dark c Adjust the contrast or brightness in the Adjust Picture of the PICTURE SETTING menu properly 1 page 32 The picture is not clear c Adjust the...

Страница 60: ... qualified Sony personnel LAMP COVER TEMP FAN POWER SAVING ON STANDBY LAMP COVER Indicator TEMP FAN Indicator TEMP FAN lights up c The internal temperature is unusually high Check to see if nothing is blocking the ventilation holes or whether or not the projector is being used at high altitudes LAMP COVER and TEMP FAN light up c The electrical system breaks down Consult with qualified Sony personn...

Страница 61: ...ture files are contained in the selected folder Slide show will not start Cannot play c Image data of a movie picture file is broken Memory Stick locked c The erasure prevention switch on a Memory Stick is set to LOCK Release the lock Memory Stick error c The Memory Stick is broken c Clean the terminal on the Memory Stick c The Memory Stick with memory select function has not been selected correct...

Страница 62: ...r so you can see its underside Note Be sure that the projector is stable after turning it over 2 Press the adjuster adjustment button to raise the adjuster 3 Open the lamp cover by loosening a screw with the Philips screwdriver 4 Loosen the two screws on the lamp unit with the Philips screwdriver Pull out the lamp unit by the handle taking care not to touch the adjuster 5 Insert the new lamp all t...

Страница 63: ...iency of the projector and to prevent a malfunction When the replacement message appears on the screen replace the air filter without delay It is recommended to replace the air filter approximately every 1000 hours of use When removing the air filter from the projector be careful that no dust or object gets into the inside of the projector 1 Place a protective sheet cloth beneath the projector Tur...

Страница 64: ...Y 1 Vp p 2dB sync negative 75 ohms terminated B CB PB 0 7 Vp p 2dB positive 75 ohms terminated R CR PR 0 7 Vp p 2 dB positive 75 ohms terminated DVI D TMDS Digital RGB HDMI Digital RGB YCB PB CR PR PJ MULTI 32 pin multi connector Composite video 1 Vp p 2 dB sync negative 75 ohms terminated S video Y C Y luminance 1 Vp p 2 dB sync negative 75 ohms terminated C chrominance burst 0 286 Vp p 2 dB NTSC...

Страница 65: ...ojector Suspension Support PSS 610 Projection Distances for a 1080i 720p format signal computer s signal etc When projecting using Side Shot adjustment only For a 1080i 720p format signal computer s signal or data stored in a Memory Stick Unit m feet Screen size inches 40 60 80 100 120 a 1 6 5 2 2 4 7 9 3 2 10 5 4 0 13 1 4 8 15 7 b 1 8 5 9 2 8 9 2 3 7 12 1 4 7 15 4 5 6 18 4 c 0 2 0 5 0 3 0 8 0 4 1...

Страница 66: ... 1 4 7 15 4 5 6 18 4 c 0 1 0 3 0 1 0 4 0 2 0 6 0 2 0 7 0 3 0 9 d 0 0 0 1 0 0 0 1 0 0 0 1 0 0 0 1 0 0 0 2 e 0 3 1 0 0 5 1 6 0 7 2 3 0 8 2 6 1 0 3 3 f 0 4 1 3 0 6 2 0 0 8 2 6 1 0 3 3 1 2 3 9 Screen size inches 150 180 200 250 300 a 6 0 19 7 7 3 24 0 8 1 26 6 10 1 33 1 12 1 39 7 b 7 0 23 0 8 4 27 6 9 4 30 8 11 7 38 4 14 1 46 3 c 0 3 1 1 0 4 1 3 0 4 1 4 0 5 1 7 0 6 2 1 d 0 1 0 2 0 1 0 2 0 1 0 2 0 1 0 ...

Страница 67: ...rom the front of the cabinet to the center of the conversion lens a Distance between the screen and the center of the lens b Distance from the floor to the center of the lens c Distance from the floor to the bottom of the projector x Free Center of the lens 35 8 mm 17 16 inches When using the VPLL CW10 Conversion Lens Distance from the front of the cabinet to the center of the conversion lens 5 9 ...

Страница 68: ... 33 6857998 0 8788 80 103586 0 975 b x SS 0 8788 5 516 c x SS 0 8788 5 516 96 3 SS inches 40 60 80 100 a Standard values 2250 88 5 8 3480 137 1 8 4720 185 7 8 5950 234 3 8 b x 251 x 10 x 377 x 14 7 8 x 502 x 19 7 8 x 628 x 24 3 4 c x 347 x 13 3 4 x 473 x 18 5 8 x 598 x 23 5 8 x 724 x 28 1 2 SS inches 40 60 80 100 a Standard values 2780 109 1 2 4280 168 5 8 5770 227 1 4 7270 286 3 8 b x 305 x 12 x ...

Страница 69: ...61 x b SS 0 7240 5 516 SS inches 40 60 80 100 120 150 180 200 250 300 a Minimum 2190 86 1 4 2940 115 7 8 3700 145 3 4 4450 175 1 4 5580 219 3 4 6720 264 5 8 7470 294 1 4 9360 368 5 8 11250 443 Maximum 2640 104 3550 139 7 8 4460 175 5 8 5370 211 1 2 6730 265 8090 318 5 8 8990 354 11260 443 3 8 13530 532 3 4 b x 457 x 18 x 609 x 24 x 762 x 30 x 914 x 36 x 1143 x 45 x 1371 x 54 x 1524 x 60 x 1905 x 7...

Страница 70: ...520 217 3 8 6140 241 7 8 7700 303 1 4 9250 364 1 4 Maximum 2160 85 1 8 2910 114 5 8 3660 144 1 8 4410 173 3 4 5530 217 3 4 6650 261 7 8 7400 291 3 8 9270 365 1 8 11130 438 1 4 x b 377 b 14 7 8 b 502 b 19 7 8 b 628 b 24 3 4 b 753 b 29 3 4 b 942 b 37 1 8 b 1130 b 44 1 2 b 1255 b 49 1 2 b 1569 b 61 7 8 b 1883 b 74 1 4 b When using the PSS 610 adjustable with 243 268 293 343 368 393 mm SS inches 40 60...

Страница 71: ...1 YP 21 SP 61 B8 YP 13 Female end YC 13L YC 13L YC 13L C7 2 YC 13L Cord type SPT 2 H03VVH2 F H03VVH2 F H03VVH2 F VCTFK Rated Voltage Current 10A 125V 2 5A 250V 2 5A 250V 2 5A 250V 7A 125V Safety approval UL CSA VDE BS SAA DENANHO Cord length max 4 5 m Item Input signal Video or S video Y C Component Video GBR Computer MS Contrast z z z z Brightness z z z z Color z except for B W z z Hue z NTSC3 58...

Страница 72: ...put signal Video or S video Y C Component Video GBR Computer MS Dot Phase z H size z preset memory numbers 43 44 47 48 only z preset memory numbers 43 44 47 48 only z Shift z preset memory numbers 5 43 44 45 47 48 49 and 50 only z preset memory numbers 5 43 44 45 47 48 49 and 50 only z Wide Mode z z preset memory numbers 1 2 3 4 43 44 47 48 only of DTV z preset memory numbers 1 2 3 4 43 44 47 48 o...

Страница 73: ...2Hz 37 861 72 809 H neg V neg 832 x 14 VGA VESA 75Hz 37 500 75 000 H neg V neg 840 x 15 VGA VESA 85Hz 43 269 85 008 H neg V neg 832 x 16 800 600 SVGA VESA 56Hz 35 156 56 250 H pos V pos 1024 x 17 SVGA VESA 60Hz 37 879 60 317 H pos V pos 1056 x 18 SVGA VESA 72Hz 48 077 72 188 H pos V pos 1040 x 19 SVGA VESA 75Hz 46 875 75 000 H pos V pos 1056 x 20 SVGA VESA 85Hz 53 674 85 061 H pos V pos 1048 x 21 ...

Страница 74: ...ator 1 page 60 Lens Ventilation holes exhaust 1 page 8 POWER SAVING indicator 1 page 34 ON STANDBY indicator 1 page 19 1 on standby switch 1 page 19 INPUT button 1 page 26 FOCUS button 1 page 20 Memory Stick slot 1 page 40 Adjuster adjustment button 1 page 19 Memory Stick access indicator 1 page 39 Front remote control detector M m arrow button 1 page 24 MENU button 1 page 24 SIDE SHOT button 1 pa...

Страница 75: ...PB CB PR CR phono type AC IN socket PJ MULTI INPUT connector 32 pin multi 1 page 16 DVI digital input connector 1 page 15 Security lock Connects to an optional security cable Kensington s Web page address http www kensington com HDMI connector 1 page 15 USB connector Connects to a computer with the USB cable Aymini B not supplied when performing Gamma Correction using the specified controller Imag...

Страница 76: ...Others GB 76 Location of Controls Bottom Ventilation holes intake 1 page 8 Ventilation holes intake 1 page 8 Lamp cover 1 page 62 Air filter cover 1 page 63 ...

Страница 77: ... DYNAMIC USER 2 PICTURE MODE USER 3 USER 1 MS SLIDE MENU APA LENS VOLUME SIDE SHOT RESET WIDE MODE ENTER LIGHT button Illuminates the buttons on the remote control SIDE SHOT button 1 page 21 VOLUME button 1 page 47 Infrared transmitter MS SLIDE button 1 page 44 1 on standby switch 1 page 19 INPUT button 1 page 19 M m arrow ENTER buttons 1 page 24 RESET button 1 page 31 MENU button 1 page 24 APA bu...

Страница 78: ... Location of controls bottom 76 front 74 rear 75 remote control 77 M Memory Stick delete a picture 53 index menu 41 initializing 58 inserting 40 Memory Stick Home 41 picture setting menu 41 protection 50 rotate 49 slide show 44 startup 51 Menu clearing the menu display 31 operation 30 reset 31 Menu Color 35 Menu Position 35 MENU SETTING menu 35 Message caution 61 caution display Memory Stick 61 wa...

Страница 79: ......

Страница 80: ...midité Afin d éviter tout risque d électrocution n ouvrez pas le châssis Confiez l entretien uniquement à un personnel qualifié Pour les utilisateurs au Canada Cet appareil numérique de la classe B est conforme à la norme ICES 003 du Canada AVERTISSEMENT La prise doit être près de l appareil et facile d accès ...

Страница 81: ...istes de menus 34 Configurations de menu 34 Paramètres de menu 34 Numéros de mémoire de présélection 38 Réglage de la qualité d image du signal de l ordinateur 38 Utilisation d un Memory Stick Memory Stick 39 Préparation à la visualisation d images fixes stockées sur un Memory Stick 42 Insertion d un Memory Stick 42 Affichage des images en mode appareil photo numérique 43 Visualisation des images ...

Страница 82: ...idéo 59 Affichage des informations du Memory Stick 60 Initialisation d un Memory Stick Formatage 61 Divers Dépannage 62 Remplacement de la lampe 65 Remplacement du filtre à air 66 Spécifications 67 Emplacement des commandes 76 Avant 76 Arrière 77 Face inférieure 78 Télécommande 79 Index 80 ...

Страница 83: ... dans l objectif lorsque la lampe est allumée Ne placez pas la main ou d autres objets à proximité des orifices de ventilation L air expulsé est brûlant Prévention de la surchauffe interne Après avoir mis l appareil hors tension au moyen de l interrupteur I 1 marche veille ne le débranchez pas de la prise murale tant que le ventilateur de refroidissement tourne Attention Le projecteur est équipé d...

Страница 84: ...acement 1 Cordon d alimentation secteur 1 Mode d emploi ce manuel 1 Mise en place des piles dans la télécommande Cette section indique comment installer le projecteur et l écran comment raccorder le matériel dont vous désirez projeter l image etc Insérez les piles avec le côté E en premier comme sur la figure Une insertion forcée ou avec une polarité inversée risque de provoquer un court circuit e...

Страница 85: ... possibilités d animation audiovisuelle à domicile dans de multiples situations Goûtez aux plaisirs du Home Cinema Redécouvrez vos jeux vidéo sur écran géant Regardez les sports etc entre amis Visualisez sur grand écran des images prises avec un appareil photo numérique et stockées sur Memory Stick Avant l installation du projecteur Ne placez pas le projecteur dans les conditions suivantes Il risq...

Страница 86: ...tallation de l appareil en altitude Si vous utilisez le projecteur à une altitude de 1 500 m ou supérieure activez le mode haute altitude dans le menu RÉGLAGE D INSTALLATION Si vous n activez pas ce mode lors d une utilisation à haute altitude il pourra en résulter des effets défavorables pour le projecteur tels que la diminution de la fiabilité de certaines pièces Utilisation du convertisseur de ...

Страница 87: ...teur et au support de suspension de projecteur PSS 610 comme sur la figure ci dessous Utilisez alors la vis M5 12 avec rondelle fournie avec le PSS 610 Placez tout d abord le PSS 610 1 sur le projecteur puis fixez le câble de sécurité 2 au PSS 610 AVERTISSEMENT Utilisez impérativement la vis M5 12 avec rondelle fournie avec le PSS 610 N utilisez jamais la vis fournie avec le convertisseur de focal...

Страница 88: ...isée f Distance verticale maximale entre le bas de l écran et le centre de l objectif lorsque le projecteur est placé sur le côté quand la distance de projection b est utilisée Lors d une projection en utilisant le réglage Side Shot seulement 1 page 21 Positionnez le projecteur avec l extrémité de son objectif dans la zone de l illustration en utilisant les valeurs a b c et d du tableau ci dessous...

Страница 89: ...isation d un écran de format 16 9 Unité m pieds Lors de l utilisation d un écran de format 4 3 Unité m pieds Taille d écran pouces 40 60 80 100 120 a 1 6 5 2 2 4 7 9 3 2 10 5 4 0 13 1 4 8 15 7 b 1 8 5 9 2 8 9 2 3 7 12 1 4 7 15 4 5 6 18 4 c 0 1 0 3 0 1 0 3 0 2 0 6 0 2 0 6 0 3 1 0 d 0 0 0 0 0 0 0 0 0 0 e 0 3 1 0 0 5 2 0 0 7 2 3 0 8 2 6 1 0 3 3 f 0 4 1 6 0 6 2 0 0 8 2 6 1 0 3 3 1 2 3 9 Taille d écran...

Страница 90: ... d installation SS Taille d écran a minimum SS 33 56 0 8788 56 520408 1 025 a maximum SS 42 3591819 0 8788 57 181415 0 975 x b SS 0 8788 5 516 a x b Support de suspension de projecteur PSS 610 non fourni Plafond Centre de l écran Centre de l objectif Distance entre l avant du boîtier et le centre de l objectif Objectif standard 61 5 mm 21 2 pouces SS pouces 40 60 80 100 a Minimum 1510 59 1 2 2290 ...

Страница 91: ...109 7 8 3740 147 3 8 4690 184 3 4 Maximum 2230 87 7 8 3370 132 3 4 4510 177 5 8 5650 222 1 2 x b 305 b 12 b 457 b 18 b 609 b 24 b 762 b 30 b Lors de l utilisation du PSS 610 réglable avec 243 268 293 343 368 393 mm SS pouces 120 150 180 200 a Minimum 5640 222 1 8 7070 278 1 2 8490 334 3 8 9440 371 3 4 Maximum 6790 267 3 8 8500 334 3 4 10210 402 1 8 11350 447 x b 914 b 36 b 1143 b 45 b 1371 b 54 b ...

Страница 92: ...l appareil raccordé Lorsque vous raccordez le projecteur à un connecteur PJ MULTI ou DVI sélectionnez le signal d entrée avec le paramètre Sél sign entr A ou Sél Sign DVI du menu RÉGLAGE 1 page 36 et 37 Remarque Avant de modifier le paramètre Sél Sign DVI débranchez le câble DVI mettez le tuner numérique hors tension etc HDMI le logo HDMI et High Definition Multimedia Interface sont des marques ou...

Страница 93: ... vidéo de ce dernier Pour raccorder le projecteur à un lecteur DVD tuner numérique sans sortie S vidéo utilisez le câble vidéo au lieu du câble S vidéo Pour raccorder le projecteur à un lecteur DVD tuner numérique avec connecteur D utilisez un câble de conversion en vente dans le commerce Raccordement à un lecteur DVD tuner numérique PB CB PR CR Y S VIDEO VIDEO DVI HDMI Y PB CB PR CR PJ MULTI Câbl...

Страница 94: ...meilleure qualité d image en raccordant un lecteur DVD tuner numérique avec sortie HDMI à l entrée HDMI du projecteur S VIDEO VIDEO DVI HDMI Y PB CB PR CR PJ MULTI Arrière du projecteur Amplificateur AV Enceintes amplifiées Tuner numérique etc avec sortie DVI vers sortie DVI Câble DVI non fourni Trajet du signal vidéo S VIDEO VIDEO DVI HDMI Y PB CB PR CR PJ MULTI Câble HDMI non fourni Trajet du si...

Страница 95: ...de connecteur S VIDEO connecteur S vidéo raccordez le câble à VIDEO sortie vidéo Vous obtiendrez une meilleure qualité sonore en raccordant le projecteur à un amplificateur AV à l aide du câble d interface signal fourni Raccordement à un appareil vidéo Raccordement à un amplificateur AV S VIDEO VIDEO DVI HDMI Y PB CB PR CR PJ MULTI Câble S vidéo ou vidéo VMC 810S non fourni Trajet du signal vidéo ...

Страница 96: ...e si vous raccordez le câble d interface signal à la sortie audio de l ordinateur il n y aura pas de sortie de son au projecteur Pour le raccordement au connecteur DVI Raccordement à un ordinateur S VIDEO VIDEO DVI HDMI Y PB CB PR CR PJ MULTI Câble d interface signal SIC HS30 non fourni Trajet du signal vidéo Arrière du projecteur vers sortie moniteur Ordinateur Enceintes amplifiées avec le logo S...

Страница 97: ...n du périphérique d interface IFU HS1 n est émis que lorsqu un téléviseur est raccordé Raccordement à divers appareils à l aide du périphérique d interface en option S VIDEO VIDEO DVI HDMI Y PB CB PR CR PJ MULTI Trajet du signal vidéo Magnétoscope etc Amplificateur audio Enceintes amplifiées Trajet du signal audio Lecteur DVD etc Câble PJ multi fourni avec l IFU HS1 Périphérique d interface IFU HS...

Страница 98: ... 1 marche veille pour mettre le projecteur sous tension L indicateur ON STANDBY s allume en vert 3 Mettez l équipement raccordé au projecteur sous tension Consultez le mode d emploi de l appareil raccordé 4 Appuyez sur INPUT pour projeter l image sur l écran À chaque pression sur la touche l indication d entrée change 1 page 28 INPUT LIGHT STANDARD CINEMA DYNAMIC USER 2 PICTURE MODE USER 3 USER 1 ...

Страница 99: ...ffectuez le réglage en tournant les patins ronds du support réglable à droite ou à gauche 7 Réglez la taille et la position de l image Si vous réglez manuellement Side Shot ou Trapèze V réglage de valeur la mire interne du projecteur est projetée à l écran Pour effectuer un réglage à l aide du signal d entrée actuel placez Mire d essai sur Off dans le menu RÉGLAGE D INSTALLATION 1 page 37 Lors d u...

Страница 100: ... le bord intérieur d un côté du cadre de l écran Si le projecteur est à gauche de l écran réglez le pour que le côté gauche de l image coïncide avec le bord intérieur du côté gauche du cadre de l écran S il est à droite réglez le pour que le côté droit de l image coïncide avec le bord intérieur du côté droit du cadre de l écran Remarque Lorsque vous réglez un côté de l image pour qu il coïncide av...

Страница 101: ...cteur de façon que l image chevauche l écran comme sur la figure ci dessous Assurez vous que les deux côtés verticaux de l image sont parallèles aux deux côtés verticaux de l écran S ils ne sont pas parallèles placez Trapèze V sur Manuel dans le menu RÉGLAGE D INSTALLATION puis appuyez sur ENTER et réglez la distorsion avec M ou m pour y remédier 3 Déplacez le projecteur horizontalement vers la ga...

Страница 102: ... d écran il se peut que le réglage du paramètre Trapèze V ne permette pas de corriger parfaitement la distorsion trapézoïdale Procédez alors à une correction manuelle par un réglage de valeur 2 Positionnez le projecteur de façon que le haut et le bas de l image soient parallèles aux côtés horizontaux du cadre de l écran et que les côtés gauche et droit de l image soient parallèles aux côtés vertic...

Страница 103: ... murale L indicateur ON STANDBY s allume en rouge et le projecteur est mis en veille 2 Appuyez sur l interrupteur 1 marche veille pour mettre le projecteur sous tension L indicateur ON STANDBY s allume en vert 3 Appuyez sur MENU Le menu apparaît Le menu actuellement sélectionné est indiqué comme un bouton jaune 4 Appuyez sur M oum pour sélectionner le menu MENU SETTING puis appuyez sur ou ENTER Le...

Страница 104: ...uyez sur M ou m pour sélectionner Language puis appuyez sur ou ENTER 6 Appuyez sur M ou m pour sélectionner une langue puis appuyez sur ENTER La langue de menu est remplacée par celle que vous avez sélectionnée Pour faire disparaître le menu Appuyez sur MENU ENTER Input A ou ENTER ...

Страница 105: ...cteur est mis en veille Cette section indique comment utiliser le projecteur pour visionner l image de l appareil raccordé au projecteur Elle explique également comme sélectionner le mode d écran large ou la qualité de l image selon vos préférences INPUT LIGHT STANDARD CINEMA DYNAMIC USER 2 PICTURE MODE USER 3 USER 1 MS SLIDE MENU APA LENS VOLUME SIDE SHOT RESET WIDE MODE ENTER 2 4 ON STANDBY S al...

Страница 106: ...puyez sur ZOOM pour régler la taille de l image ON STANDBY S allume en vert NTSC 3 58 Video 1 INPUT Pour visionner l image d un Appuyez sur INPUT pour afficher appareil vidéo raccordé à VIDEO INPUT du projecteur Video 1 appareil vidéo raccordé à S VIDEO INPUT du projecteur S Video 1 appareil RVB composantes raccordé à PJ MULTI INPUT à l aide du câble d interface signal ou du périphérique d interfa...

Страница 107: ... que le ventilateur s arrête et que l indicateur ON STANDBY s allume en rouge avant de débrancher le cordon d alimentation secteur de la prise murale Vous pouvez mettre le projecteur hors tension en appuyant sur l interrupteur 1 marche veille pendant une seconde environ au lieu d effectuer les opérations ci dessus Sélectiondumode d écran large Vous avez le choix entre plusieurs modes d écran pour ...

Страница 108: ...ctué sur une image 16 9 compressée L image est affichée au centre de l écran Direct normal Un mappage un à un est effectué sur une image au format normal 4 3 L image est affichée au centre de l écran Remarques Vous ne pouvez régler la position verticale de l image avec Position V du menu RÉGLAGE DE L ENTRÉE que si Zoom ou Sous titres est sélectionné Vous ne pouvez régler la position des sous titre...

Страница 109: ...otre salon CINEMA Sélectionnez ce mode pour obtenir des images douces comme dans les films dans un environnement sombre USER 1 2 et 3 Vous pouvez régler la qualité de l image selon vos préférences et enregistrer les paramètres dans l une des mémoires du projecteur Appuyez sur l une des touches USER 1 2 ou 3 puis réglez l image avec les menus Les paramètres sont mémorisés Vous pourrez alors les rap...

Страница 110: ... Indique le canal d entrée sélectionné s affiche lorsqu il n y a pas d entrée de signal Vous pouvez masquer cet indicateur avec État du menu RÉGLAGE DE MENU Indicateur de sélection du signal d entrée Pour Entrée A Affiche Ordinateur Composant ou Video GBR Pour Numérique Affiche Ordinateur ou Video GBR Pour Entrée Video S Video Affiche Auto ou le Standard coul sélectionné dans le menu RÉGLAGE Cette...

Страница 111: ...e sélectionné Pour faire disparaître le menu Appuyez sur MENU Pour réinitialiser les paramètres modifiés Sélectionnez le paramètre à réinitialiser puis appuyez sur RESET Effectué apparaît à l écran et le paramètre est réinitialisé à sa valeur d usine Les paramètres pouvant être réinitialisés sont Contraste Lumière Couleur Teinte et Netteté de Réglez l image dans le menu PARAMÉTRAGE DE L IMAGE Phas...

Страница 112: ...image convenant le mieux au type d image et aux conditions environnantes Dynamique Sélectionnez ce mode pour accentuer le contraste et la netteté de l image Standard Recommandé pour des conditions normales de visualisation Sélectionnez également ce mode pour réduire la rugosité lorsque vous visualisez l image en mode Dynamique Cinéma Sélectionnez ce mode pour des images peu contrastées telles que ...

Страница 113: ...sive Convertit un signal vidéo au format entrelacé en format progressif Film Sélectionnez normalement cette option Restitue des sources de film Pull Down 2 3 avec un mouvement d image régulier Lorsqu un signal vidéo d un format autre que Pull Down 2 3 est reçu le mode Progressive est automatiquement sélectionné Paramètre Description Noir Ciné Pro Commande iris Change la fonction de l iris pendant ...

Страница 114: ...º 1 2 3 4 43 ou 44 voir le tableau Signaux préprogrammés vous ne pouvez pas régler Trapèze V ou Side Shot dans le menu RÉGLAGE D INSTALLATION Pour plus d informations voir Sélection du mode d écran large à la page 29 Paramètre Description Position V Règle la position verticale de l image en mode d écran large Lorsque la valeur de réglage augmente l image remonte Lorsque la valeur de réglage diminu...

Страница 115: ...éen Position de menu Sélectionne la position d affichage parmi Haut gauche Bas gauche Centre Haut droite et Bas droite Couleur de menu Sélectionne la tonalité d affichage du menu parmi Blanc et Noir Paramètre Description Paramètre Description Trapèze V Corrige la distorsion trapézoïdale verticale de l image Auto Sélectionnez normalement cette option Manuel Spécifiez une valeur inférieure sens lors...

Страница 116: ...sur la touche APA Auto Pixel Alignment Si l image est correctement réglée Effectué apparaît à l écran Remarques Lorsque APA intelligent est sur On la fonction APA est automatiquement activée Appuyez sur la touche APA alors que l image couvre tout l écran de l ordinateur S il y a des bords noirs autour de l image la fonction APA ne fonctionnera pas correctement et il se peut que l image dépasse de ...

Страница 117: ...xception de données protégées par des droits d auteur qui nécessitent la technologie de protection des droits d auteur MagicGate Memory Stick compatible avec MagicGate transfert de données à haute vitesse Il est doté de la technologie de protection des droits d auteur MagicGate et compatible avec le transfert de données à haute vitesse Ce Memory Stick peut être utilisé avec touts les produits comp...

Страница 118: ...prend pas en charge la fonction de sécurité de contrôle d accès Le fonctionnement de cet appareil a été testé avec des Memory Stick de jusqu à 1 Go Son fonctionnement n est pas garanti pour des Memory Stick PRO de capacité supérieure Remarques sur le Memory Stick Duo Pour utiliser un Memory Stick Duo avec votre projecteur placez le dans l adaptateur Memory Stick Duo avant de l insérer dans le proj...

Страница 119: ... compressés au format JPEG Joint Photographic Experts Group extension jpg Fichiers d image au format MPEG1 enregistrés par des produits Sony MPEG MOVIE MPEG MOVIE AD MPEG MOVIE EX MPEG MOVIE HQ MPEG MOVIE HQX MPEG MOVIE CV VAIO Giga pocket équivalent au CD vidéo Avant d utiliser un Memory Stick Lorsque le taquet de protection en écriture du Memory Stick est sur LOCK il n est pas possible d enregis...

Страница 120: ...ourrait endommager les données Précautions Pour éviter des pertes de données effectuez fréquemment des copies de sauvegarde Sony ne saurait en aucun cas être tenu responsable de pertes de données L enregistrement non autorisé peut être en infraction avec la législation sur les droits d auteur Sony peut modifier ou changer le logiciel d application Memory Stick sans préavis Memory Stick Duo et sont...

Страница 121: ...afficher le menu Index sélectionnez une vignette puis appuyez sur ENTER Vous pouvez effectuer les opérations suivantes à l aide du menu qui s affiche sur l écran d index affichage d un fichier d image sur écran complet exécution d un diaporama protection d un fichier d image important rotation d un fichier d image image fixe seulement mémorisation du fichier d image de lancement image fixe seuleme...

Страница 122: ...tre fichier d image lorsqu il y en a plusieurs dans le dossier actuel appuyez sur Si vous appuyez sur MS SLIDE dans le menu de paramétrage d image l écran Origine Memory Stick réapparaît Origine Memory Stick Diaporama Option Sélectionnez un dossier Filter Still Ampl 1024x768 n 123 1234 Date 15 JUL 2003 12 34 Fichier 100MSDCF SJP0001 JPG Mode photo num Écran complet Diaporama Protect Rotation Lancm...

Страница 123: ... Origine Memory Stick 1 page 43 Ampl 320x240 n 1 1234 Date 15 JUL 2003 12 34 Fichier SJP0001 MPG Préc Écran complet Menu Précédent NEXT Informations Act Sélection audio Protect Suppr Fermer D G Menu de paramétrage d image pour un fichier vidéo Résolution Date Nom de fichier et format de fichier Icône de film S affiche si le fichier est protégé Numéro nombre total de fichiers d image INPUT LIGHT ST...

Страница 124: ...uyez sur M ou m pour sélectionner Démarrer puis appuyez sur ENTER Lorsque vous placez Diapo avan sur Auto les diapositives avancent automatiquement Lorsque vous sélectionnez une image vidéo elle est lue automatiquement et après sa lecture la diapositive suivante s affiche Si l option Manuel est sélectionnée utilisez la touche pour faire avancer les diapositives Pour revenir à la diapositive précéd...

Страница 125: ... désirez commencer le diaporama puis appuyez sur ENTER 2 Appuyez sur M ou m pour sélectionner Diaporama dans le menu Index de fichier d image fixe fichier vidéo puis appuyez sur ENTER Affichage d une image sur écran complet Écran complet Vous pouvez projeter l une des images d index sur écran complet Pour afficher une image vidéo sur écran complet voir Lecture d images vidéo à la page 48 1 Affiche...

Страница 126: ...film au format MPEG1 enregistré en MPEG MOVIE Sony etc 1 Affichez l écran Origine Memory Stick 1 page 43 2 Appuyez sur M m ou pour sélectionner l image vidéo à afficher puis appuyez sur ENTER Le menu Index de fichier vidéo apparaît Conseil Lorsque vous sélectionnez une image vidéo sur l écran d index Rotation et Lancmnt ne sont pas disponibles Ampl 1024x768 n 1 1234 Date 15 JUL 2003 12 34 Fichier ...

Страница 127: ... film affichée Remarque Le projecteur peut lire un film MPEG1 enregistré en MPEG MOVIE Sony etc Un sautillement du film se produit occasionnellement pendant la lecture Les films MPEG1 pouvant être utilisés sont MPEG MOVIE AD EX HQ HQX CV MPEG1 de VAIO Giga pocket équivalent à un CD vidéo Pour arrêter la lecture Appuyez sur m pour sélectionner x Pour visionner un film sur écran complet Appuyez sur ...

Страница 128: ...fficher puis appuyez sur ENTER Pour sélectionner des dossiers qui ne sont pas affichés appuyez sur pour sélectionner le curseur de défilement de la liste des dossiers puis appuyez sur v ou V Les 10 dossiers suivants s affichent Ampl 320x240 n 1 1234 Date 15 JUL 2003 12 34 Fichier SJP0001 MPG Préc Écran complet Menu Précédent NEXT Informations Act Sélection audio Protect Suppr Fermer D G Menu de pa...

Страница 129: ...sélectionner Mode photo num puis appuyez sur ENTER 4 Appuyez sur m pour sélectionner Dés puis appuyez sur ENTER La liste des dossiers apparaît Rotation d une image fixe Vous pouvez faire pivoter une vignette ou une image fixe d écran complet à droite ou à gauche par étapes de 90 Remarque Vous ne pouvez pas faire pivoter une image vidéo 1 Affichez l écran Origine Memory Stick 1 page 43 Origine Memo...

Страница 130: ...t 3 Effectuez les opérations des étapes 3 et 4 de Rotation d une image fixe Remarques Vous ne pouvez pas faire pivoter une image protégée 1 page 53 Avant de la faire pivoter vous devez la déprotéger Lorsque le taquet de protection en écriture du Memory Stick se trouve sur LOCK vous ne pouvez pas faire pivoter les images du Memory Stick Origine Memory Stick Diaporama Option Sélectionnez un dossier ...

Страница 131: ...es Le symbole de protection apparaît sur l écran d index pour l image protégée Pour désactiver la protection Sélectionnez Dés ou Tt dés à l étape 4 Lorsque vous sélectionnez Dés ceci déprotège l image sélectionnée Lorsque vous sélectionnez Tt dés ceci déprotège toutes les images du dossier sélectionné Pour protéger une image fixe sur écran complet 1 Affichez l image désirée sur écran complet 1 pag...

Страница 132: ...dans le projecteur est automatiquement projetée pendant 30 secondes environ même lorsqu il n y a pas d entrée de signal Vous pouvez remplacer cette image fixe par une autre de votre choix Mémorisation d une image fixe comme image de lancement Pour utiliser une image du Memory Stick comme image de lancement mémorisez la sur le Memory Stick Conseil Vous ne pouvez pas mémoriser un fichier vidéo comme...

Страница 133: ...ectuez les opérations des étapes 3 et 4 de Mémorisation d une image fixe comme image de lancement Pour abandonner la mémorisation de l image de lancement 1 Affichez l écran d index en sélectionnant une vignette sélectionnez Lancmnt puis appuyez sur ENTER 2 Appuyez sur M ou m pour sélectionner Annuler puis appuyez sur ENTER Sélection de la source de l image de lancement 1 Affichez l écran Origine M...

Страница 134: ...k contenant l image dans le projecteur puis mettez celui ci sous tension Vous pouvez mémoriser une image de lancement par Memory Stick Suppression d une image Vous pouvez supprimer les images inutiles du Memory Stick 1 Affichez l écran Origine Memory Stick 1 page 43 2 Appuyez sur M m ou pour sélectionner l image à supprimer du Memory Stick puis appuyez sur ENTER Le menu Index apparaît Filter Still...

Страница 135: ...upprimer sur écran complet 1 page 47 2 Appuyez sur ENTER pour afficher le menu de paramétrage d image fixe 3 Appuyez sur M ou m pour sélectionner Suppr puis appuyez sur ENTER 4 Appuyez sur M ou m pour sélectionner l option désirée puis appuyez sur ENTER Lorsque Le fichier sélectionné sera supprimé OK s affiche sélectionnez Oui puis appuyez sur ENTER Pour supprimer une image vidéo dans le lecteur v...

Страница 136: ...Par nom pour un tri par nom d image de Z à A Par date pour un tri par date d enregistrement depuis la plus ancienne Par date pour un tri par date d enregistrement depuis la plus récente Remarque Pour les images traitées sur ordinateur la date affichée peut être la date de modification et non la date d enregistrement INPUT LIGHT STANDARD CINEMA DYNAMIC USER 2 PICTURE MODE USER 3 USER 1 MS SLIDE MEN...

Страница 137: ...ou m pour sélectionner l option désirée puis appuyez sur ENTER Lorsque Filtre est sélectionné l option sélectionnée Image fixe ou Image vidéo est indiquée sur l écran Origine Memory Stick INPUT LIGHT STANDARD CINEMA DYNAMIC USER 2 PICTURE MODE USER 3 USER 1 MS SLIDE MENU APA LENS RESET WIDE MODE ENTER 2 4 Filter Still Origine Memory Stick Diaporama Option Sélectionnez un dossier Ampl 1024x768 n Da...

Страница 138: ...che 3 Appuyez sur M ou m pour sélectionner Memory Stick Les informations du Memory Stick actuel s affichent Pour revenir à l écran Origine Memory Stick Appuyez sur M ou m pour sélectionner Fermer INPUT LIGHT STANDARD CINEMA DYNAMIC USER 2 PICTURE MODE USER 3 USER 1 MS SLIDE MENU APA LENS RESET WIDE MODE ENTER 2 3 Filter Still Origine Memory Stick Diaporama Option Sélectionnez un dossier Ampl 1024x...

Страница 139: ... avant d initialiser le Memory Stick Sélectionnez Fermer à l étape 4 L écran Origine Memory Stick réapparaît Remarques Lors de l initialisation du Memory Stick les images protégées sont également effacées Si vous essayez d initialiser un Memory Stick avec son taquet de protection en écriture sur LOCK le message Memory Stick verrouillé s affiche Pendant l initialisation du Memory Stick vous ne pouv...

Страница 140: ...ionnez Ordinateur Composant ou Video GBR pour Sél sign entr A dans le menu RÉGLAGE en fonction du signal d entrée 1 page 36 L image via le connecteur PJ MULTI présente des couleurs anormales c Sélectionnez Ordinateur Composant ou Video GBR pour Sél sign entr A dans le menu RÉGLAGE en fonction du signal d entrée 1 page 36 La balance des couleurs est incorrecte c Réglez l image dans Réglez l image d...

Страница 141: ...atibles DCF Utilisez des images compatibles DCF Vous ne parvenez pas à afficher des fichiers d image fixe au format JPEG d un Memory Stick c Placez Filtre du menu Option sur Image fixe ou Des Vous ne parvenez pas à afficher des fichiers d image vidéo au format MPEG1 d un Memory Stick c Placez Filtre du menu Option sur Image vidéo ou Des LAMP COVER clignote c Posez correctement le couvercle de la l...

Страница 142: ...o pouvant être affiché dans ce dossier c Il n y a pas de fichier d image vidéo dans le dossier actuellement sélectionné bien que Filtre soit sur Image vidéo dans le menu Option x Aucun fichier d image fixe pouvant être affiché dans ce dossier c Il n y a pas de fichier d image fixe dans le dossier actuellement sélectionné bien que Filtre soit sur Image fixe dans le menu Option Lecture impossible c ...

Страница 143: ...st très chaude lorsque vous mettez le projecteur hors tension avec l interrupteur 1 marche veille Elle peut vous brûler si vous la touchez Avant de remplacer la lampe attendez au moins une heure pour lui permettre de se refroidir Pour retirer le module de lampe maintenez le bien à l horizontale et tirez perpendiculairement N inclinez pas le module de lampe Si vous extrayez le module de lampe en l ...

Страница 144: ...liquide ou objet n y pénètre pour éviter tout risque d électrocution ou d incendie Pour le remplacement utilisez uniquement une lampe pour projecteur LMP H180 L utilisation d une autre lampe que la LMP H180 pourrait provoquer un dysfonctionnement Avant de remplacer la lampe mettez le projecteur hors tension et débranchez le cordon d alimentation Remplacement du filtre à air Le filtre à air doit êt...

Страница 145: ... pouces en diagonale Standard couleur NTSC3 58 PAL SECAM NTSC4 43 PAL M PAL N sélection automatique manuelle Signaux vidéo compatibles RVB 15 kHz composantes 50 60 Hz composantes progressif 50 60 Hz DTV 480 60i 575 50i 480 60p 575 50p 720 60p 720 50p 1080 60i 1080 50i 1080 24PsF vidéo composite vidéo Y C Signaux d ordinateur compatibles fH 19 à 72 kHz fV 48 à 92 Hz Résolution maximale XGA 1 024 76...

Страница 146: ...e négative Memory Stick Fente 1 Généralités Dimensions 345 148 369 mm 13 5 8 5 7 8 14 5 8 pouces l h p Poids 5 4 kg 11 li 14 onces environ Alimentation 100 à 240 V CA 2 9 1 1 A 50 60 Hz Consommation électrique Max 260 W Mode de veille 5 W Température de fonctionnement 0 à 35 ºC 32 à 95 ºF Humidité de fonctionnement 35 à 85 sans condensation Température de stockage 20 à 60 ºC 4 à 140 ºF Humidité de...

Страница 147: ... 3 3 Taille d écran pouces 150 180 200 250 300 a 6 0 19 7 7 3 24 0 8 1 26 6 10 1 33 1 12 1 39 7 b 7 0 23 0 8 4 27 6 9 4 30 8 11 7 38 4 14 1 46 3 c 0 8 2 6 1 0 3 3 1 1 3 6 1 4 4 6 1 7 5 6 d 1 3 4 3 1 6 5 2 1 7 5 6 2 2 7 2 2 6 8 5 a e f b c d 12 12 f Écran Projecteur Taille d écran pouces 40 60 80 100 120 a 1 6 5 2 2 4 7 9 3 2 10 5 4 0 13 1 4 8 15 7 b 1 8 5 9 2 8 9 2 3 7 12 1 4 7 15 4 5 6 18 4 c 0 1...

Страница 148: ...nce entre l avant du boîtier et le centre du convertisseur de focale a Distance entre l écran et le centre de l objectif b Distance entre le plancher et le centre de l objectif c Distance entre le plancher et le dessous du projecteur x Libre Centre de l objectif 35 8 mm 17 16 pouces Lors de l utilisation du convertisseur de focale VPLL CW10 Distance entre l avant du boîtier et le centre du convert...

Страница 149: ...788 78 1 025 a maximum SS 33 6857998 0 8788 80 103586 0 975 b x SS 0 8788 5 516 c x SS 0 8788 5 516 96 3 SS pouces 40 60 80 100 a Valeurs standard 2250 88 5 8 3480 137 1 8 4720 185 7 8 5950 234 3 8 b x 251 x 10 x 377 x 14 7 8 x 502 x 19 7 8 x 628 x 24 3 4 c x 347 x 13 3 4 x 473 x 18 5 8 x 598 x 23 5 8 x 724 x 28 1 2 SS pouces 40 60 80 100 a Valeurs standard 2780 109 1 2 4280 168 5 8 5770 227 1 4 7...

Страница 150: ...40 211 9761 x b SS 0 7240 5 516 SS pouces 40 60 80 100 120 150 180 200 250 300 a Minimum 2190 86 1 4 2940 115 7 8 3700 145 3 4 4450 175 1 4 5580 219 3 4 6720 264 5 8 7470 294 1 4 9360 368 5 8 11250 443 Maximum 2640 104 3550 139 7 8 4460 175 5 8 5370 211 1 2 6730 265 8090 318 5 8 8990 354 11260 443 3 8 13530 532 3 4 b x 457 x 18 x 609 x 24 x 762 x 30 x 914 x 36 x 1143 x 45 x 1371 x 54 x 1524 x 60 x...

Страница 151: ... 5520 217 3 8 6140 241 7 8 7700 303 1 4 9250 364 1 4 Maximum 2160 85 1 8 2910 114 5 8 3660 144 1 8 4410 173 3 4 5530 217 3 4 6650 261 7 8 7400 291 3 8 9270 365 1 8 11130 438 1 4 x b 377 b 14 7 8 b 502 b 19 7 8 b 628 b 24 3 4 b 753 b 29 3 4 b 942 b 37 1 8 b 1130 b 44 1 2 b 1255 b 49 1 2 b 1569 b 61 7 8 b 1883 b 74 1 4 b Lors de l utilisation du PSS 610 réglable avec 243 268 293 343 368 393 mm SS po...

Страница 152: ...z z z z DDE z z seulement pour les numéros de mémoire de présélection 1 2 3 4 5 45 et 49 z seulement pour les numéros de mémoire de présélection 1 2 3 4 5 45 et 49 Noir Ciné Pro Commande iris z z z z Commande lampe z z z z Paramètre Signal d entrée Vidéo ou S vidéo Y C Composant Vidéo GBR Ordinateur MS Phase des points z Amplification H z numéros de mémoire de présélection 43 44 47 48 seulement z ...

Страница 153: ...864 x 13 VGA VESA 72 Hz 37 861 72 809 H nég V nég 832 x 14 VGA VESA 75 Hz 37 500 75 000 H nég V nég 840 x 15 VGA VESA 85 Hz 43 269 85 008 H nég V nég 832 x 16 800 600 SVGA VESA 56 Hz 35 156 56 250 H pos V pos 1024 x 17 SVGA VESA 60 Hz 37 879 60 317 H pos V pos 1056 x 18 SVGA VESA 72 Hz 48 077 72 188 H pos V pos 1040 x 19 SVGA VESA 75 Hz 46 875 75 000 H pos V pos 1056 x 20 SVGA VESA 85 Hz 53 674 85...

Страница 154: ...e 63 Objectif Orifices de ventilation sortie d air 1 page 8 Indicateur POWER SAVING 1 page 37 Indicateur ON STANDBY 1 page 20 Interrupteur 1 marche veille 1 page 20 Touche INPUT 1 page 28 Touche FOCUS 1 page 21 Fente Memory Stick 1 page 42 Bouton de verrouillage du support réglable 1 page 20 Témoin d accès du Memory Stick 1 page 42 Capteur de télécommande avant Touche M m fléchée 1 page 25 Touche ...

Страница 155: ... IN Connecteur PJ MULTI INPUT multi connecteur 32 broches 1 page 17 Connecteur DVI entréenumérique 1 page 16 Verrouillage antivol Permet de brancher un câble antivol en option Kensington Adresse de page Web http www kensington com Connecteur HDMI 1 page 16 Connecteur USB Permet de raccorder le projecteur à un ordinateur au moyen d un câble USB Aymini B non fourni lors de l exécution d une Correct ...

Страница 156: ...rs FR 78 Emplacement des commandes Face inférieure Orifices de ventilation prise d air 1 page 8 Orifices de ventilation prise d air 1 page 8 Couvercle de lampe 1 page 65 Couvercle de filtre à air 1 page 66 ...

Страница 157: ...HT STANDARD CINEMA DYNAMIC USER 2 PICTURE MODE USER 3 USER 1 MS SLIDE MENU APA LENS VOLUME SIDE SHOT RESET WIDE MODE ENTER Touche LIGHT Éclaire les touches de la télécommande Touche SIDE SHOT 1 page 22 Touche VOLUME 1 page 50 Émetteur infrarouge Touche MS SLIDE 1 page 45 Interrupteur 1 marche veille 1 page 20 Touche INPUT 1 page 20 Touches M m fléchées ENTER 1 page 25 Touche RESET 1 page 33 Touche...

Страница 158: ... menu 33 réinitialisation 33 Menu INFORMATIONS 38 Menu PARAMÉTRAGE DE L IMAGE 34 Menu RÉGLAGE 36 Menu RÉGLAGE D INSTALLATION 37 Menu RÉGLAGE DE L ENTRÉE 35 Menu RÉGLAGE DE MENU 37 Message avertissement 63 indicateur de précaution Memory Stick 65 précaution 64 Mode d image 34 Cinéma 34 Dynamique 34 Standard 34 Utilisateur 1 2 et 3 34 Mode économique 37 Mode large 36 N Netteté 35 Niveau du noir 35 N...

Страница 159: ...81FR Index Divers T Taille d écran 10 12 Teinte 35 Télécommande emplacement des commandes 79 mise en place des piles 6 Temp couleur 35 Trapèze V 11 37 V Volume 34 W WIDE MODE 29 ...

Страница 160: ...o exponga la unidad a la lluvia ni a la humedad Para evitar recibir descargas eléctricas no abra el aparato Contrate exclusivamente los servicios de personal cualificado ADVERTENCIA La toma de corriente debe encontrarse cerca del equipo y ser de fácil acceso ...

Страница 161: ...ida 37 Ajuste de la calidad de imagen de una señal procedente de un ordenador 37 Uso de un Memory Stick Acerca de Memory Stick 38 Preparación de la visualización de archivos de imagen almacenados en un Memory Stick 41 Insertar un Memory Stick 41 Presentación de las imágenes deseadas en el modo de cámara digital 42 Visualización de las imágenes 44 Visualización de las imágenes en secuencia Presenta...

Страница 162: ...cialización de un Memory Stick Formato 60 Otros Solución de problemas 61 Sustitución de la lámpara 64 Sustitución del filtro de aire 65 Especificaciones 66 Ubicación de los controles 75 Parte frontal 75 Trasera 76 Parte inferior 77 Mando a distancia 78 Índice 79 ...

Страница 163: ...a unidad No mire al objetivo mientras la lámpara esté encendida No coloque la mano ni ningún objeto cerca de los orificios de ventilación El aire que sale es caliente Prevención del calentamiento interno Después de apagar la alimentación con el interruptor I 1 encendido espera no desconecte la unidad de la toma mural mientras el ventilador de refrigeración esté en funcionamiento Precaución El proy...

Страница 164: ...ón de CA 1 Instrucciones de funcionamiento este manual 1 Introducción de las pilas en el mando a distancia En esta sección se describe cómo instalar el proyector y la pantalla cómo conectar el equipo desde el cual desea proyectar la imagen etc Introduzca las pilas comenzando por el lado E como se muestra en la ilustración Si las introduce forzándolas o con las polaridades invertidas podría provoca...

Страница 165: ...10 Con este proyector puede disfrutar de espectáculos en su propio hogar en diversas situaciones Cine en casa Videojuegos en pantalla grande Espectáculos deportivos etc en compañía Ver imágenes grabadas con una cámara digital y guardadas en un Memory Stick en pantalla grande Antes de configurar el proyector No ponga el proyector en las siguientes situaciones en las que puede sufrir daños o averías...

Страница 166: ...talación de la unidad a grandes altitudes Cuando utilice el proyector a una altitud de 1 500 metros o más establezca el Modo gran altitud en el menú AJUSTE INSTALACIÓN El no establecer este modo cuando se utilice el proyector a grandes altitudes podrá acarrear efectos adversos tales como reducción de la fiabilidad de ciertos componentes Uso de la Lente de conversión opcional Puede instalar en el p...

Страница 167: ... 610 en el paso 6 como se ilustra a continuación En este caso utilice el tornillo M5 12 con arandela que se suministra con el PSS 610 En primer lugar coloque el PSS 610 1 sobre el proyector a continuación coloque el cable de seguridad 2 en el PSS 610 ADVERTENCIA Asegúrese de utilizar el tornillo M5 12 con arandela que se suministra con el PSS 610 No utilice nunca el tornillo que se suministra con ...

Страница 168: ... parte inferior de la pantalla y el centro del objetivo del proyector cuando se coloca el proyector de lado cuando se utiliza la distancia de proyección b Proyección utilizando sólo el ajuste Side Shot 1 página 21 Sitúe el proyector de modo que el extremo del objetivo quede dentro del área de la ilustración utilice como guía los valores a b c y d de la tabla siguiente Unidad m pies Sugerencia Las ...

Страница 169: ...atrones de bandas en la pantalla dependiendo de la distancia entre la pantalla y el proyector y de la ampliación del zoom Esto no significa una avería del proyector Tamaño de la pantalla pulgadas 40 60 80 100 120 a 1 6 5 2 2 4 7 9 3 2 10 5 4 0 13 1 4 8 15 7 b 1 8 5 9 2 8 9 2 3 7 12 1 4 7 15 4 5 6 18 4 c 0 1 0 3 0 1 0 3 0 2 0 6 0 2 0 6 0 3 1 0 d 0 0 0 0 0 0 0 0 0 0 e 0 3 1 0 0 5 2 0 0 7 2 3 0 8 2 6...

Страница 170: ... Centro de la pantalla Centro del objetivo Distancia desde la parte frontal de la carcasa y el centro del objetivo Objetivo estándar 61 5 mm 21 2 pulgadas SS pulgadas 40 60 80 100 a Mínimo 1510 59 1 2 2290 90 1 4 3070 121 3850 151 5 8 Máximo 1820 71 3 4 2760 108 3 4 3700 145 3 4 4640 182 3 4 x b 251 b 10 b 377 b 14 7 8 b 502 b 19 7 8 b 628 b 24 3 4 b Cuando se utiliza el PSS 610 ajustable con 243 ...

Страница 171: ... 132 3 4 4510 177 5 8 5650 222 1 2 x b 305 b 12 b 457 b 18 b 609 b 24 b 762 b 30 b Cuando se utiliza el PSS 610 ajustable con 243 268 293 343 368 393 mm SS pulgadas 120 150 180 200 a Mínimo 5640 222 1 8 7070 278 1 2 8490 334 3 8 9440 371 3 4 Máximo 6790 267 3 8 8500 334 3 4 10210 402 1 8 11350 447 x b 914 b 36 b 1143 b 45 b 1371 b 54 b 1524 b 60 b Cuando se utiliza el PSS 610 ajustable con 243 268...

Страница 172: ...o del cable Consulte las instrucciones de funcionamiento del equipo conectado Si conecta el proyector a la conexión PJ MULTI o DVI seleccione la señal de entrada con la configuración Sel señ ent A o Sel señ DVI en el menú AJUSTE 1 página 35 y 36 Nota Antes de cambiar la configuración de Sel señ DVI desconecte el cable DVI y apague el sintonizador digital etc HDMI el logotipo HDMI y High Definition...

Страница 173: ...ntonizador digital Para conectar el proyector a un reproductor de DVD sintonizador digital que no esté equipado con salida de S vídeo utilice el cable de vídeo en lugar del cable de S vídeo Para conectar el proyector a un reproductor de DVD sintonizador digital equipado con una conexión D utilice un cable de conversión comercial Conexión con un reproductor de DVD sintonizador digital PB CB PR CR Y...

Страница 174: ...gen puede conectar un reproductor de DVD sintonizador digital equipado con salida HDMI a la entrada HDMI del proyector S VIDEO VIDEO DVI HDMI Y PB CB PR CR PJ MULTI Parte posterior del proyector Amplificador AV Altavoces activos Sintonizador digital etc con salida DVI a la salida DVI Cable DVI no suministrado Flujo de la señal de vídeo S VIDEO VIDEO DVI HDMI Y PB CB PR CR PJ MULTI Cable HDMI no su...

Страница 175: ... conecte el cable a VIDEO salida de vídeo Para disfrutar de una mejor calidad de sonido puede conectar el proyector a un amplificador AV mediante el cable de interfaz de señal que se suministra Conexión a un equipo de vídeo Conexión a un amplificador AV S VIDEO VIDEO DVI HDMI Y PB CB PR CR PJ MULTI Cable de S vídeo o vídeo VMC 810S no suministrado Flujo de la señal de vídeo Parte posterior del pro...

Страница 176: ...le de interfaz de señal a la salida de audio del ordenador el proyector no emitirá ningún sonido Para conectar a la conexión DVI Conexión con un ordenador S VIDEO VIDEO DVI HDMI Y PB CB PR CR PJ MULTI Cable de interfaz de señales SIC HS30 no suministrado Flujo de la señal de vídeo Parte posterior del proyector a la salida de monitor Ordenador Altavoces activos con el logotipo SONY hacia arriba S V...

Страница 177: ... IFU HS1 sólo se emite si hay un televisor conectado Conexión con diversos equipos mediante la unidad de interfaz opcional S VIDEO VIDEO DVI HDMI Y PB CB PR CR PJ MULTI Flujo de la señal de vídeo Videograbadora etc Amplificador de audio Altavoces activos Flujo de la señal de audio Reproductor de DVD etc Cable múltiple PJ suministrado para IFU HS1 Unidad de interfaz IFU HS1 no suministrada Parte po...

Страница 178: ...spera para encender el proyector El indicador ON STANDBY se iluminará en verde 3 Encienda el equipo conectado al proyector Consulte las instrucciones de funcionamiento del equipo conectado 4 Pulse INPUT para proyectar la imagen en la pantalla Cada vez que pulse el botón la indicación de señal de entrada cambia 1 página 27 INPUT LIGHT STANDARD CINEMA DYNAMIC USER 2 PICTURE MODE USER 3 USER 1 MS SLI...

Страница 179: ...Shot o Trapezoide V ajuste de valor se proyectará en la pantalla el patrón de prueba incorporado Si quiere hacer ajustes utilizando la señal de entrada actual establezca la opción Patrón de prueba del menú AJUSTE INSTALACIÓN en No 1 página 36 Proyección utilizando sólo el ajuste Side Shot Cuando proyecte usando sólo el ajuste Side Shot puede ajustar la corrección de la distorsión trapezoidal horiz...

Страница 180: ...inferior de la imagen de la parte inferior interior del marco de la pantalla 5 Realice el ajuste necesario para corregir la distorsión trapezoidal horizontal mediante SIDE SHOT o Pulse SIDE SHOT o de modo que el lado superior de la imagen quede paralelo al lado inferior Si el lado derecho es más largo que el lado izquierdo pulse SIDE SHOT Si el lado izquierdo es más largo que el lado derecho pulse...

Страница 181: ...ector y de una pantalla 1 página 10 4 Realice el ajuste necesario para corregir la distorsión trapezoidal horizontal mediante SIDE SHOT o Pulse SIDE SHOT o de modo que el lado superior de la imagen quede paralelo al lado inferior Si el lado derecho es más largo que el lado izquierdo pulse SIDE SHOT Si el lado izquierdo es más largo que el lado derecho pulse SIDE SHOT Para ajustar la distorsión de ...

Страница 182: ...anual pulse ENTER y a continuación ajuste con M o m de modo que queden paralelos 3 Realice el ajuste de modo que ambos extremos del lado inferior de la imagen se ajusten a los del lado inferior de la pantalla por medio del ajustador y de ZOOM o 8 Pulse el botón FOCUS o para ajustar el enfoque de nuevo Paso 4 Selección del idioma del menú Es posible seleccionar el idioma que se desee entre los trec...

Страница 183: ...amarillo 4 Pulse M o m para seleccionar el menú MENU SETTING y a continuación pulse o ENTER Aparecerá el menú seleccionado 5 Pulse M o m para seleccionar Language y a continuación pulse o ENTER 6 Pulse M o m para seleccionar un idioma y a continuación pulse ENTER El menú aparecerá en el idioma seleccionado Para que el menú desaparezca Pulse MENU MENU Picture Mode Standard Adjust Picture Volume 30 ...

Страница 184: ...royector entrará en el modo de espera En esta sección se describe cómo utilizar el proyector para ver la imagen procedente del equipo conectado También describe cómo seleccionar el modo de pantalla ancha o la calidad de imagen que se desee INPUT LIGHT STANDARD CINEMA DYNAMIC USER 2 PICTURE MODE USER 3 USER 1 MS SLIDE MENU APA LENS VOLUME SIDE SHOT RESET WIDE MODE ENTER 2 4 ON STANDBY Se ilumina en...

Страница 185: ...DBY Se ilumina en verde NTSC 3 58 Video 1 INPUT Para ver la imagen de Pulse INPUT para mostrar El equipo de vídeo conectado a la entrada VIDEO INPUT del proyector Video 1 El equipo de vídeo conectado a la entrada S VIDEO INPUT del proyector S Video 1 El equipo de vídeo RVA componente conectado a la entrada PJ MULTI INPUT mediante el cable de interfaz de señales o la unidad de interfaz opcional ENT...

Страница 186: ...nchufe el cable de alimentación de CA de la toma mural cuando el ventilador deje de funcionar y el indicador ON STANDBY se ilumine en rojo Puede apagar el proyector manteniendo pulsado el interruptor 1 encendido espera durante un segundo aproximadamente en lugar de realizar los pasos antes descritos Selección del modo de pantalla ancha Es posible disfrutar de varios modos de pantalla ancha según l...

Страница 187: ...ción uno a uno sobre una imagen 16 9 comprimida Se muestra en el centro de la pantalla Normal direc Se realiza una asignación uno a uno sobre una imagen de relación de aspecto normal 4 3 Se muestra en el centro de la pantalla Notas Sólo cuando esté seleccionado Zoom o Subtítulo podrá ajustar la posición vertical de la imagen con la opción Posición V del menú AJUSTE DE ENTRADA Sólo cuando esté sele...

Страница 188: ...ualización normales en el hogar CINEMA Seleccione para obtener una imagen suave como de película en ambientes oscuros USER 1 2 y 3 Puede ajustar la calidad de la imagen a su gusto y guardar las configuraciones en la memoria que haya seleccionado del proyector Pulse uno de los botones USER 1 2 ó 3 y a continuación ajuste la imagen utilizando los menús Las configuraciones se guardarán pulse el botón...

Страница 189: ... de señal de entrada Muestra el canal de entrada seleccionado se muestra cuando ningúna señal esté introducida Para ocultar este indicador utilice la opción Estado del menú AJUSTE DE MENÚ Indicador de configuración de señal de entrada Para ENTRAD A Muestra Ordenador Componente o Vídeo GBR Para Digital Muestra Ordenador o Vídeo GBR Para la entrada Video S Video Muestra el ajuste Auto o Sistema de c...

Страница 190: ... MENU Para restablecer elementos ajustados Seleccione el elemento que desea restablecer y a continuación pulse RESET En la pantalla aparecerá Completado y la configuración se restablecerá al valor preestablecido en fábrica Los elementos que es posible restablecer son los siguientes Contraste Brillo Color Tonalidad y Nitidez en Ajustar imagen en el menú CONFIGURACIÓN DE IMAGEN Fase Punto Tamaño H y...

Страница 191: ...r el modo de visualización de la imagen que mejor se adapte al tipo de imagen o al entorno Dinámico Selecciónelo para dar más contraste y más nitidez a la imagen Estándar Recomendado para unas condiciones de visualización normales Selecciónelo también para reducir las irregularidades de la imagen cuando se esté viendo con el modo Dinámico Cine Selecciónelo para obtener una imagen más suave como la...

Страница 192: ...azado sin conversión Progresivo Convierte las señales de vídeo de formato entrelazado a un formato progresivo Film Normalmente seleccione esta opción Reproduce las fuentes de película 2 3 Pull Down con un movimiento suave de la imagen Cuando se introduce una señal de vídeo de formato diferente a 2 3 Pull Down se selecciona automáticamente Progresivo Elementos Descripción Cine Negro Pro Ctrl diafrg...

Страница 193: ...señal de vídeo de la Memoria nº 1 2 3 4 43 ó 44 consulte el diagrama Señales predefinidas no podrá ajustar Trapezoide V o Side Shot en el menú AJUSTE INSTALACIÓN Para ver información detallada consulte Selección del modo de pantalla ancha en la página 28 Elementos Descripción Posición V Ajusta la posición vertical de la imagen en el modo de pantalla ancha Al aumentar el valor de la configuración l...

Страница 194: ... Selecciona la posición de presentación entre Sup izq Inf izq Centro Derecha superior y Derecha inferior Color de menu Selecciona el tono de la presentación de menú entre Blanco y Negro Elementos Descripción Elementos Descripción Trapezoide V Corrige la distorsión vertical trapezoidal de la imagen Auto Normalmente establezca esta posición Manual Establece un valor inferior dirección cuando la part...

Страница 195: ... Alignment Cuando la imagen esté correctamente ajustada la palabra Completado aparecerá en pantalla Notas Cuando APA inteligente está establecido en Sí la función APA se activa automáticamente Pulse el botón APA cuando aparezca la imagen en todo el área de pantalla del ordenador Si hay bordes negros alrededor de la imagen la función APA no se activará correctamente y es posible que la imagen se ex...

Страница 196: ...uier tipo excepto datos protegidos por copyright que requieren la tecnología de protección de copyright MagicGate Memory Stick compatible con MagicGate alta velocidad de transferencia de datos Está equipado con la tecnología de protección de copyright MagicGate y permite la transferencia de datos a alta velocidad Este Memory Stick puede utilizarse con todos los productos compatibles con Memory Sti...

Страница 197: ...te no es compatible con la función de seguridad de control de acceso El funcionamiento de este dispositivo se ha demostrado con Memory Stick de 1 GB de capacidad máxima No se garantiza el funcionamiento de Memory Stick PRO más allá de esta capacidad Notas sobre Memory Stick Duo Para utilizar un Memory Stick Duo con el proyector instálelo en el adaptador Memory Stick Duo antes de insertarlo en el p...

Страница 198: ...on DCF comprimidos en el formato JPEG Joint Photographic Experts Group extensión jpg Archivos de imagen con formato MPEG1 grabados por productos Sony MPEG MOVIE MPEG MOVIE AD MPEG MOVIE EX MPEG MOVIE HQ MPEG MOVIE HQX MPEG MOVIE CV VAIO Giga pocket equivalente a CD de vídeo Antes de utilizar un Memory Stick Cuando establezca la pestaña de protección de escritura del Memory Stick en LOCK no podrá g...

Страница 199: ...das de datos realice copias de seguridad de los datos con frecuencia Sony no será responsable en ningún caso de las pérdidas de datos que puedan producirse La grabación no autorizada puede ir en contra de lo establecido por las leyes de copyright Sony puede modificar o cambiar el software de aplicación del Memory Stick sin previo aviso Memory Stick Duo y son marcas comerciales de Sony Corporation ...

Страница 200: ...trar el menú de índice seleccione una miniatura y pulse ENTER El menú que se muestra en la pantalla de índice permite realizar las siguientes operaciones Mostrar un archivo de imagen en modo de pantalla completa Ejecutar de la presentación de diapositivas Proteger un archivo de imagen importante Rotar un archivo de imagen sólo imágenes estáticas Registrar el archivo de imagen inicial sólo imágenes...

Страница 201: ... de imagen de una imagen estática Si desea visualizar otro archivo de imagen cuando la carpeta actual contiene múltiples archivos de imagen pulse Si pulsa MS SLIDE en el menú de configuración de imagen la pantalla volverá a Inicio Memory Stick Inicio Memory Stick Diapos Opción Seleccionar carpeta Filtrar Imagen estática Tamaño 1024x768 Num 123 1234 Fecha 15 JUL 2003 12 34 Archivo 100MSDCF SJP0001 ...

Страница 202: ...uestre el Inicio Memory Stick 1 página 42 Tamaño 320x240 Num 1 1234 Fecha 15 JUL 2003 12 34 Archivo SJP0001 MPG Ant Pant Completa Menú Volver NEXT Información Sí Seleción de audio Protec Borrar Cerrar I D Menú de configuración de imagen de un archivo de película Resolución Fecha Nombre y formato del archivo Icono Película Aparece cuando un archivo está protegido Orden número total de archivos de i...

Страница 203: ...imagen de película se reproduce automáticamente y después de la reproducción se muestra la siguiente diapositiva Cuando lo establezca en Manual utilice el botón para avanzar una diapositiva Para volver a la diapositiva anterior utilice el botón La imagen de película no se reproduce y se muestra el primer cuadro de la imagen Para reproducir las imágenes de película consulte Reproducción de imágenes...

Страница 204: ...r una de las imágenes de índice a pantalla completa Para mostrar una imagen de película a pantalla completa consulte Reproducción de imágenes de película en la página 47 1 Muestre el Inicio Memory Stick 1 página 42 2 Pulse M m o para seleccionar la imagen estática que desea mostrar a pantalla completa y a continuación pulse ENTER Aparecerá el menú de índice del archivo de imagen estática 3 Pulse M...

Страница 205: ...en de película que desea mostrar y a continuación pulse ENTER Aparecerá el menú de índice del archivo de película Sugerencia Cuando seleccione una imagen de película en la pantalla de índice no estarán disponibles Rotar ni Iniciar 3 Pulse M o m para seleccionar Repr de películas y a continuación pulse ENTER Aparecerá el Reproductor de películas INPUT LIGHT STANDARD CINEMA DYNAMIC USER 2 PICTURE MO...

Страница 206: ...roducción Las películas MPEG1 que es posible utilizar son MPEG MOVIE AD EX HQ HQX CV MPEG1 de VAIO Giga pocket equivalente a CD de vídeo Para detener la reproducción Pulse m para seleccionar x Para reproducir una película a pantalla completa Pulse M o m para seleccionar Pant Completa en el Reproductor de películas y a continuación pulse ENTER La imagen se ampliará para llenar toda la pantalla y se...

Страница 207: ...mágenes estáticas individuales o archivos de imagen de película además de otras carpetas Cuando muestre un archivo de imagen almacenado en un Memory Stick deberá seleccionar carpetas Para desactivar el modo de cámara digital 1 Muestre el Inicio Memory Stick 2 Pulse M o m para seleccionar Seleccionar carpeta y a continuación pulse ENTER 3 Pulse M o m para seleccionar Modo cámara digi y a continuaci...

Страница 208: ... de una imagen estática 3 Pulse M o m para seleccionar Rotar y a continuación pulse ENTER 4 Pulse M o m para seleccionar la dirección de rotación a la derecha o a la izquierda y a continuación pulse ENTER La imagen rota 90 cada vez que se pulsa el botón ENTER INPUT LIGHT STANDARD CINEMA DYNAMIC USER 2 PICTURE MODE USER 3 USER 1 MS SLIDE MENU APA LENS RESET WIDE MODE ENTER 2 4 Filter Still Inicio M...

Страница 209: ...ck esté establecida en LOCK no podrá rotar las imágenes almacenadas en el Memory Stick Protección de una imagen importante Es posible proteger una imagen estática para evitar que se borre accidentalmente 1 Muestre el Inicio Memory Stick 1 página 42 2 Pulse M m o para seleccionar la imagen que desea proteger y a continuación pulse ENTER Aparecerá el menú de índice Volver Información Protec Rotar In...

Страница 210: ...ortante Protección de una imagen de película en el Reproductor de películas 1 Siga los pasos 1 a 3 de Reproducción de imágenes de película 1 página 47 para mostrar el Reproductor de películas en la pantalla 2 Pulse M o m para seleccionar Menú y a continuación pulse ENTER Aparecerá el menú de configuración de imagen de película 3 Siga los pasos 3 y 4 de Protección de una imagen importante Filter St...

Страница 211: ... de inicio y a continuación pulse ENTER Aparecerá el menú de índice de una imagen estática 3 Pulse M o m para seleccionar Iniciar y a continuación pulse ENTER 4 Pulse M o m para seleccionar Intro y a continuación pulse ENTER La marca de inicio aparece la pantalla de índice Puede registrar una imagen como imagen de inicio por Memory Stick Para registrar una imagen estática a pantalla completa como ...

Страница 212: ...pulse ENTER Original selecciónelo para utilizar la imagen original almacenada en el proyector Ésta es la configuración de fábrica Personal selecciónelo para utilizar la imagen registrada en la pantalla de índice y almacenada en el Memory Stick 1 página 53 No selecciónelo cuando no establezca el inicio Notas Cuando desee borrar la pantalla de inicio mientras se muestra pulse M m o ENTER Cuando esté...

Страница 213: ...Sí y pulse ENTER Sel Img para borrar la imagen seleccionada Todo Im para borrar todas las imágenes de la carpeta seleccionada Cerrar si no va a borrar la imagen Notas No es posible borrar el archivo protegido 1 página 51 Para borrarlo libere la protección de ese archivo Cuando la pestaña de protección contra escritura del Memory Stick está establecido en LOCK no es posible borrar las imágenes del ...

Страница 214: ... menú de configuración de imagen de película 3 Pulse M o m para seleccionar Borrar y a continuación pulse ENTER 4 Pulse M o m para seleccionar el elemento deseado y a continuación pulse ENTER Cuando se muestre Eliminado el archivo seleccionado Aceptar seleccione Sí y pulse ENTER Nota Si borra un archivo con Modo cámara digi establecido en Sí es posible que se borren otros archivos 1 página 42 Orde...

Страница 215: ...n lugar de la fecha de grabación Visualización de imágenesestáticaso imágenes de película Es posible elegir y mostrar sólo las imágenes estáticas o sólo las imágenes de película almacenadas en un Memory Stick 1 Muestre el Inicio Memory Stick 1 página 42 Nota Establezca Modo cámara digi en No antes de la operación 1 página 49 Filter Still Inicio Memory Stick Diapos Opción Seleccionar carpeta Tamaño...

Страница 216: ...cer y a continuación pulse ENTER Cuando se selecciona Filtrar la configuración seleccionada Imagen estática o Película se indica en Inicio Memory Stick Filter Still Inicio Memory Stick Diapos Opción Seleccionar carpeta Tamaño Num Fecha Archivo Archivo Configuración Memory Stick Cerrar Ordenar Filtrar No Orden por nombre Filter Still Inicio Memory Stick Diapos Opción Seleccionar carpeta Archivo Con...

Страница 217: ...cerá el menú de configuración de opción 3 Pulse M o m para seleccionar Memory Stick Aparecerá la información del Memory Stick que se está utilizando Para volver a Inicio Memory Stick Pulse M o m para seleccionar Cerrar INPUT LIGHT STANDARD CINEMA DYNAMIC USER 2 PICTURE MODE USER 3 USER 1 MS SLIDE MENU APA LENS RESET WIDE MODE ENTER 2 3 Filter Still Inicio Memory Stick Diapos Opción Seleccionar car...

Страница 218: ...cio Memory Stick antes de inicializar el Memory Stick Seleccione Cerrar en el paso 4 Se restablece Inicio Memory Stick Notas Al inicializar el Memory Stick las imágenes protegidas también se borran Cuando se inicializa un Memory Stick con la pestaña de protección contra escritura establecida en LOCK aparece el mensaje Memory Stick bloqueado Durante la inicialización del Memory Stick no es posible ...

Страница 219: ...ente o Vídeo GBR para Sel señ ent A en el menú AJUSTE según la señal de entrada 1 página 35 El color de la imagen procedente del conector PJ MULTI es extraño c Seleccione Ordenador Componente o Vídeo GBR para Sel señ ent A en el menú AJUSTE según la señal de entrada 1 página 35 El balance de color es incorrecto c Ajuste la imagen en la opción Ajustar imagen del menú CONFIGURACIÓN DE IMAGEN 1 págin...

Страница 220: ... Stick 1 página 40 c El Memory Stick está averiado Utilice otro Memory Stick Las miniaturas no se muestran c Las imágenes son de formato JPEG pero no compatibles con DCF Utilice las imágenes compatibles con DCF No es posible mostrar los archivos de imágenes estáticas con formato JPEG que se encuentran almacenados en un Memory Stick c Establezca Filtrar del menú Opción en Imagen estática o No No es...

Страница 221: ... dañado c Consulte con personal especializado de Sony c No hay señal de entrada en la entrada seleccionada Compruebe las conexiones 1 página 14 No aplicable c Pulse el botón adecuado x Ningún Memory Stick c Inserte correctamente el Memory Stick en la ranura Memory Stick No se puede mostrar ningún archivo c Está seleccionado el modo de cámara digital aunque no contiene ningún archivo de imagen comp...

Страница 222: ...iga la unidad de lámpara asegúrese de que la mantiene en posición horizontal y a continuación tire hacia arriba No incline la unidad de lámpara Si tira de la unidad de lámpara para extraerla mientras está inclinada y si la lámpara se rompe los trozos pueden esparcirse causando heridas 1 Coloque una hoja paño de protección debajo del proyector Dé la vuelta al proyector de forma que vea la parte inf...

Страница 223: ...a ni permita que se introduzcan líquidos ni objetos Asegúrese de utilizar la lámpara de proyector LMP H180 para la sustitución Si utiliza otra lámpara que no sea la LMP H180 el proyector puede sufrir averías No olvide apagar el proyector y desenchufar el cable de alimentación antes de sustituir la lámpara Sustitución del filtro de aire El filtro de aire debe sustituirse periódicamente Cuando apare...

Страница 224: ...e Sistema de color Sistema NTSC3 58 PAL SECAM NTSC4 43 PAL M PAL N de conmutación automática manual Señales de vídeo aceptables 15 kHz RVA componente 50 60 Hz Componente progresivo 50 60 Hz DTV 480 60i 575 50i 480 60p 575 50p 720 60p 720 50p 1080 60i 1080 50i 1080 24PsF Vídeo compuesto Vídeo Y C Señales de ordenador aceptables fH 19 a 72 kHz fV 48 a 92 Hz Resolución máxima XGA 1024 768 fV 85 Hz 12...

Страница 225: ...e sincronización vertical 1 5 Vp p alta impedancia positiva negativa Memory Stick Ranura 1 General Dimensiones 345 148 369 mm 13 5 8 5 7 8 14 5 8 pulgadas ancho alto profundidad Masa Aprox 5 4 kg 11 lb 14 oz Requisitos de alimentación CA 100 a 240 V 2 9 1 1 A 50 60 Hz Consumo de energía Máx 260 W Modo de espera 5 W Temperatura de funcionamiento 0ºC a 35ºC 32ºF a 95ºF Humedad de funcionamiento 35 a...

Страница 226: ...a pantalla pulgadas 150 180 200 250 300 a 6 0 19 7 7 3 24 0 8 1 26 6 10 1 33 1 12 1 39 7 b 7 0 23 0 8 4 27 6 9 4 30 8 11 7 38 4 14 1 46 3 c 0 8 2 6 1 0 3 3 1 1 3 6 1 4 4 6 1 7 5 6 d 1 3 4 3 1 6 5 2 1 7 5 6 2 2 7 2 2 6 8 5 a e f b c d 12 12 f Pantalla Proyector Tamaño de la pantalla pulgadas 40 60 80 100 120 a 1 6 5 2 2 4 7 9 3 2 10 5 4 0 13 1 4 8 15 7 b 1 8 5 9 2 8 9 2 3 7 12 1 4 7 15 4 5 6 18 4 c...

Страница 227: ...rte frontal de la carcasa hasta el centro de la lente de conversión a Distancia entre la pantalla y el centro del objetivo b Distancia desde el suelo hasta el centro del objetivo c Distancia desde el suelo hasta la parte inferior del proyector x Libre Centro del objetivo 35 8 mm 17 16 pulgadas Cuando se utiliza la lente de conversión VPLL CW10 Distancia desde la parte frontal de la carcasa hasta e...

Страница 228: ...ión SS Tamaño de la pantalla a mínimo SS 26 67 0 8788 78 1 025 a máximo SS 33 6857998 0 8788 80 103586 0 975 b x SS 0 8788 5 516 c x SS 0 8788 5 516 96 3 SS pulgadas 40 60 80 100 a Valores estándar 2250 88 5 8 3480 137 1 8 4720 185 7 8 5950 234 3 8 b x 251 x 10 x 377 x 14 7 8 x 502 x 19 7 8 x 628 x 24 3 4 c x 347 x 13 3 4 x 473 x 18 5 8 x 598 x 23 5 8 x 724 x 28 1 2 SS pulgadas 40 60 80 100 a Valo...

Страница 229: ...stalación SS Tamaño de la pantalla a SS 54 15 0 7240 211 9761 x b SS 0 7240 5 516 SS pulgadas 40 60 80 100 120 150 180 200 250 300 a Mínimo 2190 86 1 4 2940 115 7 8 3700 145 3 4 4450 175 1 4 5580 219 3 4 6720 264 5 8 7470 294 1 4 9360 368 5 8 11250 443 Máximo 2640 104 3550 139 7 8 4460 175 5 8 5370 211 1 2 6730 265 8090 318 5 8 8990 354 11260 443 3 8 13530 532 3 4 b x 457 x 18 x 609 x 24 x 762 x 3...

Страница 230: ...173 3 4 5530 217 3 4 6650 261 7 8 7400 291 3 8 9270 365 1 8 11130 438 1 4 x b 377 b 14 7 8 b 502 b 19 7 8 b 628 b 24 3 4 b 753 b 29 3 4 b 942 b 37 1 8 b 1130 b 44 1 2 b 1255 b 49 1 2 b 1569 b 61 7 8 b 1883 b 74 1 4 b Cuando se utiliza el PSS 610 ajustable con 243 268 293 343 368 393 mm SS pulgadas 40 60 80 100 120 150 180 200 250 300 a Mínimo 2190 86 1 4 2940 115 7 8 3700 145 3 4 4450 175 1 4 5580...

Страница 231: ... Brillo z z z z Color z excepto para B N z z Tonalidad z sólo NTSC3 58 4 43 excepto para B N z z Nitidez z z z Nivel de negro z z z Corr Gamma z z z z Temp de color z z z z DDE z z sólo para números de memoria predefinida 1 2 3 4 5 45 y 49 z sólo para números de memoria predefinida 1 2 3 4 5 45 y 49 Cine Negro Pro Ctrl diafrg z z z z Control lámp z z z z Elementos Señal de entrada Vídeo o S vídeo ...

Страница 232: ...6 667 H neg V neg 864 x 13 VGA VESA 72 Hz 37 861 72 809 H neg V neg 832 x 14 VGA VESA 75 Hz 37 500 75 000 H neg V neg 840 x 15 VGA VESA 85 Hz 43 269 85 008 H neg V neg 832 x 16 800 600 SVGA VESA 56 Hz 35 156 56 250 H pos V pos 1024 x 17 SVGA VESA 60 Hz 37 879 60 317 H pos V pos 1056 x 18 SVGA VESA 72 Hz 48 077 72 188 H pos V pos 1040 x 19 SVGA VESA 75 Hz 46 875 75 000 H pos V pos 1056 x 20 SVGA VE...

Страница 233: ...jetivo Orificios de ventilación escape 1 página 8 Indicador POWER SAVING 1 página 36 Indicador ON STANDBY 1 página 20 Interruptor 1 encendido espera 1 página 20 Botón INPUT 1 página 27 Botón FOCUS 1 página 21 Ranura Memory Stick 1 página 41 Botón de ajuste del ajustador 1 página 20 Indicador de acceso a Memory Stick 1 página 41 Detector frontal de control remoto Botón M m flecha 1 página 25 Botón ...

Страница 234: ... CR tipo fonográfico Clavija AC IN Conector PJ MULTI INPUT múltiple de 32 terminales 1 página 17 Conector DVI entrada digital 1 página 16 Bloqueo de seguridad Se conecta a un cable opcional de seguridad Kensington Dirección de página Web http www kensington com Conector HDMI 1 página 16 Conector USB Se conecta a un ordenador con el cable USB Ay mini B no suministrado cuando se realiza la Corr Gamm...

Страница 235: ... Ubicación de los controles Parte inferior Orificios de ventilación aspiración 1 página 8 Orificios de ventilación aspiración 1 página 8 Cubierta de la lámpara 1 página 64 Cubierta del filtro de aire 1 página 65 ...

Страница 236: ...NEMA DYNAMIC USER 2 PICTURE MODE USER 3 USER 1 MS SLIDE MENU APA LENS VOLUME SIDE SHOT RESET WIDE MODE ENTER Botón LIGHT Ilumina los botones del mando a distancia Botón SIDE SHOT 1 página 22 Botón VOLUME 1 página 48 Transmisor de infrarrojos Botón MS SLIDE 1 página 44 Interruptor 1 encendido espera 1 página 20 Botón INPUT 1 página 20 Botones M m flecha ENTER 1 página 25 Botón RESET 1 página 32 Bot...

Страница 237: ...establecida 37 74 Memory Stick borrar una imagen 55 inicialización 60 iniciar 53 insertar 41 Menú de configuración de imagen 42 Menú de índice 42 página inicial Memory Stick 42 presentación de diapositivas 44 protección 51 rotar 50 Mensaje advertencia 63 indicación de precaución Memory Stick 64 precaución 63 Menú borrar la presentación del menú 32 funcionamiento 31 restablecer 32 Menú AJUSTE 35 Me...

Страница 238: ...Índice ES 80 Otros V Volumen 33 W WIDE MODE 28 ...

Страница 239: ......

Страница 240: ...Sony Corporation Printed in Japan Printed on 100 recycled paper ...

Отзывы: