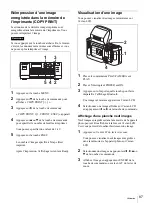
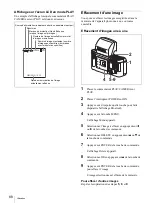
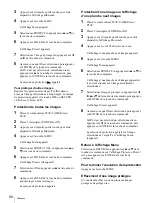
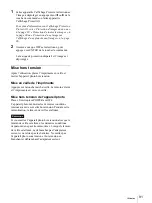
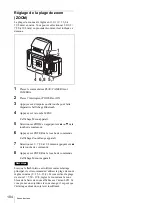
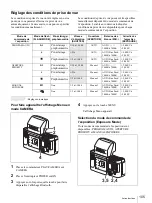
background image

Menu

92

Menu

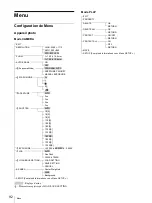
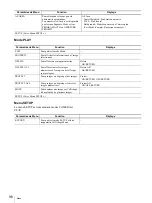
Configuration de Menu

Appareil photo

Mode CAMERA

 : Réglage d’usine

 : Éléments enregistrés par LOAD/SAVE SETTING

Mode PLAY

EXIT

RESOLUTION

HIGH: 2288 

×

 1712

MID: 1280 

×

 960

STD: 832 

×

 624

ZOOM

f = 7.50 à 19.8 mm

f = 15.6 à 19.8 mm

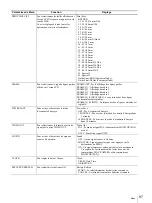
AUTO ERASE

ON

OFF

(Exposure Mode)

PROGRAM AUTO

APERTURE PRIORITY

MANUAL EXPOSURE

 FLASH MODE

A

M

M

APERTURE

AUTO

Fx.x

Fx.x

Fx.x

Fx.x

 SHUTTER

AUTO

1/2[S]

1/4[S]

1/8[S]

1/15[S]

1/30[S]

1/60[S]

1/100[S]

1/125[S]

1/250[S]

1/500[S]

1/750[S]

1/1000[S]

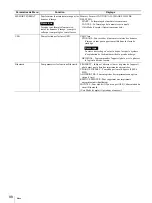
 EXPOSURE

+2.00EV à ±0.00EV à 

2.00EV

 W.B.

AUTO

One Push 

3000K à 7000K

 LOAD/SAVE SETTING

LOAD SETTING

SAVE SETTING

CANCEL

AE AREA

Center Weighted

FACE

Background

SETUP (Pour plus d’informations voir « Menu SETUP ».)

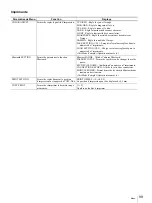
EXIT

PROPERTY

DELETE

OK

RETURN

DELETE ALL

OK

RETURN

PROTECT

ON/OFF

RETURN

PROTECT ALL

ON

OFF

RETURN

MOVE

SETUP (Pour plus d’informations voir « Menu SETUP ».)

Содержание UPX-C200

Страница 1: ...g System 2003 Sony Corporation UPX C200 Operating Instructions Basic Operations Page 2 ______________ GB Mode d emploi opérations de base Page 69 __________________ FR Manual de instrucciones Operaciones básicas página 139_______ ES ...

Страница 2: ...e dealer or experienced radio TV technician for help You are cautioned that any changes or modifications not expressly approved in this manual could void your authority to operate this equipment This device requires shielded interface cables to comply with FCC emission limits The shielded interface cable recommended in this manual must be used with this equipment in order to comply with the limits...

Страница 3: ... Norway Switzerland Liechtenstein and Lithuania Para clientes na Europa A Sony Corporation declara que a DKC C200X e a UP DX100 estáo em conformidade com os requisitos essenciais e outras disposições importantes da Directiva 1999 5 CE Para mais informações aceda ao URL apresentado em seguida http www compliance sony de Este produto pode ser utilizado nos seguintes países Áustria Bélgica Dinamarca ...

Страница 4: ...tynyt kuningaskunta Islanti Norja Sveitsi Liechtenstein ja Liettua Windows is a registered trademark of Microsoft Corporation in the United States and other countries All other companies and product names mentioned herein may be the trademarks or registered trademarks of their respective companies Furthermore and are not mentioned in each case in this manual Duplication edition or printing of a CD...

Страница 5: ...e Shooting Conditions 37 Setting the Print Size to be Displayed PRINT SIZE LIST 40 Setting the Frame FRAME 40 Setting Power Save Mode POWER SAVE 45 Selecting the Format of the Output Signal VIDEO OUT 46 Selecting Sound During Operation SOUND 46 Selecting the USB Class USB 47 Moving a Picture Displayed on a Nine Picture Multiple Display MOVE 47 Locking the Menu of the Camera 48 Adjusting the Print ...

Страница 6: ...er read and print the image data stored in the computer It is also possible to print different images color and black and white images or different sizes of images on a single sheet of print paper When using this system with a computer refer to Utility Software User s Guide on the supplied CD ROM To operate the system with a computer install the supplied printer driver on the computer For details ...

Страница 7: ...es to be printed Below each image the size number and size is shown D2 D4 D6 and D8 indicate that there are different types of printouts for the same size and X46 shows that the size is available only when the UPC X46 is used When the UPC X46 is used 1 151 101 6 mm X46 Size number Size 2 120 90 mm X46 3 95 70 mm 4 80 60 mm 5 70 53 mm 6 70 50 mm 7 60 40 mm 9 50 48 5 mm 8 54 54 mm 2 2inch 10 47 37 m...

Страница 8: ...Print DLGm 3 95 70 mm 4 80 60 mm 5 70 53 mm 6 70 50 mm 7 60 40 mm 10 47 37 mm 12 45 45 mm 8 54 54 mm 2 2inch 9 50 48 5 mm 11 45 35 mm 13 43 33 mm 14 38 32 mm 15 34 28 mm 16 23 23 mm 20 45 35 mm D4 21 Special 1 70 53 mm 47 37 mm 22 Special 2 47 37 mm 43 33 mm Guide Print RGB Guide Print DLGm ...

Страница 9: ...matically adjusted This mode is suitable for indoor portraits and identification shots using the built in flash as the main light source and the shadow clearing flash connected to the camera with a synchronization cord No flash and auto exposure mode The built in flash does not light This mode is suitable for shooting under stable light sources such as studio light video light fluorescent light et...

Страница 10: ...ware License Agreement 1 Reading the Supplied CD ROM Manual The supplied CD ROM includes manuals for basic operations and advanced operations and utility instructions for the UPX C200 in Japanese English French German Spanish Italian Portuguese Russian Chinese and Korea and also the utility software The copies of these manuals are created in PDF Portable Document Format format This manual describe...

Страница 11: ...ium Edition Microsoft Windows 2000 Professional Microsoft Windows XP Home Edition Microsoft Windows XP Professional For details refer to the Utility Software User s Guide Trademarks Intel and Pentium are registered trademarks of Intel Corporation or its subsidiaries in the United States and other countries Microsoft Windows and Windows NT are registered trademarks of Microsoft Corporation in the U...

Страница 12: ... of the camera Then connect the AC power adaptor to a wall outlet Now you can use the camera on AC power Using an AC power adaptor you need not worry about the remaining battery power Note Use the AC power adaptor near the wall outlet If some trouble occurs during operation immediately disconnect the AC power adaptor from the wall outlet to cut power supply Setting the clock frame and power save Y...

Страница 13: ...printing pack for this printer only Always use the print cartridge designed for the size of the print paper you use If you mix cartridges and paper of different types or sizes printing may not be possible or a paper jam or other trouble may occur Do not print on the used print paper Printing an image twice on the same paper will not make the printed image thicker This may even cause a malfunction ...

Страница 14: ...hen re insert it If the ink ribbon is too slack to be loaded wind the ink ribbon in the direction of the arrow to remove the slack If the print cartridge is not loaded when you turn on the printer the lamp lights up Do not touch the ink ribbon or place the print cartridge in a dusty location Fingerprints or dust on the ink ribbon may result in imperfect printing Do not change the print cartridge w...

Страница 15: ...eed automatically the lamp lights Pull out the paper tray and check for a paper jam When adding print paper to a partially full tray make sure that the total number of sheets does not exceed 25 for the UPC X46 or 30 for the UPC X34 Do not place different types or sizes of paper in the tray Otherwise a paper jam or malfunction may occur Do not write or type on the printing surface of the paper befo...

Страница 16: ... are described in Various Functions on page 32 or in the Operating Instructions Advanced Operations stored on the supplied CD ROM Preparations 1 Turn on the printer Check that Ready BT RSSI appears on the operation display 2 Set the PLAY CAMERA switch to CAMERA 3 Set the POWER switch of the camera to ON The camera starts searching for the printer and DISCOVERING appears on the LCD When the camera ...

Страница 17: ... subject and adjust the frame by monitoring the LCD of the camera Zooming is available for easily adjusting the frame by pressing the zoom lever For details see Setting the Zoom Range ZOOM on page 36 You can display the guidelines for adjusting the frame For details on the guidelines see Setting the Frame FRAME on page 40 2 Press the release button halfway until the green dot appears at the top of...

Страница 18: ... of halfway the auto focus function will be activated and you can take a picture If SOUND of the SETUP menu is set to SHUTTER or ON a sound is heard when the release button is pressed halfway and when pressed again the rest of the way Note The auto focus function may not work properly in any of the situations below The subject lacks enough contrast The subject includes an extremely bright object T...

Страница 19: ... of the CANCEL button changes to gray Then TRANSMISSION END PUSH MENU KEY TO CONITNUE appears Note Do not touch any button on the camera while the CANCEL button is in gray The number of picture set in step 4 is printed 3 Press the MENU or control button on the camera and a quick review picture appears on the LCD in CAMERA mode or a picture stored in memory in PLAY mode Selection of the print size ...

Страница 20: ...emory To print them view and select a picture to be printed then perform the procedures for printing For viewing a picture stored in memory see Viewing a Picture on page 21 Reprinting a Picture Stored in Memory of the Printer COPY PRINT The data of the last picture printed are stored in memory of the printer You can reprint the picture Note If you press the on standby button the lamp goes out and ...

Страница 21: ...ory on the LCD 2 Select a picture by pressing b B v or V of the control button 3 Display a picture by pressing ENTER of the control button or with the T side of the zoom lever Display on the LCD in PLAY mode An example of the display when the PLAY CAMERA switch is set to PLAY is shown below 1 2 4 MENU ENTER MONITOTR PAL W T LCD VIDEO OUT PLAY CAMERA PRINTER PRINT PRINTER ALARM COLOR B W SIZE STD 0...

Страница 22: ...nu display appears 5 Select DELETE ALL by pressing v or V of the control button 6 Press ENTER of the control button The Delete All display appears 7 Select OK by pressing v of the control button 8 Press ENTER of the control button to delete the all pictures The all pictures other than those protected are deleted from the memory Deleting a picture on the nine picture multiple display 1 Set the PLAY...

Страница 23: ...nd press ENTER of the control button If not selected select ON by pressing v of the control button and press ENTER of the control button The protect mark appears To protect the other pictures Repeat steps 7 and 8 above When the selected picture has been protected the protect mark appears and the OFF or RETURN button is displayed on the LCD Protecting all pictures 1 Set PLAY CAMERA switch to PLAY 2...

Страница 24: ...picture whose protection is to be released by pressing b or B of the control button or display the Protect All display For details on displaying the Protect or Protect All display see Protecting pictures one by one on page 23 Protecting all pictures on page 23 or Protecting a picture on the nine picture multiple display on page 23 2 Check that OFF is selected and press ENTER of the control button ...

Страница 25: ...RE FLASH MODE A M M APERTURE AUTO Fx x Fx x Fx x Fx x SHUTTER AUTO 1 2 S 1 4 S 1 8 S 1 15 S 1 30 S 1 60 S 1 100 S 1 125 S 1 250 S 1 500 S 1 750 S 1 1000 S EXPOSURE 2 00EV to 0 00EV to 2 00EV W B AUTO One Push 3000K to 7000K LOAD SAVE SETTING LOAD SETTING SAVE SETTING CANCEL AE AREA Center Weighted FACE Background SETUP For details see SETUP menu EXIT PROPERTY DELETE OK RETURN DELETE ALL OK RETURN ...

Страница 26: ...45 mm 13 43 33 mm 14 38 32 mm 15 34 28 mm 16 23 23 mm 17 80 60 mm D2 X46 18 60 40 mm D4 X46 19 47 37 mm D6 X46 20 45 35 mm D4 8 21 Special 1 22 Special 2 Guide Print RGB Guide Print DLGm FRAME FRAME OFF FRAME 1 FRAME 2 FRAME 3 FRAME 4 FRAME 5 LINE1 LINE2 FRAME 6 WIDTH POWER SAVE OFF 3 MINUTES 10 MINUTES VIDEO OUT1 PAL NTSC SOUND OFF SHUTTER ON CLOCK BATTERY REFRESH START CANCEL MEMORY FORMAT START...

Страница 27: ... 0 to 7 GAMMA 7 to 7 SAVE SETTING 1 2 3 LOAD SETTING 1 2 3 Bluetooth SETTING Bluetooth ADDR PASSKEY INPUT PASSKEY INPUT 1 2 3 4 MY DEVICE NAME Sony UP DX100 NONE to 9 CONNECTION RECORD 1 Sony DKC C200X 2 NONE 3 NONE MODULE POWER POWER ON OFF PRINT SETTING PRINT OFFSET 2 1 0 1 2 COPY PRINT COPY PRINT 1 1 to 9 ...

Страница 28: ...nding on the zoom position SHUTTER To select the shutter speed This selection is available only when Exposure Mode is set to MANUAL EXPOSURE Shutter Speed 1 2 S 1 4 S 1 8 S 1 15 S 1 30 S 1 60 S 1 100 S 1 125 S 1 250 S 1 500 S 1 750 S 1 1000 S EXPOSURE To change the exposure setting EV Compensation 2 00EV 1 75EV 1 50EV 1 25EV 1 00EV 0 75EV 0 50EV 0 25EV 0 00EV 0 25EV 0 50EV 0 75EV 1 00EV 1 25EV 1 5...

Страница 29: ...he Menu display PRINT SIZE LIST To select the size shown on the LCD when the SIZE button is pressed Factory setting is that all items can be selected Print Size RETURN 1 151 101 6 mm X46 2 120 90 mm X46 3 95 70 mm 4 80 60 mm 5 70 53 mm 6 70 50 mm 7 60 40 mm 8 54 54 mm 2 2inch 9 50 48 5 mm 10 47 37 mm 11 45 35 mm 12 45 45 mm 13 43 33 mm 14 38 32 mm 15 34 28 mm 16 23 23 mm 17 80 60 mm D2 X46 18 60 4...

Страница 30: ...uilt in memory for image data Note When you format the memory all image data including the protected ones are deleted Memory Format CAUTION ALL IMAGES WILL BE DELETED START Formatting of the memory begins CANCEL Formatting of the memory is canceled Refer to the Operating Instructions Advanced Operations USB Selects the USB class USB Class STORAGE For accessing the built in memory for image data as...

Страница 31: ...justed values stored in memory are loaded Refer to the Operating Instructions Advanced Operations Bluetooth SETTING You can make Bluetooth settings Bluetooth ADDR The Bluetooth address is displayed PASSKEY INPUT A passkey is set or changed MY DEVICE NAME The printer can be assigned a number CONNECTION RECORD The connection record is displayed MODULE POWER The power of the Bluetooth circuits is tur...

Страница 32: ...tes to charge four batteries When the batteries are fully charged the CHARGE lamp goes out 3 Disconnect the battery charger from the wall outlet and remove the batteries Notes Do not charge batteries other than the NH batteries Otherwise the batteries may be damaged Insert the batteries firmly When charging batteries that have not been used for a long period of time charging may stop before they a...

Страница 33: ...Memory effects If a rechargeable battery is discharged and charged repeatedly without being discharged completely the power is temporarily lowered and the operating period may be shortened on some devices This is a passing phenomenon and discharging a battery completely can restore the operating period How the memory effect actually affects operation varies among different devices Note Never refre...

Страница 34: ...lect the display mode of date Y M D M D Y or D M Y by pressing v or V of the control button 4 Set the date and time 1 Select an item to be set by pressing b or B of the control button 2 Set the value by pressing v or V of the control button 5 When all settings are finished select OK by pressing B of the control button 6 Press ENTER of the control button The date and time are set and the Setup disp...

Страница 35: ...e LCD 8 Press ENTER of the control button The Menu display is retrieved Recommended record resolutions The best combination of the resolution and print size Use this resolution if the print size is known a The resolution is too high for the print size It is recommended to use the resolution indicated by for storing the maximum number of pictures in memory f The resolution is a little lower for the...

Страница 36: ...he control button The Zoom Range display appears 7 Select f 7 50 to 19 8 mm by pressing v of the control button 8 Press ENTER of the control button The Menu display is retrieved Note When the built in flash is used as the main lighting it is recommenced to use the factory set zoom range f 15 6 19 8 If you use a zoom range of f 7 50 19 8 be sure to set the zoom to within the blue zone of the zoom b...

Страница 37: ...RA mode on page 37 Exposure control mode Flash mode FLASH MODE Prelighting prephotometry Shutter speed SHUTTER Aperture APERTURE White balance W B Exposure revise EXPOSURE PROGRAM AUTO A Prelighting prephotometry 1 30 to 1 1000 AUTO AUTO 3000K to 7000K 2 00 EV to 2 00 EV Prelighting 1 250 AUTO AUTO One Push 3000K to 7000K 2 00 EV to 2 00 EV Prephotometry 1 2 to 1 1000 AUTO AUTO One Push 3000K to 7...

Страница 38: ...omatic exposure control A Auto flash Forced flash No flash For manual exposure control M Forced flash M No flash 5 Press ENTER of the control button The selected flash mode is set and the Menu display is retrieved Making the aperture setting APERTURE When the exposure mode is set to APERTURE PRIORITY or MANUAL EXPOSURE the aperture setting can be made manually The aperture values vary depending on...

Страница 39: ...ee Displaying the Menu display in CAMERA mode on page 37 2 Select W B by pressing v or V of the control button 3 Press ENTER of the control button The White Balance display appears 4 Select the method for adjusting the white balance by pressing v or V of the control button AUTO The white balance is adjusted automatically One Push The white balance is adjusted for the lighting conditions when this ...

Страница 40: ...ZE button gray The display of the size toggles between black and gray each time you press ENTER Note The Guide Print RGB and Guide Print DLGm are always displayed on the LCD You cannot set them not to be displayed 6 When setting is finished select RETURN by pressing v or V of the control button 7 Press ENTER of the control button The Setup display is retrieved Setting the Frame FRAME Guidelines fo...

Страница 41: ...play the Setup display For details on displaying the Setup display see Displaying the Setup display on page 34 2 Select FRAME by pressing v or V of the control button 3 Press ENTER of the control button The frame select display appears 4 Select FRAME 1 FRAME 2 FRAME 3 or FRAME 4 by pressing v or V of the control button The guidelines for the selected frame appear on the LCD 5 Press ENTER of the co...

Страница 42: ... 2 13 5 9 16 37 5 11 2 15 5 5 8 34 5 13 8 25 5 11 16 11 5 15 32 38 5 19 16 13 5 9 16 30 5 11 4 7 18 D4 60 23 8 40 15 8 11 0 7 16 33 0 15 16 13 0 17 32 30 5 11 4 22 5 29 32 9 0 3 8 34 5 13 8 11 0 7 16 27 0 11 8 8 54 21 4 54 21 4 5 5 7 32 37 5 11 2 7 5 5 16 34 5 13 8 25 5 11 16 3 5 5 32 38 5 19 16 5 5 7 32 30 5 11 4 9 50 2 48 5 115 16 6 0 1 4 33 0 15 16 8 0 5 16 30 5 11 4 22 5 29 32 4 0 3 16 34 5 13...

Страница 43: ... the control button 6 Press ENTER of the control button The Setup display is retrieved Size of printouts for FRAME 5 At the factory LINE1 is set to 66 and LINE2 is set to 242 The values for c and d are obtained by multiplying the value in F with the values of LINE1 and LINE2 as shown below c LINE1 F d LINE2 LINE1 F If you select Size No 10 and the guidelines are placed at the factory setting posit...

Страница 44: ...e size 10 with the factory setting position the size to be printed is as follows g 112 0 18 20 2 mm Note The value G is rounded so that the calculated values may not indicate the exact ones It is recommended to measure the size of the printouts to obtain the exact value Tolerance 3 11 20 D4 8 45 113 16 35 17 16 7 0 9 32 27 0 11 8 0 15 12 45 113 16 45 113 16 3 5 5 32 33 0 15 16 0 19 13 43 13 4 33 1...

Страница 45: ...age 34 2 Select POWER SAVE by pressing v or V of the control button 3 Press ENTER of the control button The Power Save display appears 4 Select the time for activation of power save mode by pressing v or V of the control button OFF Power save mode is not set 3 MINUTES The camera enters the power save mode when three minutes have elapsed 10 MINUTES The camera enters the power save mode when ten min...

Страница 46: ... monitoring on the LCD VIDEO OUT For monitoring on the connected video monitor Selecting Sound During Operation SOUND When you operate the camera you can be prompted or notified with the sound if you wish 1 Display the Setup display For details on displaying the Setup display see Displaying the Setup display on page 34 2 Select SOUND by pressing v or V of the control button 3 Press ENTER of the co...

Страница 47: ...re stored in the camera s memory or if folders or files stored in the camera are deleted or renamed when the camera is connected as the storage class normal shooting playback or data transmission may not be obtained Never perform such operations Moving a Picture Displayed on a Nine Picture Multiple Display MOVE A picture on a nine picture multiple display can be moved to another position 1 Set the...

Страница 48: ...PLAY mode Then you can prevent unintended changes of the menu settings by careless operation However only the exposure can still be changed by pressing v or V of the control button Locking the menu Press and hold the MENU button for more than three seconds The Menu display is turned off and the lock mark appears When you press the MENU button the Menu display does not appear but the lock mark appe...

Страница 49: ...item is as follows CYN RED Pressing b gives the picture more cyan while pressing B makes it more reddish MAG GRN Pressing b gives the picture more magenta while pressing B makes the picture more greenish YEL BLU Pressing b makes the picture more yellowish while pressing B makes the picture more bluish DARK Contrast in the dark areas is adjusted Pressing B increases the darkness LIGHT Contrast in t...

Страница 50: ...ions such as COLOR ADJUST setting saving of adjusted values or retrieving of stored values are completed press the MENU button The display returns to the Ready display Adjusting the Printing Location PRINT SETTING Adjust so that a printed image is correctly located on the print paper when the UPC X46 is used The printing location can be shifted by 0 5 mm 1 Turn on the printer 2 Press the MENU butt...

Страница 51: ... even if the Bluetooth device is in a bag or if there are obstacles between the devices Also the Bluetooth wireless technology has advanced security functions such as scrambled frequencies and data encryption When using the Bluetooth function the distance between the camera and the printer you intend to connect must be within 10 m 33 feet without obstacles 1 The Bluetooth trademarks are owned by t...

Страница 52: ...trol button The passkey currently set appears on the PASSKEY INPUT display 7 Press the EXEC button To exit the menu operation press the MENU button Changing the passkey settings You can change the passkey as required On the UPX C200 and separately available UP DX100 Digital Photo Printer the same passkey has been set at the factory For communication security it is recommended to change the passkey...

Страница 53: ...lected then press ENTER of the control button The lamp goes dark To turn off the lamp of the printer 1 Press the MENU button 2 Press V of the control button to display Bluetooth SETTING 3 Press B of the control button Bluetooth ADDR None appears 4 Press V of the control button to display MODULE POWER 5 Press B of the control button 6 Press b or B of the control button to set the POWER to OFF 7 Pre...

Страница 54: ...ence of checking the subject To adjust the picture quality on the monitor use the adjustment features on the monitor side Note When you connect a video monitor to the VIDEO OUT jack with VIDEO OUT of the menu set to PAL you have to set the MONITOR PAL switch to VIDEO OUT to view a picture on the video monitor E RELEASE jack minijack Connect a remote commander The same action is obtained as if the ...

Страница 55: ...the LCD side When the subject is sitting the camera position has to be low to keep the lens and the subject s eyes at the same level In such a case rotating the grip on the LCD side allows you to hold the camera in a natural posture Note When turning the grip do not apply excessive force at the end of rotation Be sure to turn the grip gently Avoid turning the grip frequently to avoid wear on the r...

Страница 56: ...ew display press the MENU button The PRINT button is enabled when a quick review picture or a playback picture is displayed on the LCD F PRINTER ALARM lamp Lights when some trouble occurs on the printer When multiple printers are used the status of the printer selected with the PRINTER button is indicated Check the printer G Zoom lever 17 19 When the PLAY CAMERA switch is set to CAMERA Adjusts the...

Страница 57: ...AY CAMERA switch is set to PLAY press to select a picture In MENU operation press to select a menu item and to settle the selection L MENU button 17 34 Press to display the Menu display Press it again to disappear the Menu or layout display M Standby lamp 17 The lamp is lit or flashing to indicate the following conditions When the PLAY CAMERA switch is set to CAMERA Flashing in red Preparing for s...

Страница 58: ...to select a menu item and to settle the selection G Lamps lamp Lights when the Bluetooth function is enabled PRINT lamp Lights while printing is in progress and flashes while the printer is receiving image data lamp Lights if paper runs out the print cartridge is out of ink or cartridge and paper of different types or sizes are mixed ALARM lamp Lights in case of occurrence of problem H Cartridge c...

Страница 59: ...connector 16 Connect to a wall outlet using the supplied AC power cord C USB connector Connect to the USB connector on a computer using the USB cable Note When connecting a computer using a USB cable depending on the type of computer normal operation may not be obtained In such a case use a commercially available USB hub 1 2 3 AC IN ...

Страница 60: ... excessive sunlight extremely high or low temperatures close to sources of strong magnetism close to sources of powerful electromagnetic radiation such as radios or TV transmitters Do not use other electronic equipment near the printer It will not work properly in strong electromagnetic fields Do not place a heavy object such as a monitor on the printer Keep the AC power adaptor away from AM recei...

Страница 61: ...eries in a pocket to warm it up and insert it in your electronic equipment immediately before you start taking shots Have spare batteries handy for two or three times the expected recording time and make trial recording before taking the actual recording If the power may go off although the remaining battery time indicator indicates that the batteries have enough power to operate charge the batter...

Страница 62: ...onitor 1 8 inch cold polisilicone TFT color LCD viewfinder 110 000 pixel Lens f 7 5 to 19 8 mm 2 6 times equivalent to a 36 to 96 mm lens with a 35 mm film camera auto focus F value F2 8 at W to F4 8 at T Input output connectors VIDEO OUT 3 5 mm ø phono jack 1 0 Vp p 75 ohms unbalanced sync negative composite video NTSC color TV system Burst level 0 25 V 0 03 V 10 Sync level 0 29 V 0 03 V 10 PAL c...

Страница 63: ...tage DC 8 4 V 1 5 A in operating mode Operating temperature 5 C to 35 C 41 F to 95 F Storage temperature 20 C to 60 C 4 F to 140 F Dimensions w h d Approx 125 39 62 mm 5 1 9 16 2 1 2 inches including projecting parts Mass Approx 230 g 8 oz Battery Charger Power requirements 100 240 V AC 50 60 Hz Power consumption 8 W Output 1 2 V DC AA 920 mA 2 460 mA 4 Operating temperature 0 C to 35 C 4 F to 95 ...

Страница 64: ...mp is lit in red tCheck the displayed remaining number of pictures that can be taken If zero erase any picture that is not necessary tSet AUTO ERASE to ON Refer to the Operating Instructions Advanced Operations The flash does not light Flash Mode is not set appropriately tSet FLASH MODE in menu to A or M The cord of the external flash is not connected to the camera tConnect the cord of the externa...

Страница 65: ...lock the lens It is dark around the picture Zoom is set higher than 1 3x when the built in flash is used tSet the zoom position to 1 3x or lower Symptom Possible causes Action Cannot operate the printer after the printer is turned on The AC power cord is not connected correctly tConnect the AC power cord to an AC outlet securely Cannot print The print paper and print cartridge do not match tUse th...

Страница 66: ...ting pack Notes Make cleaning only when there are white lines or dots on the print When you can obtain proper printing performances cleaning will not improve the printed picture quality 1 Remove the paper tray from the printer If there is print paper in the tray remove the print paper from the tray 2 Place the protective sheet with the imprint side facing down and the arrow pointing in the same di...

Страница 67: ...d is too low The Bluetooth antenna portion of the printer and or the camera is covered with a hand etc tDo not cover the antenna portion Data transmission speed varies depending on the distance between the printer and the camera obstacles or radio wave conditions Change the position of the printer or set the printer closer to the device Even with the distance between the printer and the desired de...

Страница 68: ... paper and print cartridge do not match tSet the proper size of the print paper for the print cartridge and press the EXEC button REMOVE PRINTS PUSH EXEC The print paper remains in the ejection slot tRemove the paper tray then the print paper Then press the EXEC button PRINTER SERVICE CALL Some trouble has occurred with the printer tContact your Sony service facility or your Sony dealer Bluetooth ...

Страница 69: ...e par ces présentes que les DKC C200X et UP DX100 sont conformes aux exigences essentielles et aux dispositions applicables de la Directive 1999 5 EC Pour les détails accédez à l URL suivante http www compliance sony de Ces produits sont prévu pour être utilisés dans les pays suivants Autriche Belgique Danemark Finlande France Allemagne Grèce Irlande Italie Luxembourg Pays Bas Portugal Espagne Suè...

Страница 70: ... Sélection de la taille d impression affichée PRINT SIZE LIST 108 Sélection du cadre FRAME 108 Activation du mode d économie d énergie POWER SAVE 113 Sélection du format du signal de sortie VIDEO OUT 114 Activation désactivation des signaux sonores d opération SOUND 114 Sélection de la classe USB USB 115 Déplacement d une image affichée sur une planche neuf images MOVE 115 Verrouillage du Menu de ...

Страница 71: ...données d image ainsi stockées et les imprimer Il est également possible d imprimer différents types d image images couleur et noir et blanc ou différentes tailles d image sur une même feuille de papier Lorsque vous utilisez ce système avec un ordinateur consultez le Guide de l utilisateur Utility Software fourni sur le CD ROM Pour utiliser le système avec un ordinateur installez le pilote d impri...

Страница 72: ... Elles n indiquent pas les tailles exactes à imprimer Le numéro de taille et la taille sont indiqués sous chaque image D2 D4 D6 et D8 indiquent qu il y a des types d impression différents pour la même taille et X46 que la taille n est disponible que lorsque l UPC X46 est utilisé Lorsque l UPC X46 est utilisé 1 151 101 6 mm X46 Numéro de taille Taille 2 120 90 mm X46 3 95 70 mm 4 80 60 mm 5 70 53 m...

Страница 73: ...e Print RGB Guide Print DLGm 3 95 70 mm 4 80 60 mm 5 70 53 mm 6 70 50 mm 7 60 40 mm 10 47 37 mm 12 45 45 mm 8 54 54 mm 2 2inch 9 50 48 5 mm 11 45 35 mm 13 43 33 mm 14 38 32 mm 15 34 28 mm 16 23 23 mm 20 45 35 mm D4 21 Special 1 70 53 mm 47 37 mm 22 Special 2 47 37 mm 43 33 mm Guide Print RGB Guide Print DLGm ...

Страница 74: ...sont automatiquement réglées Ce mode convient aux portraits en intérieur et aux photos d identité avec le flash intégré utilisé comme source d éclairage principale et le flash de suppression des ombres raccordé à l appareil photo par un cordon de synchronisation Mode sans flash et exposition automatique Le flash intégré ne se déclenche pas Ce mode convient à des prises de vue avec des sources d éc...

Страница 75: ...our les autres pays Software License Agreement 1 Lecture des manuels sur le CD ROM fourni Le CD ROM fourni contient les manuels pour les opérations de base et les opérations avancées et le manuel pour le logiciel utilitaire de l UPX C200 en japonais anglais français allemand espagnol italien portugais russe chinois et coréen Il contient également le logiciel utilitaire Les copies de ces manuels so...

Страница 76: ...osoft Windows 2000 Professional Microsoft Windows XP Home Edition Microsoft Windows XP Professional Pour plus d informations consultez le Guide de l utilisateur Utility Software Marques Intel et Pentium sont des marques déposées d Intel Corporation ou de ses filiales aux États Unis et dans d autres pays Microsoft Windows et Windows NT sont des marques déposées de Microsoft Corporation aux États Un...

Страница 77: ...vercle soit correctement verrouillé Lors du remplacement des batteries elles risquent de tomber si le couvercle de leur logement est tourné vers le bas Pour éviter ceci tournez le bloc de prise en main de façon que le couvercle soit vers le haut Fonction de la pile bouton La pile bouton alimente l horloge interne Veillez à ce qu elle soit correctement insérée CLOSE OPEN CR2025 CR2025 CR 202 5 CLOS...

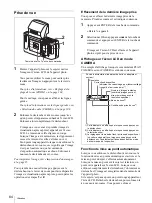
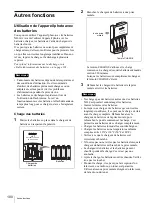
Страница 78: ...e et activer ou désactiver le mode d économie d énergie sur l affichage Setup qui apparaît sur l écran LCD de l appareil photo Pour plus d informations sur les procédures de réglage voir Autres fonctions à la page 100 Fixation sur un trépied Vous pouvez fixer l appareil photo sur un trépied en utilisant le filetage pour trépied situé sur la face inférieure de l appareil photo Remarque Vissez la vi...

Страница 79: ...paisse Ceci pourra même entraîner un dysfonctionnement ou une panne Ne touchez pas le ruban encreur de la cartouche d impression ou la face imprimable du papier S il y a des traces de doigts ou de la poussière sur la face imprimable ou le ruban encreur la qualité d impression pourra se dégrader Pour pouvoir obtenir des tirages de haute qualité ne placez pas le kit d impression dans des endroits ex...

Страница 80: ...n le témoin s allume Ne touchez pas le ruban encreur et ne placez pas la cartouche d imprimante dans un endroit poussiéreux La présence de traces de doigts ou de poussière sur le ruban encreur entraînerait une impression imparfaite Ne remplacez pas la cartouche d impression pendant l impression Ne placez pas la cartouche d impression dans un endroit exposé à de hautes températures une humidité éle...

Страница 81: ...rmat du bac il pourra en résulter un bourrage papier Ne retirez pas ou n insérez pas le bac à papier pendant l impression Si l alimentation papier ne s effectue pas automatiquement le témoin s allume Retirez le bac à papier et vérifiez s il n y a pas de bourrage Lorsque vous ajoutez du papier dans un bac qui en contient déjà assurez vous que le nombre total de feuilles ne dépasse pas 25 pour un ki...

Страница 82: ...t de stocker du papier impression partiellement utilisé remettez le dans sa pochette d origine Mise en place du couvercle du bac à papier Laissez toujours le couvercle fourni en place sur le bac à papier lorsque vous n utilisez pas l imprimante pour protéger le papier impression dans le bac contre la poussière Vous pouvez placer le couvercle aussi bien sur le bac à papier pour UPC X46 ou le bac à ...

Страница 83: ...etooth restent en gris et DISCOVERED n apparaît pas ou si NO PRINTER apparaît reportez vous à Dépannage à la page 134 et prenez les mesures nécessaires Si le problème persiste reportez vous à Mode d emploi Opérations avancées ou consultez votre revendeur Sony ou un centre de service après vente Sony Conditions de prise de vue réglées en usine Les conditions de prise de vue ont été réglées en usine...

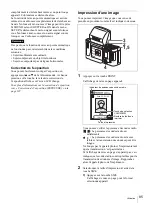
Страница 84: ...uyant sur v de la touche de commande et appuyez sur ENTER de la touche de commande L image sur l écran LCD est effacée et l appareil photo est prêt pour la prise de vue Affichage sur l écran LCD en mode CAMERA Un exemple d affichage lorsque le commutateur PLAY CAMERA est sur CAMERA est donné ci dessous Fonction de mise au point automatique Lorsque vous enfoncez le déclencheur à mi course la foncti...

Страница 85: ... d exposition voir Correction de l exposition EXPOSURE à la page 107 Impression d une image Vous pouvez imprimer l image que vous venez de prendre en procédant comme il est indiqué ci dessous 1 Appuyez sur la touche PRINT L affichage de mise en page apparaît Vous pouvez vérifier la puissance des ondes radio La puissance des ondes radio est satisfaisante La puissance des ondes radio est assez faibl...

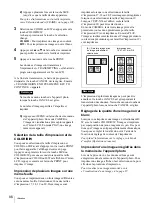
Страница 86: ...es sur une même feuille Vous pouvez imprimer deux ou trois images différentes sur une même feuille Sélectionnez l une des tailles d impression 17 18 19 ou 20 Deux images sont imprimées lorsque vous sélectionnez la taille d impression 17 18 ou 20 Trois images sont imprimées lorsque vous sélectionnez la taille d impression 19 Lorsque l UPC X34 est utilisé seule la taille d impression 20 peut être sé...

Страница 87: ... pouvez visualiser des images mémorisées sur l écran LCD 1 Placez le commutateur PLAY CAMERA sur PLAY 2 Placez l interrupteur POWER sur ON 3 Appuyez sur n importe quelle touche pour faire disparaître l affichage Bluetooth Une image mémorisée apparaît sur l écran LCD 4 Sélectionnez une image affichée sur l écran LCD en appuyant sur b ou B de la touche de commande Affichage d une planche neuf images...

Страница 88: ...sur v ou V de la touche de commande 7 Appuyez sur ENTER de la touche de commande L affichage Delete apparaît 8 Sélectionnez OK en appuyant sur v de la touche de commande 9 Appuyez sur ENTER de la touche de commande pour effacer l image L image sélectionnée est effacée de la mémoire Pour effacer d autres images Répétez les opérations des étapes 5 8 et 9 STD 006 006 092 2003 05 01 12 00 Source d ali...

Страница 89: ...Sélectionnez DELETE en appuyant sur v ou V de la touche de commande L affichage d une planche neuf images apparaît et le curseur clignote sur l image actuellement sélectionnée 7 Sélectionnez l image à effacer en appuyant sur b B v ou V de la touche de commande puis appuyez sur ENTER de la touche de commande L affichage Delete apparaît 8 Sélectionnez OK en appuyant sur b de la touche de commande 9 ...

Страница 90: ...ande 8 Appuyez sur ENTER de la touche de commande pour protéger toutes les images La marque de protection apparaît Protection d une image sur l affichage d une planche neuf images 1 Placez le commutateur PLAY CAMERA sur PLAY 2 Placez l interrupteur POWER sur ON 3 Appuyez sur n importe quelle touche pour faire disparaître l affichage Bluetooth 4 Appuyez sur le côté W du levier de zoom L affichage d...

Страница 91: ...ilisation placez l imprimante en veille et mettez l appareil photo hors tension Mise en veille de l imprimante Appuyez sur la touche marche veille Le témoin s éteint et l imprimante est mise en veille Mise hors tension de l appareil photo Placez l interrupteur POWER sur OFF L appareil photo mémorise les dernières conditions internes avant de se mettre hors tension Pendant cette mémorisation le tém...

Страница 92: ...FLASH MODE A M M APERTURE AUTO Fx x Fx x Fx x Fx x SHUTTER AUTO 1 2 S 1 4 S 1 8 S 1 15 S 1 30 S 1 60 S 1 100 S 1 125 S 1 250 S 1 500 S 1 750 S 1 1000 S EXPOSURE 2 00EV à 0 00EV à 2 00EV W B AUTO One Push 3000K à 7000K LOAD SAVE SETTING LOAD SETTING SAVE SETTING CANCEL AE AREA Center Weighted FACE Background SETUP Pour plus d informations voir Menu SETUP EXIT PROPERTY DELETE OK RETURN DELETE ALL OK...

Страница 93: ... mm 13 43 33 mm 14 38 32 mm 15 34 28 mm 16 23 23 mm 17 80 60 mm D2 X46 18 60 40 mm D4 X46 19 47 37 mm D6 X46 20 45 35 mm D4 8 21 Special 1 22 Special 2 Guide Print RGB Guide Print DLGm FRAME FRAME OFF FRAME 1 FRAME 2 FRAME 3 FRAME 4 FRAME 5 LINE1 LINE2 FRAME 6 WIDTH POWER SAVE OFF 3 MINUTES 10 MINUTES VIDEO OUT1 PAL NTSC SOUND OFF SHUTTER ON CLOCK BATTERY REFRESH START CANCEL MEMORY FORMAT START C...

Страница 94: ...S 0 à 7 GAMMA 7 à 7 SAVE SETTING 1 2 3 LOAD SETTING 1 2 3 Bluetooth SETTING Bluetooth ADDR PASSKEY INPUT PASSKEY INPUT 1 2 3 4 MY DEVICE NAME Sony UP DX100 NONE à 9 CONNECTION RECORD 1 Sony DKC C200X 2 NONE 3 NONE MODULE POWER POWER ON OFF PRINT SETTING PRINT OFFSET 2 1 0 1 2 COPY PRINT COPY PRINT 1 1 à 9 ...

Страница 95: ... le réglage de l ouverture Cette option n est disponible que lorsque Exposure Mode est sur APERTURE PRIORITY ou MANUAL EXPOSURE Aperture Setting Le nombre d options disponibles trois ou quatre et leur valeur varient selon la position du zoom SHUTTER Pour sélectionner la vitesse d obturation Cette option n est disponible que lorsque Exposure Mode est sur MANUAL EXPOSURE Shutter Speed 1 2 S 1 4 S 1 ...

Страница 96: ...e Menu Fonction Réglage EXIT Pour quitter le mode Menu PROPERTY Pour afficher les informations de l image sélectionnée DELETE Pour effacer une image mémorisée Delete OK RETURN DELETE ALL Pour effacer toutes les images mémorisées à l exception de celles qui sont protégées Delete All OK RETURN PROTECT Pour protéger ou déprotéger des images Protect ON RETURN OFF RETURN PROTECT ALL Pour protéger ou dé...

Страница 97: ... FRAME 6 WIDTH La largeur des deux lignes verticales est réglable POWER SAVE Pour activer et désactiver le mode d économie d énergie Power Save OFF Pas d économie d énergie 3 MINUTES Pour activer le mode d économie d énergie dans 3 minutes 10 MINUTES Pour activer le mode d économie d énergie dans 10 minutes VIDEO OUT Pour sélectionner le format de sortie de signal par la prise VIDEO OUT Video Out ...

Страница 98: ...ockage Remarque La classe de stockage n est activée que lorsque le système d exploitation de l ordinateur utilisé la prend en charge ORIGINAL Pour commander l appareil photo avec le pilote et le logiciel utilitaire fournis Bluetooth Pour paramétrer les fonctions Bluetooth PROPERTY Indique l adresse et le mot de passe de l appareil photo ainsi que la liste des imprimantes enregistrées CHANGE PASSKE...

Страница 99: ...depuis la mémoire de l imprimante Voir Mode d emploi Opérations avancées Bluetooth SETTING Permet de paramétrer la fonction Bluetooth Bluetooth ADDR Affiche l adresse Bluetooth PASSKEY INPUT Permet de spécifier ou de changer le mot de passe MY DEVICE NAME Attribution d un numéro à l imprimante CONNECTION RECORD Affiche le relevé des connexions MODULE POWER Permet de mettre les circuits Bluetooth s...

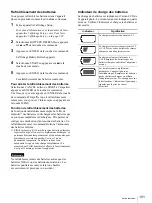
Страница 100: ...rge des quatre batteries demande environ 230 minutes Lorsque les batteries sont complètement chargées le témoin CHARGE s éteint 3 Débrancher le chargeur de batteries de la prise murale et retirer les batteries Remarques Ne chargez pas des batteries autres que des batteries NH Ceci pourrait endommager les batteries Insérez fermement les batteries Lorsque vous chargez des batteries qui sont restées ...

Страница 101: ...que l autonomie des batteries diminue 1 Effet de mémoire Si l on recharge une batterie à plusieurs reprises avant qu elle ne soit complètement déchargée sa puissance diminue temporairement et son autonomie peut diminuer sur certains appareils Ceci n est qu un phénomène temporaire La batterie retrouve son autonomie lorsqu on la décharge complètement La manière dont l effet de mémoire affecte le fon...

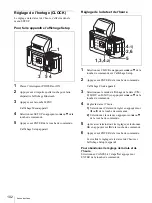
Страница 102: ...Sélectionnez le mode d affichage de la date Y M D M D Y ou D M Y en appuyant sur v ou V de la touche de commande 4 Réglez la date et l heure 1 Sélectionnez l élément à régler en appuyant sur b ou B de la touche de commande 2 Sélectionnez la valeur en appuyant sur v ou V de la touche de commande 5 Après avoir terminé tous les réglages sélectionnez OK en appuyant sur B de la touche de commande 6 App...

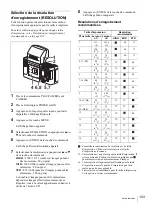
Страница 103: ...araissant en haut et à droite de l écran LCD 8 Appuyez sur ENTER de la touche de commande L affichage Menu réapparaît Résolutions d enregistrement recommandées La meilleure combinaison de résolution et de taille d impression Utilisez cette résolution si la taille d impression est connue a La résolution est trop élevée pour la taille d impression Il est recommandé d utiliser la résolution indiquée ...

Страница 104: ...uyez sur ENTER de la touche de commande L affichage Zoom Range apparaît 7 Sélectionnez f 7 50 à 19 8 mm en appuyant sur v de la touche de commande 8 Appuyez sur ENTER de la touche de commande L affichage Menu réapparaît Remarque Lorsque le flash interne est utilisé comme éclairage principal il est recommandé d utiliser la plage de zoom réglée en usine f 15 6 19 8 Si vous utilisez la plage de zoom ...

Страница 105: ...ERTURE PRIORITY et MANUAL EXPOSURE Mode de commande de l exposition Mode de flash FLASH MODE Pré éclairage préphotométrie Vitesse d obturation SHUTTER Ouverture APERTURE Balance des blancs W B Correction de l exposition EXPOSURE PROGRAM AUTO A Pré éclairage préphotométrie 1 30 à 1 1000 AUTO AUTO 3000K à 7000K 2 00 EV à 2 00 EV Pré éclairage 1 250 AUTO AUTO One Push 3000K à 7000K 2 00 EV à 2 00 EV ...

Страница 106: ...H MODE en appuyant sur v ou V de la touche de commande 3 Appuyez sur ENTER de la touche de commande L affichage Flash Mode apparaît 4 Sélectionnez le mode de flash en appuyant sur v ou V de la touche de commande Pour la commande automatique de l exposition A Flash automatique Flash toujours actif Pas de flash Pour la commande manuelle de l exposition M Flash toujours actif M Pas de flash 5 Appuyez...

Страница 107: ...le verrouillage du Menu voir Verrouillage du Menu de l appareil photo à la page 116 Réglage de la balance des blancs W B 1 Faites apparaître l affichage Menu Pour plus d informations sur la manière de faire apparaître l affichage Menu voir Pour faire apparaître l affichage Menu en mode CAMERA à la page 105 2 Sélectionnez W B en appuyant sur v ou V de la touche de commande 3 Appuyez sur ENTER de la...

Страница 108: ...r les autres tailles que vous ne désirez pas sélectionner avec la touche SIZE L affichage de la taille passe entre le noir et le gris à chaque pression sur la touche ENTER Remarque Guide Print RGB et Guide Print DLGm sont toujours affichés sur l écran LCD Vous ne pouvez pas spécifier qu ils ne soient pas affichés 6 Après ce paramétrage sélectionnez RETURN en appuyant sur v ou V de la touche de com...

Страница 109: ...nformations sur la manière de faire apparaître l affichage Setup voir Pour faire apparaître l affichage Setup à la page 102 2 Sélectionnez FRAME en appuyant sur v ou V de la touche de commande 3 Appuyez sur ENTER de la touche de commande L affichage de sélection de cadre apparaît 4 Sélectionnez FRAME 1 FRAME 2 FRAME 3 ou FRAME 4 en appuyant sur v ou V de la touche de commande Les lignes guides pou...

Страница 110: ...7 5 11 2 15 5 5 8 34 5 13 8 25 5 11 16 11 5 15 32 38 5 19 16 13 5 9 16 30 5 11 4 7 18 D4 60 23 8 40 15 8 11 0 7 16 33 0 15 16 13 0 17 32 30 5 11 4 22 5 29 32 9 0 3 8 34 5 13 8 11 0 7 16 27 0 11 8 8 54 21 4 54 21 4 5 5 7 32 37 5 11 2 7 5 5 16 34 5 13 8 25 5 11 16 3 5 5 32 38 5 19 16 5 5 7 32 30 5 11 4 9 50 2 48 5 115 16 6 0 1 4 33 0 15 16 8 0 5 16 30 5 11 4 22 5 29 32 4 0 3 16 34 5 13 8 6 0 1 4 27 ...

Страница 111: ... en appuyant sur b ou B de la touche de commande 4 Sélectionnez la position de LINE2 en appuyant sur v ou V de la touche de commande 5 Appuyez sur ENTER de la touche de commande 6 Appuyez sur ENTER de la touche de commande L affichage Setup réapparaît Tailles imprimées pour FRAME 5 LINE1 a été réglé à 66 et LINE2 à 242 en usine Les valeurs pour c et d s obtiennent en multipliant la valeur de F par...

Страница 112: ...iant la valeur de G par les valeurs de WIDTH comme il est indiqué ci dessous g WIDTH G Si vous sélectionnez la taille 10 avec la position réglée en usine la taille imprimée est la suivante g 112 0 18 20 2 mm Remarque La valeur de G est arrondie et il se peut donc que les valeurs calculées ne soient pas des valeurs exactes Il est recommandé de mesurer les tailles imprimées pour obtenir la valeur ex...

Страница 113: ...re l affichage Setup à la page 102 2 Sélectionnez POWER SAVE en appuyant sur v ou V de la touche de commande 3 Appuyez sur ENTER de la touche de commande L affichage Power Save apparaît 4 Sélectionnez le délai pour l activation de la fonction d économie d énergie en appuyant sur v ou V de la touche de commande OFF Le mode d économie d énergie est désactivé 3 MINUTES L appareil photo passe en mode ...

Страница 114: ... vidéo raccordé Activation désactivation des signaux sonores d opération SOUND Si vous le désirez des signaux sonores peuvent vous avertir qu une opération a été effectuée ou vous inviter à effectuer une opération lorsque vous utilisez l appareil photo 1 Faites apparaître l affichage Setup Pour plus d informations sur la manière de faire apparaître l affichage Setup voir Pour faire apparaître l af...

Страница 115: ...s la mémoire de l appareil photo ou si des dossiers ou fichiers mémorisés dans l appareil photo sont effacés ou renommés lorsque l appareil photo est connecté en tant que classe de stockage il se peut que la prise de vue la lecture ou la transmission des données ne soit pas normale N effectuez jamais de telles opérations Déplacement d une image affichée sur une planche neuf images MOVE Vous pouvez...

Страница 116: ...LAY Ceci permet d éviter que les réglages du MENU puisse être modifiés par inadvertance Seule l exposition peut encore être changée à l aide de la touche v ou V de commande Verrouillage du menu Appuyez continuellement sur la touche MENU pendant plus de trois secondes L affichage Menu disparaît et la marque de cadenas apparaît Lorsque vous appuyez sur la touche MENU l affichage Menu n apparaît pas ...

Страница 117: ... les réglages nécessaires Les différents paramètres permettent d effectuer les réglages suivants CYN RED Une pression sur b donne plus de cyan à l image tandis qu une pression sur B la rend plus rouge MAG GRN Une pression sur b donne plus de magenta à l image tandis qu une pression sur B la rend plus verte YEL BLU Une pression sur b donne plus de jaune à l image tandis qu une pression sur B la ren...

Страница 118: ...églées Les valeurs réglées enregistrées en mémoire peuvent être rappelées 1 Sur l affichage COLOR ADJUST réglage de la couleur appuyez sur B de la touche de commande 2 Appuyez plusieurs fois sur V de la touche de commande jusqu à ce que LOAD SETTING apparaisse 3 Appuyez sur b ou B de la touche de commande pour sélectionner le numéro de cellule de mémoire 1 2 ou 3 4 Appuyez sur la touche EXEC Les v...

Страница 119: ...impression Effectuez un test d impression et vérifiez si l image est imprimée sur la position correcte sur le papier Si un autre réglage est nécessaire répétez les opérations ci dessus Pour l impression d une image voir Impression d une image à la page 85 Pour quitter le mode PRINT SETTING paramétrage de l impression Appuyez sur la touche MENU L affichage revient sur Ready et l imprimante est prêt...

Страница 120: ...th vérifiez ses spécifications Bluetooth et BIP Communication entre l appareil photo et l imprimante à l aide de la fonction Bluetooth Les conditions suivantes sont nécessaires pour la communication entre l appareil photo et l imprimante à l aide de la fonction Bluetooth Le même mot de passe doit être spécifié sur l appareil photo et l imprimante Le témoin doit être allumé Vérification des réglage...

Страница 121: ...e la touche de commande L affichage BT MODULE POWER apparaît 6 Assurez vous que ON est sélectionné puis appuyez sur ENTER de la touche de commande Le témoin s allume Pour allumer le témoin de l imprimante 1 Appuyez sur la touche MENU 2 Appuyez sur V de la touche de commande pour afficher Bluetooth SETTING paramétrage Bluetooth 3 Appuyez sur B de la touche de commande Bluetooth ADDR None aucune adr...

Страница 122: ... commande pour placer POWER sur OFF 7 Appuyez sur la touche EXEC REBOOTING redémarrage apparaît L imprimante redémarre alors et le témoin s éteint Ajout d imprimantes Vous pouvez utiliser jusqu à trois imprimantes avec l appareil photo Après avoir ajouté des imprimantes au système vous pouvez sélectionner celle que vous désirez utiliser avec la touche PRINTER de l appareil photo Il est pratique d ...

Страница 123: ...signaux de la prise VIDEO OUT vous permettent de contrôler le sujet Pour régler la qualité d image sur le moniteur utilisez les fonctions de réglage du côté moniteur Remarque Lorsque vous raccordez un moniteur vidéo à la prise VIDEO OUT alors que VIDEO OUT est sur PAL dans le menu vous devez placer le commutateur MONITOR PAL sur VIDEO OUT pour pouvoir visualiser l image sur le moniteur vidéo E Pri...

Страница 124: ...é de l écran LCD Si le sujet est assis vous devez tenir l appareil photo sur une position basse pour que l objectif soit au même niveau que les yeux du sujet En pivotant le bloc de prise en main situé sur le côté de l écran LCD vous pouvez tenir l appareil sans vous accroupir Remarque Lorsque vous tournez le bloc de prise en main n exercez pas une force excessive à la fin de la course du pivotemen...

Страница 125: ... imprimante et imprimées Pendant la transmission des données TRANSMITTING apparaît sur l écran LCD Pour faire disparaître l affichage d aperçu de mise en page appuyez sur la touche MENU La touche PRINT est active lorsque l image de visualisation après capture ou une autre image de lecture est affichée sur l écran LCD F Témoin PRINTER ALARM S allume pour signaler une anomalie de l imprimante Lorsqu...

Страница 126: ...apparaît K Touche de commande 87 102 Lorsque le commutateur PLAY CAMERA est sur PLAY appuyez sur cette touche pour sélectionner une image En mode MENU appuyez sur cette touche pour sélectionner un paramètre du menu et pour valider L Touche MENU 83 102 Appuyez sur cette touche pour faire apparaître l affichage Menu Appuyez à nouveau sur cette touche pour faire disparaître l affichage Menu ou l affi...

Страница 127: ...7 117 Appuyez sur cette touche pour sélectionner un paramètre du menu et pour valider G Témoin témoin Lorsque la fonction Bluetooth est activée Témoin PRINT S allume lorsqu une impression est en cours Clignote lorsque l imprimante reçoit des données d image Témoin S allume lorsqu il n y a plus de papier lorsque la cartouche d encre est épuisée ou lorsque le type ou le format de la cartouche ne cor...

Страница 128: ...e prise murale à l aide du cordon d alimentation secteur fourni C Connecteur USB Raccordez ce connecteur au connecteur USB d un ordinateur à l aide du câble USB Remarque En cas de raccordement à un ordinateur à l aide d un câble USB il est possible que l appareil ne fonctionne pas correctement en fonction du type d ordinateur utilisé Dans ce cas utilisez un concentrateur USB disponible dans le com...

Страница 129: ... imprimante ou l appareil photo dans un endroit soumis à des vibrations mécaniques très humide excessivement poussiéreux exposé à la pluie directement ou excessivement exposé au soleil soumis à des températures très élevées ou basses proche de sources magnétiques puissantes proche d un rayonnement électromagnétique puissant émetteurs de radio ou de télévision par exemple N utilisez pas un autre ma...

Страница 130: ...ature ambiante est basse La durée pendant laquelle elles peuvent être utilisées est donc plus courte dans des endroits froids Pour prolonger l autonomie des batteries nous vous recommandons ce qui suit Placez les batteries dans votre poche pour les garder au chaud et ne les introduisez dans le matériel électronique que juste avant la prise de vue Munissez vous de batteries de réserve pour deux ou ...

Страница 131: ...nts d image Élément d image à semi conducteurs 4M CCD de 1 1 8 pouce Capacité d enregistrement 20 images ou plus environ haute résolution 80 images ou plus environ résolution moyenne 200 images ou plus environ résolution standard Enregistrement des images 2 288 1 712 pixels HIGH 1 280 960 pixels MID 832 624 pixels STD Méthode d effacement Effacement d une image effacement de toutes les images Bala...

Страница 132: ...le Méthode d introduction du papier Introduction automatique depuis le bac à papier Capacité maximale du bac à papier UPC X46 25 feuilles UPC X34 30 feuilles Méthode d éjection du papier Éjection par l avant Les feuilles sont éjectées dans l ordre au dessus du bac à papier Capacité d impression de la cartouche de ruban UPC X46 25 feuilles UPC X34 30 feuilles Entrées AC IN entrée secteur Format d i...

Страница 133: ...à 35 C 4 F à 95 F Dimensions l h p Environ 65 105 26 mm 2 5 8 41 4 13 16 pouces fiche non comprise Poids 110 g 4 oz environ batteries non comprises Accessoires fournis Bac à papier pour l UPC X46 1 Bac à papier pour l UPC X34 1 Couvercle du bac à papier 1 Porte papier 2 Cordon d alimentation secteur pour l imprimante 1 Adaptateur secteur PCS AC08 1 Cordon d alimentation secteur pour le PCS AC08 1 ...

Страница 134: ...ine le témoin de veille s allume en rouge tVérifiez l affichage du nombre d images restantes pouvant être prises S il est nul effacez les images inutiles tPlacez AUTO ERASE sur ON Voir Mode d emploi Opérations avancées Le flash ne se déclenche pas Le mode de flash n est pas correctement sélectionné tPlacez FLASH MODE sur A ou M dans le menu Le cordon du flash externe n est pas raccordé à l apparei...

Страница 135: ...de l utilisation du flash interne tRéglez le zoom sur 1 3x ou moins Symptôme Causes possible Action L imprimante ne fonctionne pas après avoir été mise sous tension Le cordon d alimentation secteur n est pas correctement branché tBranchez correctement le cordon d alimentation secteur à une prise de courant Impression impossible Le papier et la cartouche d impression ne correspondent pas tUtilisez ...

Страница 136: ...e kit d impression Remarques Ne procédez à ce nettoyage que s il y a des lignes ou points blancs sur le tirage Si les performances d impression sont correctes le nettoyage n améliorera pas la qualité de l image imprimée 1 Retirez le bac à papier de l imprimante S il reste du papier impression dans le bac enlevez le 2 Placez la feuille protectrice avec la face portant les inscriptions vers le bas e...

Страница 137: ...Bluetooth de l imprimante et ou de l appareil photo est couverte par une main etc tNe couvercle pas le capot La vitesse de transmission des données dépend de la distance entre l imprimante et l appareil photo des obstacles ou des conditions des ondes radio Changez la position de l imprimante ou rapprochez la de l appareil La connexion ne peut pas être établie bien que la distance entre l imprimant...

Страница 138: ... cartouche d impression ne correspondent pas tUtilisez une taille de papier impression appropriée pour la cartouche d impression et appuyez sur la touche EXEC REMOVE PRINTS PUSH EXEC Il reste du papier impression dans la fente d éjection tRetirez le bac à papier puis le papier impression Appuyez ensuite sur la touche EXEC PRINTER SERVICE CALL Une anomalie s est produite dans l imprimante tConsulte...

Страница 139: ...s están destinados a utilizarse en los siguientes países Alemania Austria Bélgica Dinamarca España Finlandia Francia Grecia Holanda Irlanda Islandia Italia Liechtenstein Lituania Luxemburgo Noruega Portugal Reino Unido Suecia y Suiza ADVERTENCIA Windows es una marca comercial registrada de Microsoft Corporation en los Estados Unidos y en otros países Todos los demás nombres de compañías y producto...

Страница 140: ...ones para tomar fotografías 174 Ajuste del tamaño de la impresión que va a ser visualizado PRINT SIZE LIST 177 Ajuste de encuadre FRAME 177 Ajuste del modo de ahorro de energía POWER SAVE 182 Selección del formato de la señal de salida VIDEO OUT 183 Selección del sonido durante el funcionamiento SOUND 183 Selección de la Clase USB USB 184 Desplazamiento de una fotografía visualizada en una visuali...

Страница 141: ...l ordenador y leer e imprimir los datos de imagen almacenados en el mismo También se puede imprimir imágenes diferentes en color y en blanco y negro o imágenes de tamaños diferentes en una sola hoja de papel de impresión Cuando se utilice este sistema con un ordenador consulte la Guía del usuario del Utility Software que se encuentra en el CD ROM suministrado Para utilizar el sistema con un ordena...

Страница 142: ...an los tamaños exactos que van a imprimirse Debajo de cada imagen se muestra el número del tamaño y el tamaño D2 D4 D6 y D8 indican que hay tipos de impresión diferentes para el mismo tamaño y X46 muestra que el tamaño sólo se encuentra disponible cuando se utiliza el UPC X46 Cuando se utiliza el UPC X46 1 151 101 6 mm X46 Númeo de tamaño Tamaño 2 120 90 mm X46 3 95 70 mm 4 80 60 mm 5 70 53 mm 6 7...

Страница 143: ...Print RGB Guide Print DLGm 3 95 70 mm 4 80 60 mm 5 70 53 mm 6 70 50 mm 7 60 40 mm 10 47 37 mm 12 45 45 mm 8 54 54 mm 2 2 inch 9 50 48 5 mm 11 45 35 mm 13 43 33 mm 14 38 32 mm 15 34 28 mm 16 23 23 mm 20 45 35 mm D4 21 Special 1 70 53 mm 47 37 mm 22 Special 2 47 37 mm 43 33 mm Guide Print RGB Guide Print DLGm ...

Страница 144: ... ajustan automáticamente Este modo es apropiado para tomar retratos en interiores y fotografías de identificación utilizando el flash incorporado como fuente de iluminación principal y el flash anulador de sombras conectado a la cámara con un cable de sincronización Sin el modo de flash y exposición automática El flash incorporado no se enciende Este modo es apropiado para tomar fotografías bajo f...

Страница 145: ...ra EE UU y Canadá y 1 para los demás países Software License Agreement 1 Lectura del manual del CD ROM suministrado El CD ROM suministrado incluye manuales para las operaciones básicas y avanzadas e instrucciones de utilidad para el UPX C200 en japonés inglés francés alemán español italiano portugués ruso chino y coreano y también software de utilidad Las copias de estos manuales son del formato P...

Страница 146: ...Professional Microsoft Windows XP Home Edition Microsoft Windows XP Professional Para conocer los detalles consulte Guía del usuario del Utility Software Marcas registradas Intel y Pentium son marcas registradas de Intel Corporation o sus subsidiarias en los Estados Unidos y en otros países Microsoft Windows y Windows NT son marcas registradas de Microsoft Corporation en los Estados Unidos y o en ...

Страница 147: ...ora puede utilizar la cámara con alimentación CA Si utiliza un adaptador de alimentación CA no tendrá que preocuparse de cuánta energía queda en las baterías Nota Utilice el adaptador de alimentación CA cerca del enchufe Si se produce algún problema durante el funcionamiento desconecte inmediatamente del enchufe el adaptador de alimentación CA para interrumpir el suministro de energía Configurar e...

Страница 148: ...la impresión Si lo hace así obtendrá una impresión incorrecta e incluso puede provocar una avería Utilice el paquete de impresión sólo para esta impresora Utilice siempre el cartucho de impresión diseñado para el tamaño de papel que utilice para la impresión Si mezcla cartuchos y papeles de diferentes tipos o tamaños la impresión puede no ser posible y puede provocar atascos de papel u otros probl...

Страница 149: ...o para la impresión Si lo hace así obtendrá una impresión incorrecta e incluso puede provocar una avería Si el cartucho de impresión no encaja en su lugar retírelo e insértelo de nuevo Si la cinta de tinta está demasiado floja para cargarla bobínela en la dirección de la flecha para apretarla Si el cartucho de impresión no está cargado al encender la impresora se iluminará la lámpara No toque la c...

Страница 150: ...e se separen las hojas A continuación inserte el papel con la cara de impresión la cara que no está marcada hacia arriba y con la flecha apuntando en el mismo sentido que la flecha de la bandeja Puede colocar 25 hojas si utiliza el UPC X46 y 30 hojas si utiliza el UPC X34 2 Retire la hoja protectora del papel de impresión Nota Conserve la hoja protectora que se utiliza para limpiar el interior de ...

Страница 151: ...cionamiento Antes de la impresión no pliegue ni doble el papel de impresión No deje más de cinco hojas de papel impreso expulsado en la bandeja de papel Evite situar el papel de impresión en lugares expuestos a altas temperaturas elevada humedad exceso de polvo o luz solar directa Evite almacenar el papel con las caras impresas en contacto entre sí o en contacto con productos de goma o de plástico...

Страница 152: ...alizándose en color gris y no aparece DISCOVERED o aparece NO PRINTER consulte Solución de problemas en la página 202 y tome la medida apropiada Si el problema persiste consulte el Manual de instrucciones operaciones avanzadas o póngase en contacto con su concesionario Sony o su centro de servicio Sony Condiciones establecidas en fábrica para tomar fotografías Las condiciones para tomar una fotogr...

Страница 153: ...La fotografía de la pantalla LCD se borrará y la cámara podrá tomar otra Visualización en la pantalla LCD en el modo CAMERA Abajo se muestra un ejemplo de la visualización cuando el conmutador PLAY CAMERA está en CAMERA Función de enfoque automático Cuando pulse el botón disparador hasta la mitad la función de enfoque automático se activará y el motivo quedará enfocado automáticamente Una vez enfo...

Страница 154: ...bil así que la transmisión de los datos puede tardar más tiempo No mueva la cámara ni la impresora hasta que termine la transmisión de los datos Si la visualización de la distribución no aparece la onda de radio será demasiado débil para transmitir datos de imagen Acerque más la cámara y la impresora 2 Seleccione el tamaño de la impresión utilizando el botón SIZE 1 Pulse el botón SIZE Aparece la v...

Страница 155: ... podrá seleccionarse el tamaño de la impresión 20 En el modo CAMERA se imprimen la fotografía que acaba de tomarse y la anterior o las dos fotografías anteriores si se imprime el tamaño 19 y en el modo PLAY se imprimen la fotografía actualmente seleccionada y la anterior o dos fotografías anteriores a ella si se imprime en el tamaño 19 Nota La impresión de múltiples fotografías no se puede cancela...

Страница 156: ...Puede ver en el panel LCD las fotografías almacenadas en la memoria 1 Establezca el conmutador PLAY CAMERA en PLAY 2 Establezca el conmutador POWER en ON 3 Pulse cualquier botón para apagar la visualización Bluetooth En el panel LCD aparecerá una fotografía que se encuentra en la memoria 4 Seleccione una fotografía visualizada en la pantalla LCD pulsando b o B en el panel de control Visualización ...

Страница 157: ...ER en el botón de control Aparecerá la visualización Delete 8 Seleccione OK pulsando v en el botón de control 9 Pulse ENTER en el botón de control para borrar la fotografía La fotografía seleccionada se borrará de la memoria Para borrar la otra fotografía Repita los pasos 5 8 y 9 STD 006 006 092 2003 05 01 12 00 Fuente de alimentación Indicador de baterías o adaptador de alimentación de CA Número ...

Страница 158: ...otón de control para seleccionar DELETE Aparece la visualización múltiple de nueve fotografías y el cursor parpadea en la fotografía actualmente seleccionada 7 Seleccione una fotografía para borrarla pulsando b B v o V en el botón de control y luego pulse ENTER en el botón de control Aparecerá la visualización Delete 8 Seleccione OK pulsando b en el botón control 9 Pulse ENTER en el botón de contr...

Страница 159: ...ón de control 8 Pulse ENTER en el botón de control para proteger todas las fotografías Aparecerá la marca de protección Protección de una fotografía de la visualización múltiple de nueve fotografías 1 Establezca el conmutador PLAY CAMERA en PLAY 2 Establezca el conmutador POWER en ON 3 Pulse cualquier botón para apagar la visualización Bluetooth 4 Pulse el lado W de la palanca del zoom Aparece la ...

Страница 160: ...saparece y se cancela la protección Desconexión de la alimentación Cuando termine de utilizar la impresora y cámara ponga la primera en el modo de espera y apague la segunda Puesta de la impresora en el modo de espera Pulse el botón de encendido espera La luz se apaga y la impresora se pone en el modo de espera Apagado de la cámara Ponga el interruptor POWER en OFF La cámara almacena en la memoria...

Страница 161: ...SH MODE A M M APERTURE AUTO Fx x Fx x Fx x Fx x SHUTTER AUTO 1 2 S 1 4 S 1 8 S 1 15 S 1 30 S 1 60 S 1 100 S 1 125 S 1 250 S 1 500 S 1 750 S 1 1000 S EXPOSURE 2 00EV a 0 00EV a 2 00EV W B AUTO One Push 3000K a 7000K LOAD SAVE SETTING LOAD SETTING SAVE SETTING CANCEL AE AREA Center Weighted FACE Background SETUP Para conocer detalles consulte Menú SETUP EXIT PROPERTY DELETE OK RETURN DELETE ALL OK R...

Страница 162: ...5 45 mm 13 43 33 mm 14 38 32 mm 15 34 28 mm 16 23 23 mm 17 80 60 mm D2 X46 18 60 40 mm D4 X46 19 47 37 mm D6 X46 20 45 35 mm D4 8 21 Special 1 22 Special 2 Guide Print RGB Guide Print DLGm FRAME FRAME OFF FRAME 1 FRAME 2 FRAME 3 FRAME 4 FRAME 5 LINE1 LINE2 FRAME 6 WIDTH POWER SAVE OFF 3 MINUTES 10 MINUTES VIDEO OUT1 PAL NTSC SOUND OFF SHUTTER ON CLOCK BATTERY REFRESH START CANCEL MEMORY FORMAT STA...

Страница 163: ...S 0 a 7 GAMMA 7 a 7 SAVE SETTING 1 2 3 LOAD SETTING 1 2 3 Bluetooth SETTING Bluetooth ADDR PASSKEY INPUT PASSKEY INPUT 1 2 3 4 MY DEVICE NAME Sony UP DX100 NONE a 9 CONNECTION RECORD 1 Sony DKC C200X 2 NONE 3 NONE MODULE POWER POWER ON OFF PRINT SETTING PRINT OFFSET 2 1 0 1 2 COPY PRINT COPY PRINT 1 1 a 9 ...

Страница 164: ...uentra disponible cuando Exposure Mode se ajusta en APERTURE PRIORITY o MANUAL EXPOSURE Aperture Setting El número de opciones disponibles tres o cuatro y sus valores dependen de la posición del zoom SHUTTER Para seleccionar la velocidad del obturador Esta selección sólo se encuentra disponible cuando Exposure Mode se pone en MANUAL EXPOSURE Shutter Speed 1 2 S 1 4 S 1 8 S 1 15 S 1 30 S 1 60 S 1 1...

Страница 165: ...XIT Para salir del modo de menús PROPERTY Para visualizar la información de la imagen seleccionada DELETE Para borrar una fotografía almacenada en la memoria Delete OK RETURN DELETE ALL Para borrar todas las fotografías almacenadas en la memoria excepto las protegidas Delete All OK RETURN PROTECT Para establecer o cancelar la protección de las fotografías Protect ON RETURN OFF RETURN PROTECT ALL P...

Страница 166: ...ajustables FRAME 6 WIDTH La anchura de las dos líneas verticales es ajustable POWER SAVE Para establecer y cancelar el modo de ahorro de energía Power Save OFF No hay operación de ahorro de energía 3 MINUTES Para establecer el modo de ahorro de energía en tres minutos 10 MINUTES Para establecer el modo de ahorro de energía en 10 minutos VIDEO OUT Para seleccionar el formato de la señal que va a sa...

Страница 167: ...cenamiento Nota La clase de almacenamiento se activa solamente cuando el sistema operativo del ordenador conectado la soporta ORIGINAL Para controlar la cámara utilizando el controlador y el software de utilidad suministrados Bluetooth Ajustes para las funciones Bluetooth PROPERTY Muestra la dirección y la clave de la cámara y la lista de impresora registradas CHANGE PASSKEY Para cambiar la clave ...

Страница 168: ...en la memoria Consulte el Manual de instrucciones operaciones avanzadas Bluetooth SETTING Es posible configurar Bluetooth Bluetooth ADDR Se muestra la dirección Bluetooth PASSKEY INPUT Se establece o se modifica una contraseña MY DEVICE NAME A la impresora se le puede asignar un número CONNECTION RECORD Se muestra el registro de conexión MODULE POWER Se activa o se desactiva la alimentación de los...

Страница 169: ...nos 230 minutos La luz CHARGE se apaga cuando las baterías están completamente cargadas 3 Desconecte el cargador de baterías de la toma de corriente y retire las baterías Notas No cargue otras baterías que no sean NH De lo contrario las baterías podrían estropearse Introduzca firmemente las baterías Cuando cargue baterías que no hayan sido utilizadas durante mucho tiempo la carga puede detenerse a...

Страница 170: ...iento de las baterías se reduce 1 Efectos memoria si una batería se descarga y carga repetidamente sin descargarse por completo su potencia se reducirá con el tiempo y también disminuirá el periodo de funcionamiento de algunos aparatos Éste es un fenómeno pasajero y la descarga de una batería por completo puede restaurar el periodo de funcionamiento El modo on que el efecto memoria afecta realment...

Страница 171: ... 3 Seleccione el modo de visualización A M D M D A o D M A pulsando v o V en el botón de control 4 Ajuste la fecha y la hora 1 Seleccione el elemento que va a ajustar pulsando b o B en el botón de control 2 Ponga el valor pulsando v o V en el botón de control 5 Cuando termine todos los ajustes seleccione OK pulsando B en el botón de control 6 Pulse ENTER en el botón de control La fecha y la hora s...

Страница 172: ...ualizado en la parte superior derecha de la pantalla LCD 8 Pulse ENTER en el botón de control Se vuelve a la visualización Menu Resoluciones de grabación recomendadas La mejor combinación de resolución y tamaño de la impresión Utilice esta resolución si se conoce el tamaño de la impresión a La resolución es demasiado alta para el tamaño de la impresión Se recomienda utilizar la resolución indicada...

Страница 173: ... Aparece la visualización Zoom Range 7 Seleccione f 7 50 a 19 8 mm pulsando v en el botón de control 8 Pulse ENTER en el botón de control Se vuelve a la visualización Menu Nota Cuando se utilice el flash incorporado como iluminación principal se recomienda utilizar el ajuste de margen establecido en la fábrica f 15 6 19 8 Si utiliza un margen de zoom de f 7 50 19 8 asegúrese de ajustar el zoom ent...

Страница 174: ...TURE PRIORITY y MANUAL EXPOSURE Modo de control de exposición Modo del flash FLASH MODE Preiluminación prefotometría Velocidad del obturador SHUTTER Abertura APERTURE Balance del blanco W B Revisión de exposición EXPOSURE PROGRAM AUTO A Preiluminación prefotometría 1 30 a 1 1000 AUTO AUTO 3000K a 7000K 2 00 EV a 2 00 EV Preiluminación 1 250 AUTO AUTO One Push 3000K a 7000K 2 00 EV a 2 00 EV Prefot...

Страница 175: ...lsando v o V en el botón de control 3 Pulse ENTER en el botón de control Aparece la visualización Flash Mode 4 Seleccione el modo del flash pulsando v o V en el botón de control Para el control automático de la exposición A Flash automático Flash forzado Sin flash Para el control manual de la exposición M Flash forzado M Sin flash 5 Pulse ENTER en el botón de control El modo de flash seleccionado ...

Страница 176: ...del menú de la cámara en la página 185 Ajuste del balance del blanco W B 1 Muestre la visualización Menu Para mostrar detalles sobre cómo mostrar la visualización Menu consulte Para mostrar la visualización Menu en el modo CAMERA en la página 174 2 Seleccione W B pulsando v o V en el botón de control 3 Pulse ENTER en el botón de control Aparece la visualización en el White Balance 4 Seleccione el ...

Страница 177: ...los tamaños que no van a ser seleccionados con el botón SIZE La visualización de los tamaños cambia entre negro y gris cada vez que usted pulsa ENTER Nota Las guías Guide Print RGB y Guide Print DLGm se visualizan siempre en la pantalla LCD No puede hacer nada para no visualizarlas 6 Cuando termine el ajuste seleccione RETURN pulsando v o V en el botón de control 7 Pulse ENTER en el botón de contr...

Страница 178: ...bre cómo mostrar la visualización Setup consulte Para mostrar la visualización Setup en la página 171 2 Seleccione FRAME pulsando v o V en el botón de control 3 Pulse ENTER en el botón de control Aparece la visualización de selección de encuadre 4 Seleccione FRAME 1 FRAME 2 FRAME 3 o FRAME 4 pulsando v o V en el botón de control Las guías para el encuadre seleccionado aparecen en la pantlla LCD 5 ...

Страница 179: ... 5 9 16 30 5 11 4 6 70 27 8 50 2 13 5 9 16 37 5 11 2 15 5 5 8 34 5 13 8 25 5 11 16 11 5 15 32 38 5 19 16 13 5 9 16 30 5 11 4 7 18 D4 60 23 8 40 15 8 11 0 7 16 33 0 15 16 13 0 17 32 30 5 11 4 22 5 29 32 9 0 3 8 34 5 13 8 11 0 7 16 27 0 11 8 8 54 21 4 54 21 4 5 5 7 32 37 5 11 2 7 5 5 16 34 5 13 8 25 5 11 16 3 5 5 32 38 5 19 16 5 5 7 32 30 5 11 4 9 50 2 48 5 115 16 6 0 1 4 33 0 15 16 8 0 5 16 30 5 11...

Страница 180: ...n de LINE2 pulsando v o V en el botón de control 5 Pulse ENTER en el botón de control 6 Pulse ENTER en el botón de control Se vuelve a la visualización en el Setup Tamaño de las impresiones para FRAME 5 En la fábrica LINE1 se ha ajustado en 66 y LINE2 en 242 Los valores para c y d se obtienen multiplicando el valor de F por los valores de LINE1 y LINE2 como se muestra abajo c LINE1 F d LINE2 LINE1...

Страница 181: ...g WIDTH G Si usted selecciona el tamaño 10 con la posición de ajuste de fábrica el tamaño de la impresión será el siguiente g 112 0 18 20 2 mm Nota El valor G se redondea por lo que los valores calculados puede que no indiquen los valores exactos Se recomienda medir el tamaño de las impresiones para obtener el valor exacto Tolerancia 3 9 50 2 48 5 115 16 6 0 1 4 33 0 15 16 0 19 10 19 D6 47 17 8 37...

Страница 182: ...sando v o V en el botón de control 3 Pulse ENTER en el botón de control Aparece la visualización Power Save 4 Seleccione el tiempo tras el que se va activar el modo de ahorro de energía pulsando v o V en el botón de control OFF El modo de ahorro de energía no está establecido 3 MINUTES La cámara entra en el modo de ahorro de energía después de haber transcurrido 3 minutos 10 MINUTES La cámara entr...

Страница 183: ...robar imágenes en la pantalla LCD VIDEO OUT Para comprobar imágenes en el monitor de vídeo conectado Selección del sonido durante el funcionamiento SOUND Cuando utilice la cámara podrá ser avisado con sonido si así lo desea 1 Muestre la visualización Setup Para conocer detalles sobre cómo mostrar la visualización Setup consulte Para mostrar la visualización Setup en la página 171 2 Seleccione SOUN...

Страница 184: ... JPEG de imágenes tomadas con la cámara o si se borran o cambian de nombre carpetas o archivos almacenados en la cámara cuando la cámara se conecte como dispositivo de almacenamiento la toma de fotografías normal la reproducción o la transmisión de los datos puede que no se realice No realice nunca esas operaciones Desplazamiento de una fotografía visualizada en una visualización múltiple de nueve...

Страница 185: ... MENU en el modo CAMERA o PLAY Así podrá impedir los cambios hechos sin intención en los ajustes de menú Sin embargo sólo la exposición podrá cambiarse pulsando v o V en el botón de control Bloqueo del menú Mantenga pulsado el botón MENU durante más de tres segundos La visualización Menu se apaga y la marca de bloqueo aparece Cuando pulsa el botón MENU la visualización Menu no aparece pero la marc...

Страница 186: ...te CYN RED Al pulsar b se le da a la fotografía un cián más intenso mientras que al pulsar B la fotografía aparece más rojiza MAG GRN Al pulsar b se le da a la fotografía un magenta más intenso mientras que al pulsar B la fotografía aparece más verdosa YEL BLU Al pulsar b se le da a la fotografía un tono amarillento mientras que al pulsar B la fotografía aparece más azulada DARK Se ajusta el contr...

Страница 187: ...emplo el ajuste COLOR ADJUST el almacenamiento de los valores ajustados o la recuperación de valores almacenados pulse el botón MENU La visualización vuelve a la visualización Ready Ajustar la posición de impresión PRINT SETTING Cuando utilice la UPC X46 ajústela de modo que la imagen impresa quede correctamente ubicada sobre el papel de impresión La posición de impresión puede desplazarse en 0 5 ...

Страница 188: ...o Bluetooth se encuentre en una bolsa o aunque haya obstáculos entre los dispositivos Además la tecnología inalámbrica Bluetooth dispone de funciones de seguridad avanzada como por ejemplo frecuencias codificadas y encriptación de datos Cuando utilice la función Bluetooth la distancia entre la cámara y la impresora que usted intente conectar no deberá ser superior a 10 m 33 pies y no deberá haber ...

Страница 189: ... INPUT en la visualización de funcionamiento 6 Pulse B en el botón de control La contraseña actualmente establecida aparecerá en la visualización PASSKEY INPUT 7 Pulse el botón EXEC Para salir de la operación con menú pulse el botón MENU Cambio de los ajustes de la clave Puede cambiar la clave si lo desea En fábrica se ha ajustado la misma clave para la UPX C200 y la fotoimpresora digital UP DX100...

Страница 190: ...ontrol Aparece la visualización BT MODULE POWER 6 Verifique que esté seleccionado OFF y luego pulse ENTER en el botón de control La luz se apaga Para apagar la luz de la impresora 1 Pulse el botón MENU 2 Pulse V en el botón de control para mostrar Bluetooth SETTING 3 Pulse B en el botón de control Aparecerá Bluetooth ADDR None 4 Pulse V en el botón de control para mostrar MODULE POWER 5 Pulse B en...

Страница 191: ...a visualizada en la pantalla LCD y en la pantalla del monitor Las señales procedentes de la conexión VIDEO OUT permiten comprobar cómodamente el sujeto Para ajustar la calidad de la imagen en el monitor utilice las funciones de ajuste del propio monitor Nota Cuando conecte un monitor de vídeo a la conexión VIDEO OUT con la opción VIDEO OUT del menú establecida en PAL deberá establecer el conmutado...

Страница 192: ...mara tiene una empuñadura con 90 grados de giro en el lado del panel LCD Cuando el sujeto está sentado la posición de la cámara debe ser baja para mantener el objetivo y los ojos del sujeto al mismo nivel En tal caso puede girar la empuñadura del lado del panel LCD para poder sostener la cámara en una postura natural Nota Cuando gire la empuñadura no aplique una fuerza excesiva al final de la rota...

Страница 193: ...grafía se transmitirán a la impresora y se imprimirán Mientrs se transmiten los datos aparece TRANSMITTING en la pantalla LCD Para apagar la visualización de la presentación preliminar de la distribución pulse el botón MENU El botón PRINT se activa cuando se visualiza en la pantalla LCD una fotografía de revisión rápida o una fotografía de reproducción F Luz PRINTER ALARM Se enciende cuando se pro...

Страница 194: ... se conecte a un ordenador utilizando el cable USB la fotografía desaparecerá de la pantalla LCD y aparecerá USB CONNECTED K Botón de control 156 171 Cuando el conmutador PLAY CAMERA esté establecido en PLAY púlselo para seleccionar una fotografía En las operaciones de MENU pulse para seleccionar un elemento de menú y para confirmar la selección L Botón MENU 152 171 Pulse para mostrar la visulaiza...

Страница 195: ...a seleccionar un elemento de menú y para confirmar la selección G Lámparas Luz Se ilumina cuando está activa la función Bluetooth Luz PRINT Se ilumina cuando hay una impresión en curso y parpadea cuando la impresora está recibiendo datos de imagen luz Se enciende si se agota el papel el cartucho de impresión no tiene tinta o se mezclan un cartucho y papel de diferentes tipos o tamaños Luz ALARM Se...

Страница 196: ... IN 151 Conéctela a un enchufe mediante el cable de alimentación CA que se suministra C Conector USB Conéctelo a la conexión USB de un ordenador mediante el cable USB Nota Si conecta un ordenador mediante un cable USB es posible que el ordenador no funcione correctamente según el tipo de ordenador En tal caso utilice un concentrador USB disonible en el mercado 1 2 3 AC IN ...

Страница 197: ...stalación Evite situar la impresora o la cámara en una ubicación sujeta a vibraciones mecánicas elevada humedad exceso de polvo exposición a la lluvia luz solar directa o excesiva temperaturas extremadamente altas o bajas cerca de fuentes intensas de magnetismo cerca de fuentes potentes de radiación electromagnética tales como radios o transmisores de TV No utilice otros equipos electrónicos cerca...

Страница 198: ... recomendamos cargarlas por completo a una temperatura ambiente entre 0ºC y 35ºC Usar las baterías Cárguelas antes de usarlas El rendimiento de las baterías se reduce en entornos de bajas temperaturas Por lo tanto el tiempo de uso de las baterías resulta más corto en lugares fríos Recomendamos lo siguiente para prolongar su uso Guarde las baterías en un bolsillo para calentarlas e insértelas en el...

Страница 199: ...de grabación reproducción Encuadre digital Sistema de compresión descompresión de datos Sistema de línea de base JPEG Soporte de grabación Memoria flash incorporada de 32 MB Elementos de imagen Elemento de imagen de estado sólido CCD 4M 1 1 8 pulgadas Capacidad de grabación 20 o más imágenes aproximadamente alta resolución 80 o más imágenes aproximadamente resolución media 200 o más imágenes aprox...

Страница 200: ...2 7 Kg 5 lb 15 oz sólo la unidad principal Método de impresión Proceso de transferencia térmica por sublimación secuencial de cuatro superficies amarillo magenta cián laminado Resolución de impresión 403 403 dpi Cabezal térmico 403 puntos pulgada Gradaciones de impresión 8 bits para amarillo magenta y cián Tiempo de impresión UPC X46 100 seg hoja UPC X34 65 seg hoja Método de suministro de papel A...

Страница 201: ...alientes Peso Aproximadamente 230 g 8 oz Cargador de baterías Requisitos de alimentación 100 240 V CA 50 60 Hz Consumo de energía 8 W Salida 1 2 V CC AA 920 mA 2 460 mA 4 Temperatura de funcionamiento 0 C a 35 C 4 F a 95 F Dimensiones ancho alto profundidad Aproximadamente 65 105 26 mm 2 5 8 41 4 13 16 pulgadas no se incluye clavija Peso Aproximadamente 110 g 4 oz sin incluir las baterías Accesori...

Страница 202: ...jo tVerifique el número restante visualizado de las fotografías que pueden tomarse Si es cero borre las fotografías que no sean necesarias tAjuste AUTO ERASE en ON Consulte el Manual de instrucciones operaciones avanzadas El flash no se ilumina El modo de flash no está establecido correctamente tAjuste FLASH MODE del menú en A o M El cable del flash externo no está conectado a la cámara tConecte e...

Страница 203: ...om está ajustado más alto que 1 3x cuando se utiliza el flash incorporado tPonga el zoom en la posición 1 3 x o inferior Síntoma Causas posibles Acción No se puede utilizar la impresora después de encenderla El cable de alimentación CA no está conectado correctamente tConecte firmemente el cable de alimentación CA a un enchufe de CA No se puede imprimir El papel de impresión y el cartucho de impre...

Страница 204: ...n contenida en el paquete de impresión Notas Realice la limpieza sólo cuando haya líneas o puntos blancos en la impresión Si obtiene rendimientos de impresión correctos la limpieza no mejorará la calidad de la imagen impresa 1 Retire la bandeja de papel de la impresora Si hay papel de impresión en la bandeja retire el papel de impresión de la bandeja 2 Coloque la hoja protectora con el lado de imp...

Страница 205: ...iado baja La parte de la antena Bluetooth de la impresora y o la cámara está tapada con una mano etc tNo cubra la parte de la antena La velocidad de la transmisión de datos depende de la distancia entre la impresora y la cámara los obstáculos que pueda haber o las condiciones de las ondas de radio Cambie la posición de la impresora o ubique la impresora más cerca del dispositivo No se puede establ...

Страница 206: ...rtucho de impresión no coinciden tPonga el papel de impresión del tamaño apropiado para el cartucho de impresión y pulse el botón EXEC REMOVE PRINTS PUSH EXEC El papel de impresión permanece en la ranura de inspección tQuite la bandeja de papel y luego el papel de impresión A continuación pulse el botón EXEC PRINTER SERVICE CALL Se ha producidoalgún problema con la impresora tContacte con su centr...

Страница 207: ......

Страница 208: ...Sony Corporation Printed in Japan ...

Отзывы: