O
per
a
tio
n
Printing
30
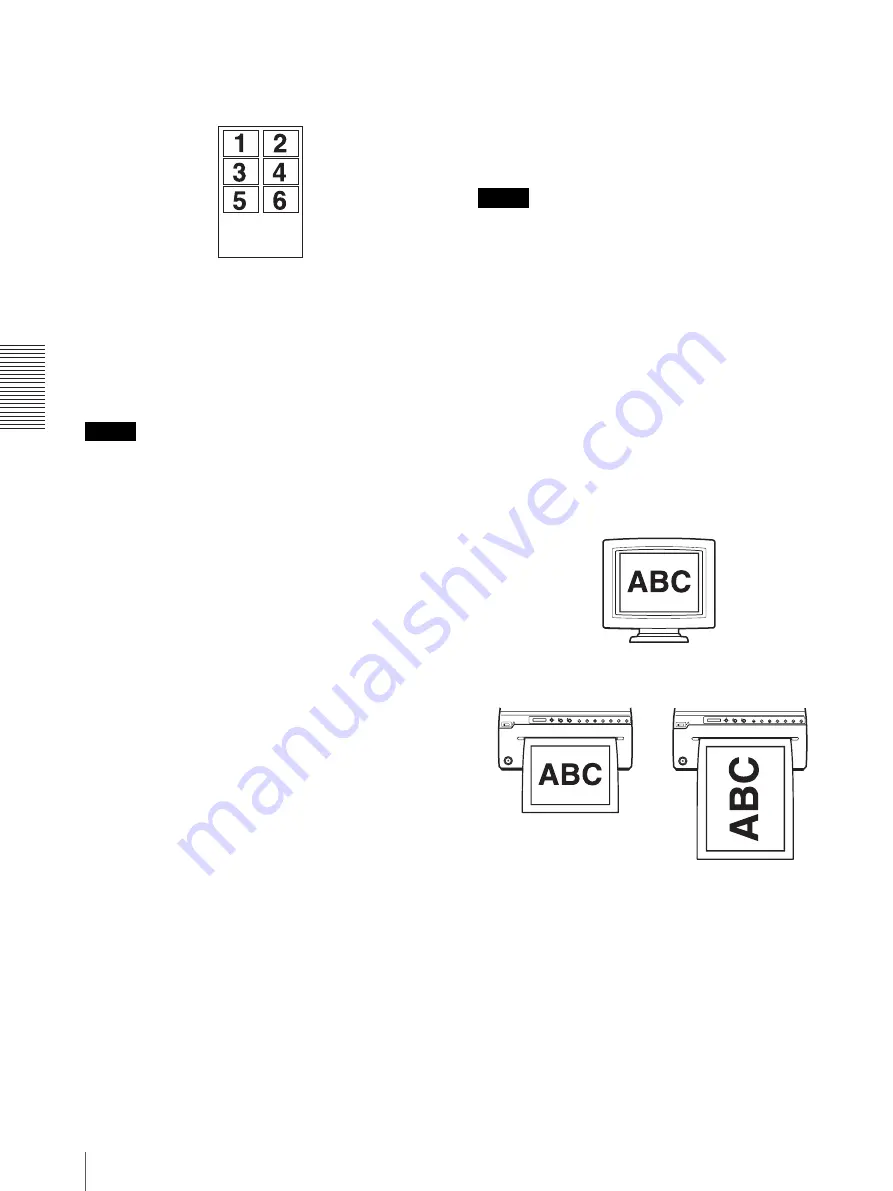
Example: If “N.MULTI” is set to “MULTI:6” and six
images are captured, “IMAGE:6” is printed in the
margin as the information for that image.
Making Copies of the Last Printout
Press the COPY button in the single-picture mode. Press
the PRINT button in the multi-picture mode. The unit
makes a copy of the last printout. Each press of the
button prints one paper regardless of the paper numbers
set in the “QTY” menu.
Note
If you press the COPY button immediately after turning
the power on, the alarm buzzer will sound as nothing is
stored in memory. In this case, you cannot start a copy
job.
Making copies of the same image continuously
Press the COPY button in the single-picture mode, or
press the PRINT button in the multi-picture mode. And
press the COPY or PRINT button while copying the first
printout. When you press the COPY or PRINT button
once, a buzzer sounds and one printout will be made.
The number of printouts accords to how many times you
press the COPY or PRINT button. Each press of the
button prints one paper regardless of the paper numbers
set in the “QTY” menu.
To interrupt copying
To cancel a print job in progress, press the OPEN/
CLOSE button, FEED button or CUT button.
To make copies in different directions
You can copy the image stored last in a different
direction. Before pressing the COPY button in the
single-picture mode or the PRINT button in the multi-
picture mode, select the printing direction.
To print from a remote location
If the Remote commander RM-91 is connected to the
REMOTE connector on the rear panel, you can start
printing at a short distance from the unit by pressing the
remote switch.
Single-picture mode
When an image you want to print appears, press the
remote switch. The screenshot of that instant is printed.
Multi-picture mode
When an image you want to capture appears, press the
remote switch to save a screenshot of that instant in the
memory of the unit.
Printing starts automatically when the number of images
set in the “MULTI” menu have been captured.
Note
Even if “INTRA:ON” is selected in the "VIDEO" "-
INTRPT" menu, pressing the remote switch performs
the same action as pressing the PRINT button or
CAPTURE button in each mode.
Selecting the printing direction
You can select the printing direction using the “SIDE”
menu item.
To print in the same direction as the one
displayed on the video monitor
Select “SIDE:OFF” from “SIDE.”
To print an image rotated counterclockwise
Select “SIDE:ON” from “SIDE.”
To set the range of the image to be
printed
1
When the “VIDEO.” “-PRT.POS,” “P.POS:OK”
menu is displayed, press the menu lever. The unit
prints the video image with coordinate lines for
adjusting the printing area.
2
On the printout, decide the starting point (upper
left) and ending point (lower right) of the printing
area, and check the coordinate values of the points.
IMAGE:6
[Image
Information]
Image displayed on the video monitor
Printouts
When “SIDE:OFF” is selected
When “SIDE:ON” is selected
Содержание UP-971AD
Страница 46: ...Sony Corporation ...


