5
Note
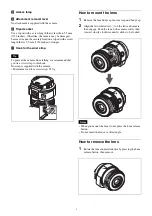
Remove the lens after turning the camera “OFF” and
confirming that the lens has been retracted into the lens
unit.
Supplying power (USB)
By supplying power via the USB terminal of the host
device, the camera can be used while saving the power of
the battery (When you use the power supply from the USB,
a charged battery needs to be inserted).
Notes
• While supplying power, the remaining battery indicator
on the display panel of the camera will disappear.
While the camera is turned off, the battery is charged.
• Use the host device with USB supplying power of more
than 1.5 A.
Charging the battery
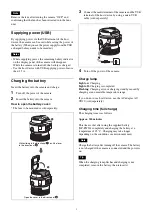
Insert the battery into the camera and charge.
1
Turn off the power of the camera.
2
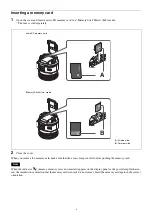
Insert the battery into the camera.
How to open the battery cover:
* The lens to be mounted is sold separately.
3
Connect the multi terminal of the camera and the USB
terminal of the host device by using a micro USB
cable (sold separately).
4
Turn off the power of the camera.
Charge lamp
Light on:
Charging
Light off:
Charging is completed
Flashing:
Charging error, or charging standby caused by
charging at an unsuitable temperature range
If you do not use a host device, use the AC adapter AC-
UD10 (sold separately).
Charging time (full charge)
The charging time is as follows:
Approx. 310 minutes
This time is that after using the supplied battery
(NP-FW50) completely and charging the battery at a
temperature of 25 °C. Charging may take longer
depending on the conditions or environment used.
Note
Charge the battery after turning off the camera. The battery
is not charged if the camera is connected and the power is
on.
Tip
When the charging lamp flashes and charging is not
completed, remove the battery, then reinsert it.
2
3
While sliding to the direction of
1
, pull the lever
to the direction of
2
Open the cover to the direction of
3
.


